


Hardware components | ||||||
 |
| × | 1 | |||
 |
| × | 1 | |||
 |
| × | 9 | |||
| × | 9 | ||||
| × | 1 | ||||
 |
| × | 1 | |||
| × | 1 | ||||
| × | 1 | ||||
Software apps and online services | ||||||
| ||||||
 |
| |||||
| ||||||
| ||||||
Hand tools and fabrication machines | ||||||
 |
| |||||
 |
| |||||
 |
| |||||
| ||||||
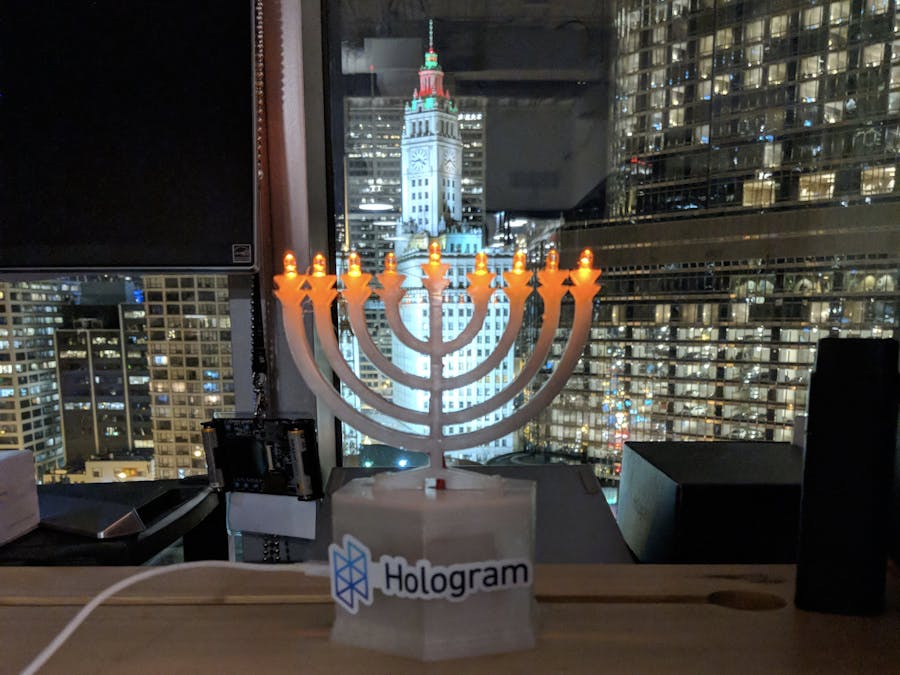
The Holo-day Hanukkah Menorah was designed to connect people celebrating Hanukkah away from friends and family. Using Hologram's network, friends and family can turn on the menorah's lights remotely via SMS and allow users to share the holidays even when they are not physically together.
Contents:- The Structure
- The Circuit
- The Assembly
- The Code
- The Cloud
- The Result
The Structure
The Menorah was designed in TinkerCad and is based on this image (shout-out to Wikimedia Commons and ShakataGaNai).
I got a bitmap of the image and imported it to TinkerCad. There I made some small modifications. First, I made sure the image was one single piece by adding little blocks on the candle holder ends to connect everything.
I also made a notch at the base because I first thought that I would print a copy of the base with a complementary notch to link them at a 90 degree angle and add stability. After I wired everything together, I realized that would be messy so I decided to make the box this all sits on instead. My idea for the menorah is that I would sandwich two copies to hide all the wiring. This worked well, but the base where all the wires meet is thicker than the top so if I were to make this again I would definitely add wire channels to one side of the print.
The box was quite straight forward so I decided to make it from scratch. I went with a warped hexagon I made using the basic shapes tool, making sure that it could fit a breadboard for the circuitry. I also decided to add a few steps to the bottom to add some flair - mind blowing - I know. Making the two halves latch together just took some TinkerCAD work, but wasn't anything out of this world. One thing I learned is that adding something to grip onto when opening the box is very handy so for the second iteration I also added a step to the top of the box.
Here is what it all looks when put together in TinkerCAD:
All four pieces were printed on an Ultimaker 3 using transparent PLA filament and took about 40 hours on 20% infill. The files are on Thingiverse for those who want to just download them.
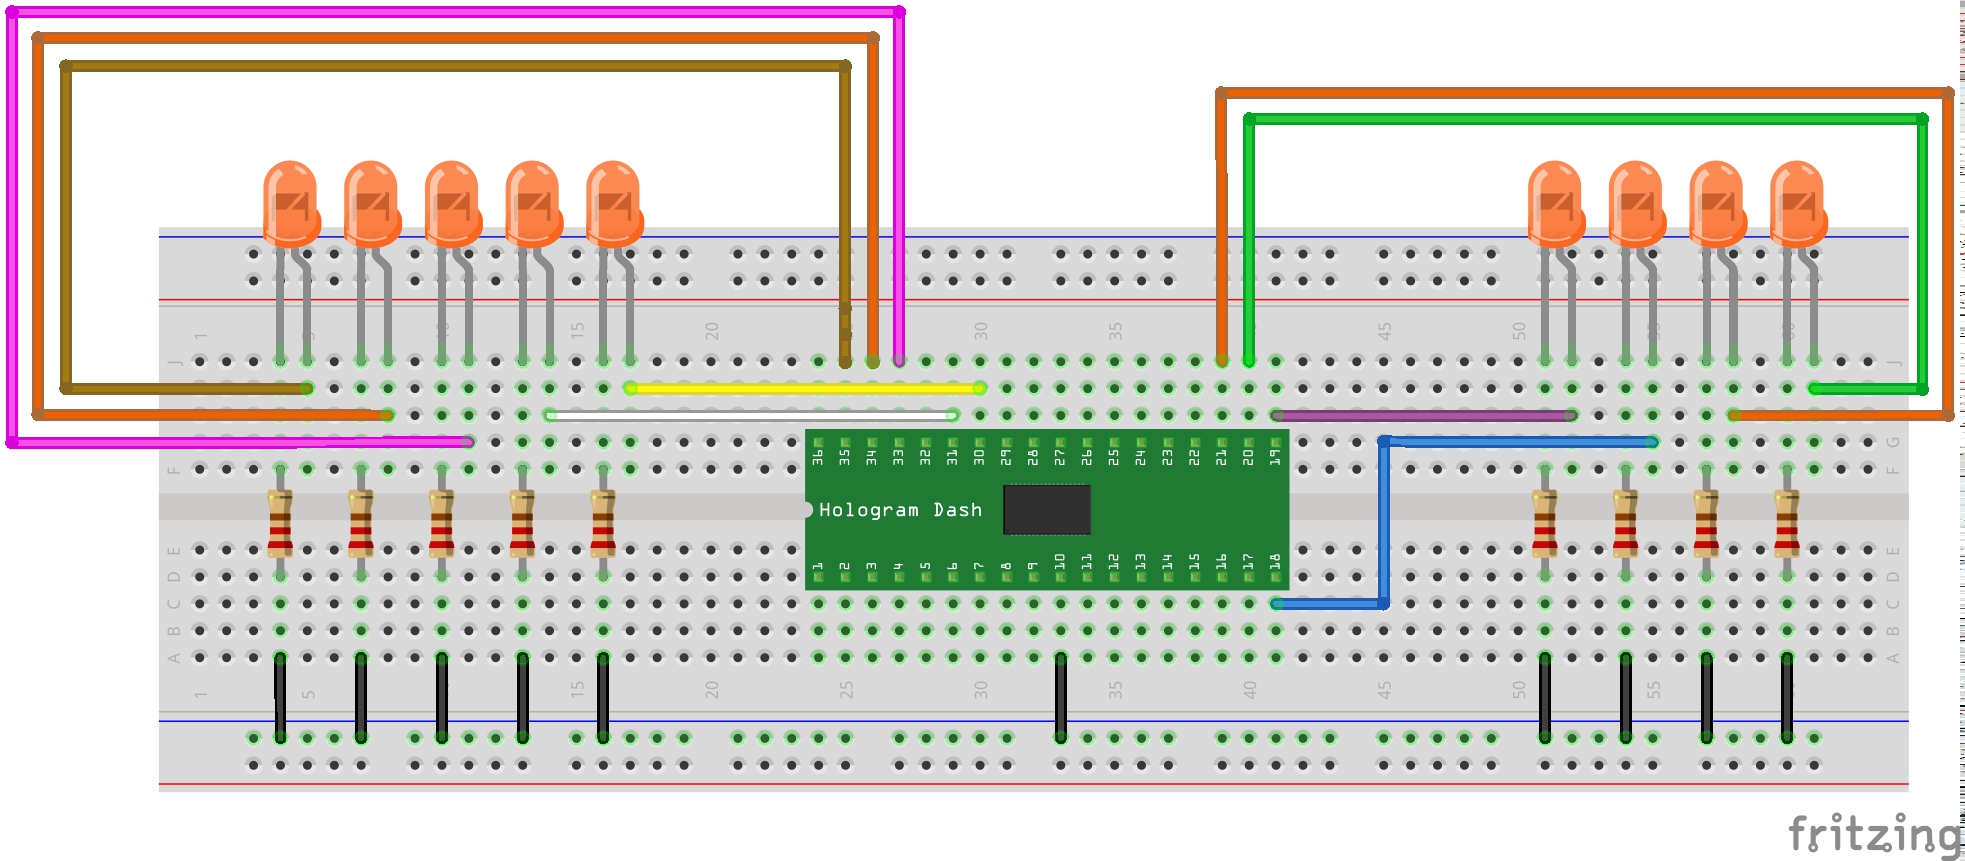
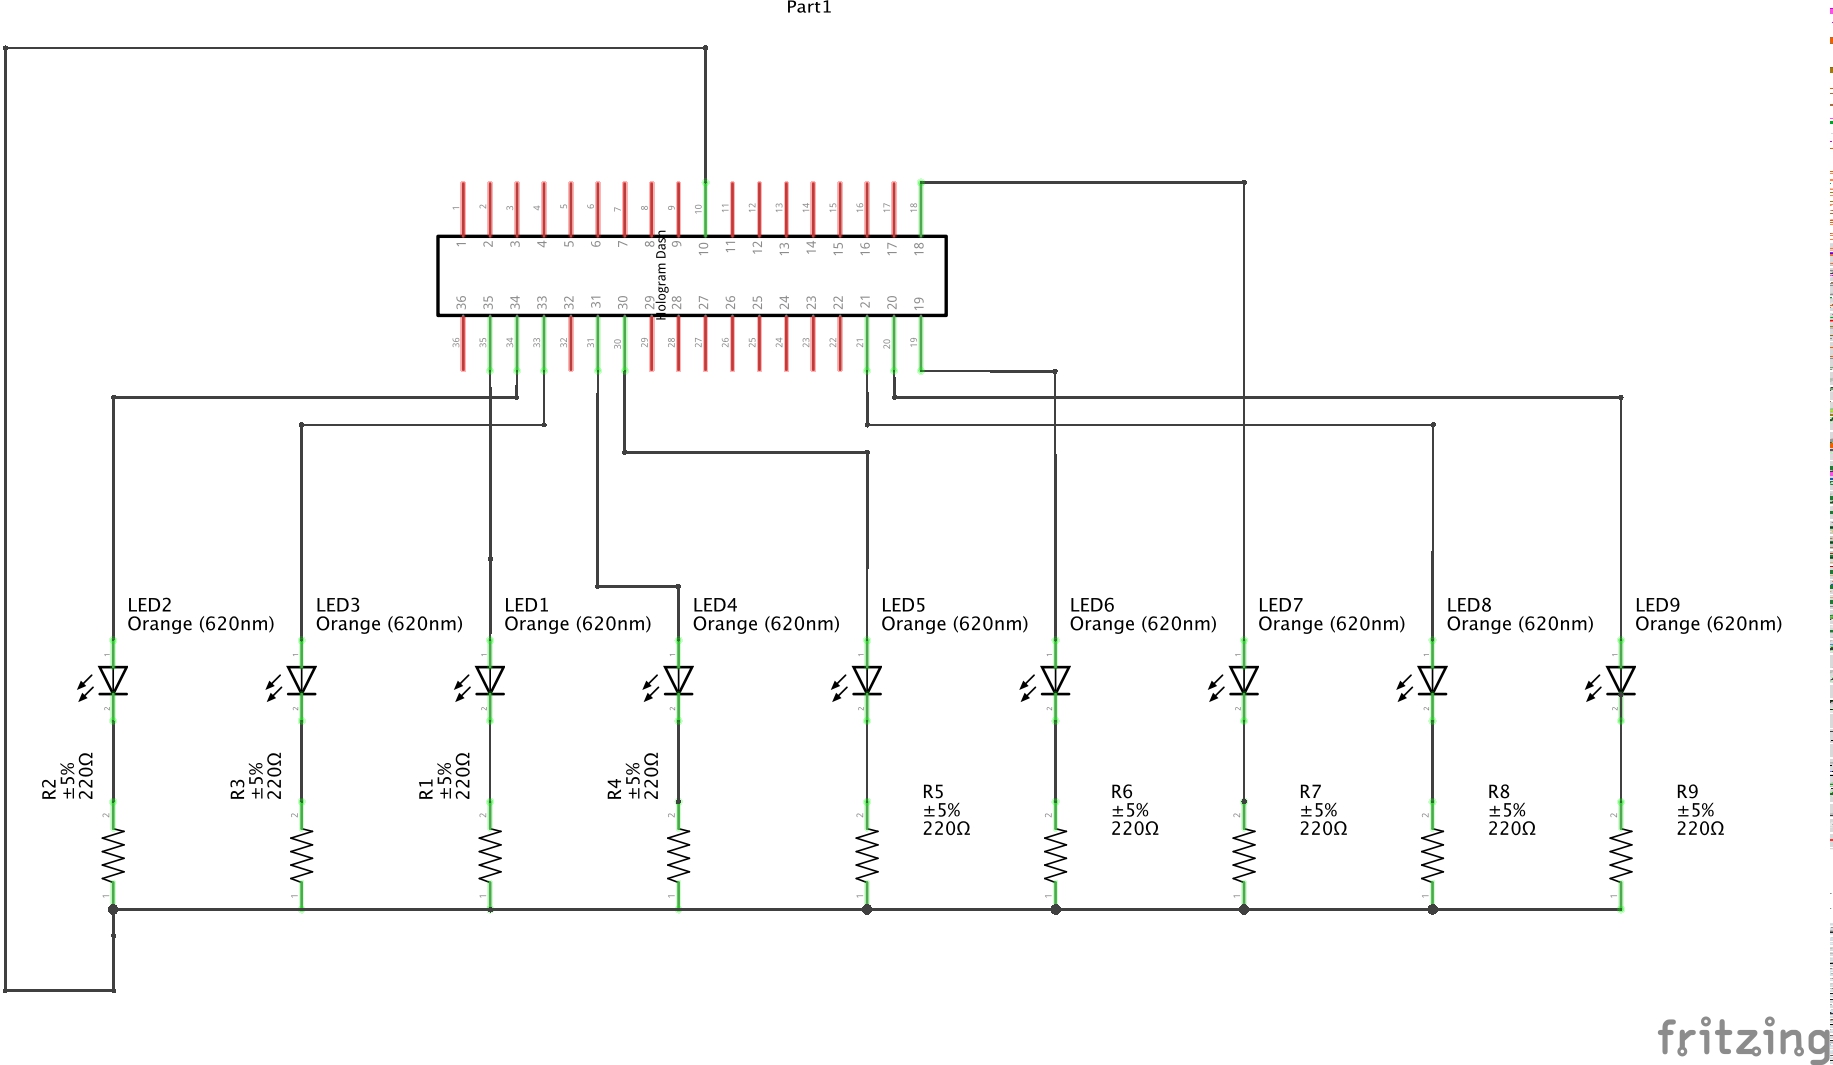
The circuit
The circuitry is dead simple. Literally just 9 LEDs wired to resistors and plugged into Hologram's Dash which is a cellular connected micro controller. I got a ton of generic LEDs from China back in my college days and wasn't able to find any information on them so my apologies for that. I chose to use orange ones because they made the most sense, but I think a turquoise would look great on the "transparent" filament I used. I experimented using different resistors I had floating around until I was satisfied with the look. I ended up using 220 Ohm ones. Regardless of the LED color you choose, I recommend playing around with resistor values to get a nice look while making sure you don't blow or burn your LEDs, especially if you only have nine of them. The positive lead of the LED + Resistor combo is matched to one of the Dash's digital pins and the negative leads are all tied together and matched to the Dash's ground.
The Assembly
Assembling this was a pain in the ass-embly area. I guess its what you can expect when you cram a ton of wires in a small area. What I did is I soldered the Resistors and LEDs and pre wired them. I also added a piece of conductive tape down the middle of the menorah to ground everything and reduce the rats nest. I then hot glued everything onto one side of the menorah 3D print.
Before I sandwiched everything with hot glue and the other menorah 3D print I made sure to test all the connections. Finding out you have a short or a poor connection after you've applied half your paycheck in hot glue is less then ideal.
After this it was just a matter of cleaning it up, wiring everything through the hole in the top of the box and gluing the menorah down in place.
The code
The code was written with Arduino's IDE and uses Hologram's API to abstract all the cellular connectivity portion. Currently it allows users to light candles 0-8, supports a few animations, and has a help function to list what it can do.
The first section declares the variables and establishes the names of the pins on the Dash. One thing to note here is that the ninth candle (the Shamash) is 0 in our sketch.
int zero = D15;
int one = D30;
int two = D28;
int three = D29;
int four = D26;
int five = D07;
int six = D06;
int seven = D05;
int eight = D02;
//variables
int whileCounter = 5;
int messageSuccess = 0;
int pointer = 0;
int sms_queue = 0;
//this array is used to simplify the order on the animations
int lights[] = {one, two, three, four, zero, five, six, seven, eight};
The setup loop sets our Dash's pins to outputs, initializes serial communication for debugging, goes through a test sequence which I will talk about later, and finally uses Hologram's API to send a message to the Hologram Cloud and attaches an SMS handler function which is described further down in this section.
void setup() {
 //set pins to output
 pinMode(zero, OUTPUT);
 pinMode(one, OUTPUT);
 pinMode(two, OUTPUT);
 pinMode(three, OUTPUT);
 pinMode(four, OUTPUT);
 pinMode(five, OUTPUT);
 pinMode(six, OUTPUT);
 pinMode(seven, OUTPUT);
 pinMode(eight, OUTPUT);
// initialize Serial communication for debugging
 Serial.begin(9600);
 Serial.println("Starting");
//test sequence
test_sequence();
//send a starting messge to the Hologram cloud
 HologramCloud.sendMessage("Starting", "Holiday");
 //attach the SMS Handler Funciton
 HologramCloud.attachHandlerSMS(cloud_sms);
}
The loop in this sketch simply prints out a "loop" debug message every 3 seconds. This is because our light animations will be their own functions and because the SMS handler will do most of the heavy lifting.
void loop() {
//print loop to let us know we are running in serial
 Serial.println("loop");
   delay(3000);
}
The SMS handler was borrowed from Hologram's REPL sketch and modified to fit this project (Shout-out to Hologram). Basically, it gets the sender, timestamp, and message fields from incoming SMS messages and prints them to serial. The part I added converted the message into a string called message2, which was then set to all lower case and passed through a battery of if-else if statements that printed the message name (hebrew numbers for the days of Hanukkah) and triggered the specific animation function. I also added a helper condition that sends a list of the text queues to both the Hologram Cloud and Serial. This was aptly named "Plz Help" only because "Can I Haz Halp" was a tad too long to text over and over again. The last condition, the else sans the if, is a catch all for any input that is not tied to a function.
The last bit of this function echos the text message to the Hologram Cloud and prints a success or failure message. This will then allow us to implement routes on Holograms Data Engine to add even more functionality.
//On received SMS, print the sender, timestamp and message
//Message the cloud that an SMS was received with the sender number
//as the content and the tag SMSRX
void cloud_sms(const String &sender, const rtc_datetime_t ×tamp, const String &message) {
Serial.println("CLOUD SMS RECEIVED:");
Serial.print("SMS SENDER: ");
Serial.println(sender);
Serial.print("SMS TIMESTAMP: ");
Serial.println(timestamp);
Serial.println("SMS TEXT: ");
Serial.println(message);
String message2 = message;
message2.toLowerCase();
if (message2 == "one" || message2 == "1") {
Serial.println("ehad");
night_one();
}
else if (message2 == "two" || message2 == "2") {
Serial.println("shtaim");
night_two();
}
else if (message2 == "three" || message2 == "3") {
Serial.println("shalosh");
night_three();
}
else if (message2 == "four" || message2 == "4") {
Serial.println("arba");
night_four();
}
else if (message2 == "five" || message2 == "5") {
Serial.println("hamesh");
night_five();
}
else if (message2 == "six" || message2 == "6") {
Serial.println("shesh");
night_six();
}
else if (message2 == "seven" || message2 == "7") {
Serial.println("sheva");
night_seven();
}
else if (message2 == "eight" || message2 == "8") {
Serial.println("shmona");
night_eight();
}
else if (message2 == "zero" || message2 == "0") {
Serial.println("0");
night_zero();
}
else if (message2 == "off") {
Serial.println("off");
all_off();
}
else if (message2 == "marquee") {
Serial.println("Marquee");
all_off();
marquee();
}
else if (message2 == "random") {
Serial.println("Random");
all_off();
Random();
}
else if (message2 == "ladder") {
Serial.println("Ladder");
all_off();
Ladder();
}
else if (message2 == "plz help") {
HologramCloud.sendMessage("0-8, Off, Marquee, Random, Ladder", "Help");
Serial.println("0-8");
Serial.println("Off");
Serial.println("Marquee");
Serial.println("Random");
Serial.println("Ladder");
}
else {
Serial.println("Invalid Input");
}
if (HologramCloud.sendMessage(message, "SMSRX")) {
Serial.println("SMS received message sent to cloud.");
} else {
Serial.println("Notification send failed.");
}
}
After this we have the various light "animation" functions. Basic all on and all off functions, 8 days of Hanukkah functions that all build on each other and a few more to keep it spicy.
All on and All off... Nothing to see here folks, just pins being turned or off.
void all_off() {
 digitalWrite(zero, LOW);
 digitalWrite(one, LOW);
 digitalWrite(two, LOW);
 digitalWrite(three, LOW);
 digitalWrite(four, LOW);
 digitalWrite(five, LOW);
 digitalWrite(six, LOW);
 digitalWrite(seven, LOW);
 digitalWrite(eight, LOW);
}
void all_on() {
 digitalWrite(zero, HIGH);
 digitalWrite(one, HIGH);
 digitalWrite(two, HIGH);
 digitalWrite(three, HIGH);
 digitalWrite(four, HIGH);
 digitalWrite(five, HIGH);
 digitalWrite(six, HIGH);
 digitalWrite(seven, HIGH);
 digitalWrite(eight, HIGH);
}
8 days of Hanukkah:
void night_zero() {
 all_off();
 digitalWrite(zero, HIGH);
}
void night_one() {
 night_zero();
 delay(300);
 digitalWrite(one, HIGH);
}
void night_two() {
 night_one();
 delay(300);
 digitalWrite(two, HIGH);
}
void night_three() {
 night_two();
 delay(300);
 digitalWrite(three, HIGH);
}
void night_four() {
 night_three();
 delay(300);
 digitalWrite(four, HIGH);
}
void night_five() {
 night_four();
 delay(300);
 digitalWrite(five, HIGH);
}
void night_six() {
 night_five();
 delay(300);
 digitalWrite(six, HIGH);
}
void night_seven() {
 night_six();
 delay(300);
 digitalWrite(seven, HIGH);
}
void night_eight() {
 night_seven();
 delay(300);
 digitalWrite(eight, HIGH);
}
Marquee, which turns lights on and off in order like a marquee:
void marquee() {
 sms_queue = 0;
 Serial.println(sms_queue);
 while (sms_queue == 0) {
   Serial.println(sms_queue);
   while (pointer != 8) {
     sms_queue = HologramCloud.checkSMS();
     digitalWrite(lights[pointer], HIGH);
     delay(300);
     digitalWrite(lights[pointer], LOW);
     pointer++;
   }
   while (pointer != 0) {
     sms_queue = HologramCloud.checkSMS();
     digitalWrite(lights[pointer], HIGH);
     delay(300);
     digitalWrite(lights[pointer], LOW);
     pointer--;
   }
 }
}
Random, which randomly turns a light on and off:
void Random() {
 sms_queue = 0;
 Serial.println(sms_queue);
 while(sms_queue == 0){
   Serial.println(sms_queue);
   sms_queue = HologramCloud.checkSMS();
   pointer = random(0,9);
   digitalWrite(lights[pointer], HIGH);
     delay(300);
     digitalWrite(lights[pointer], LOW);
   }
}
Ladder, which is the same thing as marquee except that it doesn't turn LEDs off once it turns them on until the loop is done.
void Ladder() {
 sms_queue = 0;
 while (sms_queue == 0) {
   pointer = 0;
   while (pointer <= 8) {
     sms_queue = HologramCloud.checkSMS();
     digitalWrite(lights[pointer], HIGH);
     delay(300);
     pointer++;
   }
   pointer = 8;
   while (pointer >= 0 ) {
     sms_queue = HologramCloud.checkSMS();
     digitalWrite(lights[pointer], LOW);
     delay(300);
     pointer--;
   }
 }
}
And finally a test sequence that goes through the 8 days of Hanukkah:
void test_sequence(){
 all_on();
 delay(200);
 all_off();
 delay(500);
 all_on();
 delay(200);
 all_off();
 delay(200);
 night_one();
 delay(200);
 night_two();
 delay(200);
 night_three();
 delay(200);
 night_four();
 delay(200);
 night_five();
 delay(200);
 night_six();
 delay(200);
 night_seven();
 delay(200);
 night_eight();
}
Here is a post of all the code in one chunk for your copy+pasting convenience you cheeky you:
// Maiky Iberkleid Dec 2017
// Holo-day Hanukah Menorah V1.0
// Mandatory shout-out to Pranav Gokhale and Franky Romero
//Dash Pins
int zero = D15;
int one = D30;
int two = D28;
int three = D29;
int four = D26;
int five = D07;
int six = D06;
int seven = D05;
int eight = D02;
//Variables
int whileCounter = 5;
int messageSuccess = 0;
int pointer = 0;
int sms_queue = 0;
//this array is used to simplify the order on the animations
int lights[] = {one, two, three, four, zero, five, six, seven, eight};
void setup() {
//set pins to output
pinMode(zero, OUTPUT);
pinMode(one, OUTPUT);
pinMode(two, OUTPUT);
pinMode(three, OUTPUT);
pinMode(four, OUTPUT);
pinMode(five, OUTPUT);
pinMode(six, OUTPUT);
pinMode(seven, OUTPUT);
pinMode(eight, OUTPUT);
// initialize Serial communication for debugging
Serial.begin(9600);
Serial.println("Starting");
//test sequence
test_sequence();
//send a starting messge to the Hologram cloud
HologramCloud.sendMessage("Starting", "Holiday");
//attach the SMS Handler Funciton
HologramCloud.attachHandlerSMS(cloud_sms);
}
void loop() {
//print loop to let us know we are running in serial
Serial.println("loop");
delay(3000);
}
//On received SMS, print the sender, timestamp and message
//Message the cloud that an SMS was received with the sender number
//as the content and the tag SMSRX
//Thanks Hologram!
void cloud_sms(const String &sender, const rtc_datetime_t ×tamp, const String &message) {
Serial.println("CLOUD SMS RECEIVED:");
Serial.print("SMS SENDER: ");
Serial.println(sender);
Serial.print("SMS TIMESTAMP: ");
Serial.println(timestamp);
Serial.println("SMS TEXT: ");
Serial.println(message);
String message2 = message;
message2.toLowerCase();
if (message2 == "one" || message2 == "1") {
Serial.println("ehad");
night_one();
}
else if (message2 == "two" || message2 == "2") {
Serial.println("shtaim");
night_two();
}
else if (message2 == "three" || message2 == "3") {
Serial.println("shalosh");
night_three();
}
else if (message2 == "four" || message2 == "4") {
Serial.println("arba");
night_four();
}
else if (message2 == "five" || message2 == "5") {
Serial.println("hamesh");
night_five();
}
else if (message2 == "six" || message2 == "6") {
Serial.println("shesh");
night_six();
}
else if (message2 == "seven" || message2 == "7") {
Serial.println("sheva");
night_seven();
}
else if (message2 == "eight" || message2 == "8") {
Serial.println("shmona");
night_eight();
}
else if (message2 == "zero" || message2 == "0") {
Serial.println("0");
night_zero();
}
else if (message2 == "off") {
Serial.println("off");
all_off();
}
else if (message2 == "marquee") {
Serial.println("Marquee");
all_off();
marquee();
}
else if (message2 == "random") {
Serial.println("Random");
all_off();
Random();
}
else if (message2 == "ladder") {
Serial.println("Ladder");
all_off();
Ladder();
}
else if (message2 == "plz help") {
HologramCloud.sendMessage("0-8, Off, Marquee, Random, Ladder", "Help");
Serial.println("0-8");
Serial.println("Off");
Serial.println("Marquee");
Serial.println("Random");
Serial.println("Ladder");
}
else {
Serial.println("Invalid Input");
}
if (HologramCloud.sendMessage(message, "SMSRX")) {
Serial.println("SMS received message sent to cloud.");
} else {
Serial.println("Notification send failed.");
}
}
void all_off() {
digitalWrite(zero, LOW);
digitalWrite(one, LOW);
digitalWrite(two, LOW);
digitalWrite(three, LOW);
digitalWrite(four, LOW);
digitalWrite(five, LOW);
digitalWrite(six, LOW);
digitalWrite(seven, LOW);
digitalWrite(eight, LOW);
}
void all_on() {
digitalWrite(zero, HIGH);
digitalWrite(one, HIGH);
digitalWrite(two, HIGH);
digitalWrite(three, HIGH);
digitalWrite(four, HIGH);
digitalWrite(five, HIGH);
digitalWrite(six, HIGH);
digitalWrite(seven, HIGH);
digitalWrite(eight, HIGH);
}
void night_zero() {
all_off();
digitalWrite(zero, HIGH);
}
void night_one() {
night_zero();
delay(300);
digitalWrite(one, HIGH);
}
void night_two() {
night_one();
delay(300);
digitalWrite(two, HIGH);
}
void night_three() {
night_two();
delay(300);
digitalWrite(three, HIGH);
}
void night_four() {
night_three();
delay(300);
digitalWrite(four, HIGH);
}
void night_five() {
night_four();
delay(300);
digitalWrite(five, HIGH);
}
void night_six() {
night_five();
delay(300);
digitalWrite(six, HIGH);
}
void night_seven() {
night_six();
delay(300);
digitalWrite(seven, HIGH);
}
void night_eight() {
night_seven();
delay(300);
digitalWrite(eight, HIGH);
}
void marquee() {
sms_queue = 0;
Serial.println(sms_queue);
while (sms_queue == 0) {
Serial.println(sms_queue);
while (pointer != 8) {
sms_queue = HologramCloud.checkSMS();
digitalWrite(lights[pointer], HIGH);
delay(300);
digitalWrite(lights[pointer], LOW);
pointer++;
}
while (pointer != 0) {
sms_queue = HologramCloud.checkSMS();
digitalWrite(lights[pointer], HIGH);
delay(300);
digitalWrite(lights[pointer], LOW);
pointer--;
}
}
}
void Random() {
sms_queue = 0;
Serial.println(sms_queue);
while(sms_queue == 0){
Serial.println(sms_queue);
sms_queue = HologramCloud.checkSMS();
pointer = random(0,9);
digitalWrite(lights[pointer], HIGH);
delay(300);
digitalWrite(lights[pointer], LOW);
}
}
void Ladder() {
sms_queue = 0;
while (sms_queue == 0) {
pointer = 0;
while (pointer <= 8) {
sms_queue = HologramCloud.checkSMS();
digitalWrite(lights[pointer], HIGH);
delay(300);
pointer++;
}
pointer = 8;
while (pointer >= 0 ) {
sms_queue = HologramCloud.checkSMS();
digitalWrite(lights[pointer], LOW);
delay(300);
pointer--;
}
}
}
void test_sequence(){
all_on();
delay(200);
all_off();
delay(500);
all_on();
delay(200);
all_off();
delay(200);
night_one();
delay(200);
night_two();
delay(200);
night_three();
delay(200);
night_four();
delay(200);
night_five();
delay(200);
night_six();
delay(200);
night_seven();
delay(200);
night_eight();
}
I won't walk you through the Hologram on-boarding process as you can find it all here. I assume that at this point you have an activated SIM and have purchased a phone number for it through Hologram's Dashboard. This is mostly to show you all of this in action and walk you through my quick route.
As can be seen in the picture below, your Dash should be echoing all messages to you Dashboard.
As an extra step for convenience I created a route to send my phone number the help text that is sent to the cloud by the Dash when one texts it "Plz Help". To do this I simply created a new route, added the topic that I wanted to trigger it (in this case its "help", and chose the SMS action. Then, I entered my phone number, clicked on the "add route" button and voilá!
Holo-day Hanukkah Menorah Bread Board Pic

_t9PF3orMPd.png?auto=compress%2Cformat&w=40&h=40&fit=fillmax&bg=fff&dpr=2)


Comments
Please log in or sign up to comment.