


Hardware components | ||||||
 |
| × | 1 | |||
 |
| × | 1 | |||
 |
| × | 1 | |||
| × | 1 | ||||
 |
| × | 1 | |||
| × | 2 | ||||
 |
| × | 1 | |||
Software apps and online services | ||||||
| ||||||
 |
| |||||
| ||||||
| ||||||
| ||||||
| ||||||
Hand tools and fabrication machines | ||||||
 |
| |||||
 |
| |||||
Holo-day St. Valentines Day boombox is an SMS triggered music/ sound clip player designed to serenade your valentine on demand. By pre-loading the box with sound clips user's can trigger songs and clips with a simple SMS message.
Contents:- The Structure
- The Circuit
- The Assembly
- The Code
- The Songs
- The Cloud
- The Result
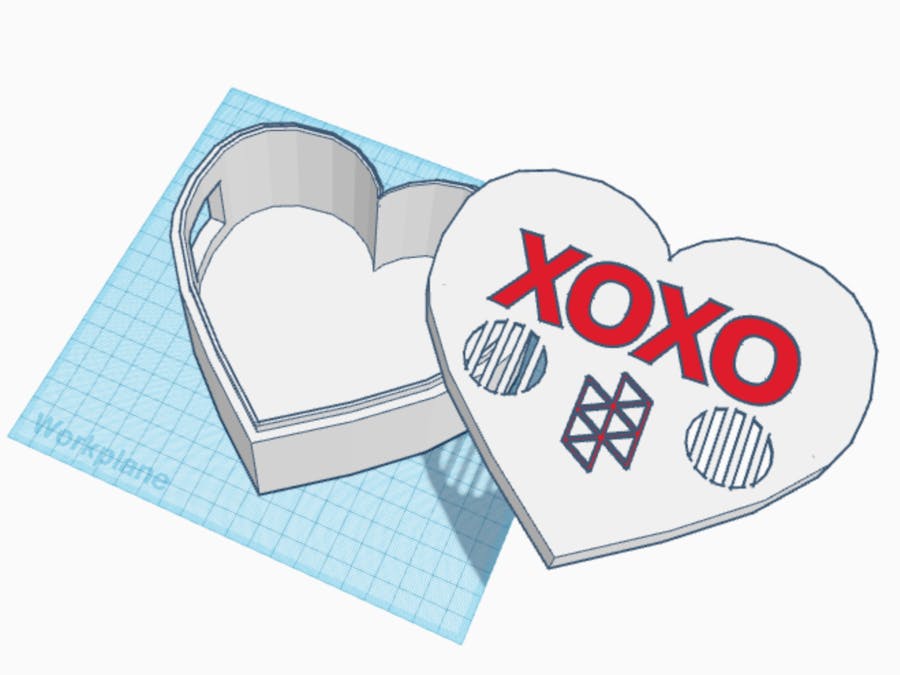
The heart-shaped box (queue in some Nirvana) was designed entirely in TinkerCad with the exception of the Hologram Logo tree topper which was a bitmap image that I imported it to TinkerCad. I'll link to that tutorial video once its up.
To kick this off I measured the Hologram Dash on the breadboard and the Sound FX Board and made rough rectangular shaped place holders to make sure they would fit into my box.
I then used TinkerCAD's basic shapes tool and added a heart that was big enough to encompass the shape place holders I made. There should be enough room around the heart to form the walls so make sure that the place holders aren't too close to the edge.
Here is a general tinkerCAD box youtube tutorial I made for most of the process I describe below if you prefer a visual run through.
After this, I made two copies of the heart. These will be the box's lip/cavity, and the box's lid with the original being the box's body.
The first step is to make the lip/cavity. For this we take one of the copies and make it smaller. The difference between the original and the copy will become the thickness of the wall. I personally like walls around 4.5mm, but wall strength is affected by your printer settings so make sure to fine tune this to what works best for you. The next step is to extrude the lip/cavity copy to be taller then the box, I added 5mm. Once you are happy with the lip/cavity object make two copies of it and turn both into holes. These will be the cavity for the top and body of the box while the original will be the lip for the body.
The second step is to take the body's cavity and make it smaller than the lip object. The difference between these two will be the lip's width. For this I like something around 1mm.
The third step is to elevate the cavity objects 1 or 2mm above the lid and body, align the lid with the lid cavity and the body, lip, and body cavity and merge the two groups. This will leave you with the lid with a cavity and the body with a lip and a cavity.
The fourth step is to add text and logo. The method I describe works well if you have a double extrude printer. If not you can raise or sink this text onto the lid to make it readable. To do this I imported the Hologram logo I used for my X-Mas tree tutorial and used the text option in TinkerCAD's Basic Shapes menu. Once I was happy with the font and size I made sure the text was the same height as top of the lid which should be the amount you raised the lid cavity by. After that I made two copies of the text and aligned them with the box's lid. One copy I turned into a hole and used it to cut away from the lid. The second copy was then used to instruct the printer that that part should be printed with a different extruder.
Both pieces were printed on an Ultimaker 3 using transparent and green PLA filament and took about 25 hours on 20% infil. The files are on Thingiverse for those who want to just download them.
The CircuitThe circuit consists of a Hologram Dash connected to an Adafruit Audio FX Sound Board + 2x2W Amp - WAV/OGG Trigger board and two 1 inch diameter 8 ohm 0.5W speakers. The Dash is powered by a USB cable and then power and ground are wired to the sound board. After that 10 IO pins on the Dash are wired to the sound board's signal pins and the two speakers are wired to the sound board's amplifier.
The Assembly
Assembly is very straight forward. All you need to do is hot glue the speakers to the speaker grills, place the electronics inside the box, close it, and you're done!
The code was written in Arduino's IDE and uses Hologram's API to abstract all the cellular connectivity portion. Currently it plays 10 sound clips.
The first section declares the variables and establishes the names of the pins on the Dash.
//Dash Pins
int zero = D15;
int one = D30;
int two = D28;
int three = D29;
int four = D26;
int five = D07;
int six = D06;
int seven = D05;
int eight = D02;
int nine = D16;
int ten = D17;
//variables
int sms_queue = 0;
The setup look sets our Dash's pins to outputs, sets the high as the sound board interprets grounding as the interrupt, initializes serial communication for debugging, uses Hologram's API to send a message to the Hologram Cloud, and attaches an SMS handler function which is described further down in this section.
void setup() {
 //set pins to output
 pinMode(zero, OUTPUT);
 pinMode(one, OUTPUT);
 pinMode(two, OUTPUT);
 pinMode(three, OUTPUT);
 pinMode(four, OUTPUT);
 pinMode(five, OUTPUT);
 pinMode(six, OUTPUT);
 pinMode(seven, OUTPUT);
 pinMode(eight, OUTPUT);
 pinMode(nine, OUTPUT);
 pinMode(ten, OUTPUT);
 digitalWrite(zero, HIGH);
 digitalWrite(one, HIGH);
 digitalWrite(two, HIGH);
 digitalWrite(three, HIGH);
 digitalWrite(four, HIGH);
 digitalWrite(five, HIGH);
 digitalWrite(six, HIGH);
 digitalWrite(seven, HIGH);
 digitalWrite(eight, HIGH);
 digitalWrite(nine, HIGH);
 digitalWrite(ten, HIGH);
 // initialize Serial communication for debugging
 Serial.begin(9600);
 Serial.println("Starting");
 //send a starting messge to the Hologram cloud
 HologramCloud.sendMessage("Starting", "St.Valentines");
 //attach the SMS Handler Funciton
 HologramCloud.attachHandlerSMS(cloud_sms);
}
The loop on this sketch simply prints out a "loop" debug message every 3 seconds. This is because the SMS handler does all the heavy lifting.
void loop() {
 //print loop to let us know we are running in serial
 Serial.println("loop");
 delay(3000);
}
The SMS handler was borrowed from Hologram's REPL sketch and modified to fit this project (Shout-out to Hologram). Basically, it gets the sender, timestamp, and message fields from incoming SMS messages and prints them to serial. The part I added converted the message into a string called message2, which was then set to all lower case and passed through a battery of if-else if statements that printed the message name (song number) and triggered the sound clip. I also added a helper condition that sends a list of the text queues to both the Hologram Cloud and Serial. This is the "Plz Help" section. The last condition, the else without the if, is a catch all for any input that is not tied to a function. The last bit of this function echos the text message to the Hologram Cloud and prints a success or failure message. This will then allow us to implement routes on Holograms Data Engine to add even more functionality.
//On received SMS, print the sender, timestamp and message
//Send a message to the cloud that an SMS was received with the sender number
//as the content and the tag SMSRX
void cloud_sms(const String &sender, const rtc_datetime_t ×tamp, const String &message) {
Serial.println("CLOUD SMS RECEIVED:");
Serial.print("SMS SENDER: ");
Serial.println(sender);
Serial.print("SMS TIMESTAMP: ");
Serial.println(timestamp);
Serial.println("SMS TEXT: ");
Serial.println(message);
String message2 = message;
message2.toLowerCase();
if (message2 == "zero" || message2 == "0" || message2 == "atm") {
Serial.println("Play Pin 0");
digitalWrite(zero, LOW);
delay(300);
digitalWrite(zero, HIGH);
}
else if (message2 == "one" || message2 == "1" || message2 == "Im all shook up") {
Serial.println("Play Pin 1");
digitalWrite(one, LOW);
delay(300);
digitalWrite(one, HIGH);
}
else if (message2 == "two" || message2 == "2" || message2 == "I feel good") {
Serial.println("Play Pin 2");
digitalWrite(two, LOW);
delay(300);
digitalWrite(two, HIGH);
}
else if (message2 == "three" || message2 == "3" || message2 == "Kiss the sky") {
Serial.println("Play Pin 3");
digitalWrite(three, LOW);
delay(300);
digitalWrite(three, HIGH);
}
else if (message2 == "four" || message2 == "4" || message2 == "Te Amo") {
Serial.println("Play Pin 4");
digitalWrite(four, LOW);
delay(300);
digitalWrite(four, HIGH);
}
else if (message2 == "five" || message2 == "5" || message2 == "Kiss") {
Serial.println("Play Pin 5");
digitalWrite(five, LOW);
delay(300);
digitalWrite(five, HIGH);
}
else if (message2 == "six" || message2 == "6" || message2 == "Hold Your Hand") {
Serial.println("Play Pin 0");
digitalWrite(six, LOW);
delay(300);
digitalWrite(six, HIGH);
}
else if (message2 == "seven" || message2 == "7" || message2 == "Heartbeat") {
Serial.println("Play Pin 7");
digitalWrite(seven, LOW);
delay(300);
digitalWrite(seven, HIGH);
}
else if (message2 == "eight" || message2 == "8" || message2 == "Chu") {
Serial.println("Play Pin 8");
digitalWrite(eight, LOW);
delay(300);
digitalWrite(eight, HIGH);
}
else if (message2 == "nine" || message2 == "9" || message2 == "Be my valentine") {
Serial.println("Play Pin 9");
digitalWrite(nine, LOW);
delay(300);
digitalWrite(nine, HIGH);
}
else if (message2 == "ten" || message2 == "10" || message2 == "Wonderwall") {
Serial.println("Play Pin 10");
digitalWrite(ten, LOW);
delay(300);
digitalWrite(ten, HIGH);
}
else if (message2 == "plz help") {
HologramCloud.sendMessage("0-Atm, 1-Im all shook up, 2-I feel good, 3-Kiss the sky, 4-Te amo, 5-Kiss, 6-I wanna hold your hand, 7-Heartbeat, 8-Chu, 9-Be my valentine, 10-Wonderwall ", "Help");
Serial.println("0 - Atm ");
Serial.println("1- Im all shook up");
Serial.println("2- I feel good");
Serial.println("3- Kiss the sky");
Serial.println("4- Te amo");
Serial.println("5- Kiss");
Serial.println("6- I wanna hold your hand");
Serial.println("7- Heartbeat");
Serial.println("8- Chu");
Serial.println("9- Be my valentine");
Serial.println("10- Wonderwall");
}
else {
Serial.println("Invalid Input");
}
if (HologramCloud.sendMessage(message, "SMSRX")) {
Serial.println("SMS received message sent to cloud.");
} else {
Serial.println("Notification send failed.");
}
}
Here is all the code in one chunk to make it easier to copy and paste. Happy St. Valentines Day!
//Dash Pins
int zero = D15;
int one = D30;
int two = D28;
int three = D29;
int four = D26;
int five = D07;
int six = D06;
int seven = D05;
int eight = D02;
int nine = D16;
int ten = D17;
//variables
int sms_queue = 0;
void setup() {
//set pins to output
pinMode(zero, OUTPUT);
pinMode(one, OUTPUT);
pinMode(two, OUTPUT);
pinMode(three, OUTPUT);
pinMode(four, OUTPUT);
pinMode(five, OUTPUT);
pinMode(six, OUTPUT);
pinMode(seven, OUTPUT);
pinMode(eight, OUTPUT);
pinMode(nine, OUTPUT);
pinMode(ten, OUTPUT);
digitalWrite(zero, HIGH);
digitalWrite(one, HIGH);
digitalWrite(two, HIGH);
digitalWrite(three, HIGH);
digitalWrite(four, HIGH);
digitalWrite(five, HIGH);
digitalWrite(six, HIGH);
digitalWrite(seven, HIGH);
digitalWrite(eight, HIGH);
digitalWrite(nine, HIGH);
digitalWrite(ten, HIGH);
// initialize Serial communication for debugging
Serial.begin(9600);
Serial.println("Starting");
//send a starting messge to the Hologram cloud
HologramCloud.sendMessage("Starting", "St.Valentines");
//attach the SMS Handler Funciton
HologramCloud.attachHandlerSMS(cloud_sms);
}
void loop() {
//print loop to let us know we are running in serial
Serial.println("loop");
delay(3000);
}
//On received SMS, print the sender, timestamp and message
//Send a message to the cloud that an SMS was received with the sender number
//as the content and the tag SMSRX
void cloud_sms(const String &sender, const rtc_datetime_t ×tamp, const String &message) {
Serial.println("CLOUD SMS RECEIVED:");
Serial.print("SMS SENDER: ");
Serial.println(sender);
Serial.print("SMS TIMESTAMP: ");
Serial.println(timestamp);
Serial.println("SMS TEXT: ");
Serial.println(message);
String message2 = message;
message2.toLowerCase();
if (message2 == "zero" || message2 == "0" || message2 == "atm") {
Serial.println("Play Pin 0");
digitalWrite(zero, LOW);
delay(300);
digitalWrite(zero, HIGH);
}
else if (message2 == "one" || message2 == "1" || message2 == "Im all shook up") {
Serial.println("Play Pin 1");
digitalWrite(one, LOW);
delay(300);
digitalWrite(one, HIGH);
}
else if (message2 == "two" || message2 == "2" || message2 == "I feel good") {
Serial.println("Play Pin 2");
digitalWrite(two, LOW);
delay(300);
digitalWrite(two, HIGH);
}
else if (message2 == "three" || message2 == "3" || message2 == "Kiss the sky") {
Serial.println("Play Pin 3");
digitalWrite(three, LOW);
delay(300);
digitalWrite(three, HIGH);
}
else if (message2 == "four" || message2 == "4" || message2 == "Te Amo") {
Serial.println("Play Pin 4");
digitalWrite(four, LOW);
delay(300);
digitalWrite(four, HIGH);
}
else if (message2 == "five" || message2 == "5" || message2 == "Kiss") {
Serial.println("Play Pin 5");
digitalWrite(five, LOW);
delay(300);
digitalWrite(five, HIGH);
}
else if (message2 == "six" || message2 == "6" || message2 == "Hold Your Hand") {
Serial.println("Play Pin 0");
digitalWrite(six, LOW);
delay(300);
digitalWrite(six, HIGH);
}
else if (message2 == "seven" || message2 == "7" || message2 == "Heartbeat") {
Serial.println("Play Pin 7");
digitalWrite(seven, LOW);
delay(300);
digitalWrite(seven, HIGH);
}
else if (message2 == "eight" || message2 == "8" || message2 == "Chu") {
Serial.println("Play Pin 8");
digitalWrite(eight, LOW);
delay(300);
digitalWrite(eight, HIGH);
}
else if (message2 == "nine" || message2 == "9" || message2 == "Be my valentine") {
Serial.println("Play Pin 9");
digitalWrite(nine, LOW);
delay(300);
digitalWrite(nine, HIGH);
}
else if (message2 == "ten" || message2 == "10" || message2 == "Wonderwall") {
Serial.println("Play Pin 10");
digitalWrite(ten, LOW);
delay(300);
digitalWrite(ten, HIGH);
}
else if (message2 == "plz help") {
HologramCloud.sendMessage("0-Atm, 1-Im all shook up, 2-I feel good, 3-Kiss the sky, 4-Te amo, 5-Kiss, 6-I wanna hold your hand, 7-Heartbeat, 8-Chu, 9-Be my valentine, 10-Wonderwall ", "Help");
Serial.println("0 - Atm ");
Serial.println("1- Im all shook up");
Serial.println("2- I feel good");
Serial.println("3- Kiss the sky");
Serial.println("4- Te amo");
Serial.println("5- Kiss");
Serial.println("6- I wanna hold your hand");
Serial.println("7- Heartbeat");
Serial.println("8- Chu");
Serial.println("9- Be my valentine");
Serial.println("10- Wonderwall");
}
else {
Serial.println("Invalid Input");
}
if (HologramCloud.sendMessage(message, "SMSRX")) {
Serial.println("SMS received message sent to cloud.");
} else {
Serial.println("Notification send failed.");
}
}
The Audio Clips
I recorded all my audio clips using QuickTime and converted them to WAV files in iTunes. Adafruit has a great guide for that second part which I will link here.
The Result

_t9PF3orMPd.png?auto=compress%2Cformat&w=40&h=40&fit=fillmax&bg=fff&dpr=2)


Comments
Please log in or sign up to comment.