


Hardware components | ||||||
 |
| × | 1 | |||
 |
| × | 1 | |||
Software apps and online services | ||||||
| ||||||
Hologram is the platform for developing cellular-connected devices. This guide takes you through the easiest way to connect a device over cellular–using the Hologram Dash development board, Hologram SIM for mobile connectivity, and the Hologram Cloud for receiving and routing messages from the device.
Even if you plan on using your own hardware or messaging, this guide illustrates the general concepts relevant for connecting any device with Hologram’s global cellular network.
Activate Your SIMThe Hologram Dash ships with a global SIM card for connecting to the Hologram cellular network. You may also order a SIM separately for use in other devices.
If you haven’t already, create a Hologram account to manage your devices and billing.
From the Hologram Dashboard, click the Activate SIM button in the top-right corner.
Every SIM card has an 18-22 digit unique ID printed on it. Enter your SIM’s ID in the activation form.
Then, choose your data plan and zone according to your needs. If you aren’t sure which plan is right for you, start with pay-as-you-go. See our pricing page for more details on plans and zones.
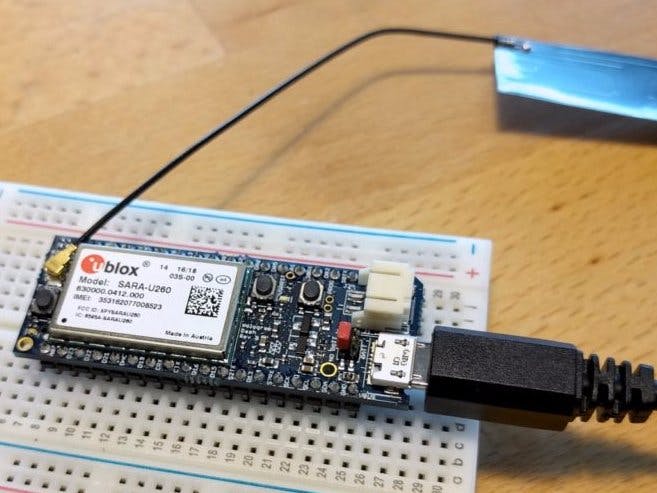
Set up the DashWith your Hologram Dash powered off, insert the Hologram Global SIM Card into your Dash as shown:
Connect the antenna by snapping the connector onto the u.FL socket:
WARNING
To avoid damaging the Dash, make sure to remove it from the conductive packaging foam before powering it on.
WARNING
The Dash ships preconfigured for non-battery power, and connecting a battery in this mode will damage the Dash. If you wish to power the Dash via battery, please consult the Hologram Dash Datasheet for the correct jumper settings.
Use a standard micro USB cable to connect the Dash to your PC. The USB connection serves three purposes:
- Provide power to the Dash
- Load new programs onto the Dash
- Communicate with the Dash over a Serial interface
Install and configure the Arduino IDE as described in the Programming and Firmware guide.
Send a message with the Dash REPLUpload the Dash REPL example sketch to your Dash as described in the Dash REPL guide.
To send your first message, open the serial monitor and enter:
cloud send "Hello Hologram!" REPL_MESSAGE
This sends a message to the Hologram Cloud with data paylod “Hello Hologram!” and topic “REPL_MESSAGE”. If the send was successful, you should see:
Sending message... Complete
The Logs page on the Hologram dashboard displays a searchable history of messages sent from your devices. You should see a row for the message you sent from the Serial Monitor.
NOTE
After first activating your SIM card, it can take up to 15 minutes for your device to connect to the network. If you don't see your first message on the Logs page, wait 1-2 minutes and try sending another message. If the message still doesn't show up, our Troubleshooting guide can help.
The Data column displays the message’s text that you typed into the Serial Monitor:
Click on the … icon to display all metadata associated with the message. One important metadata field is the message’s list of topics. You can filter messages in a Route based on these topics (covered below). For more information on the content and metadata of a message, see the Cloud Services Router guide.
Route Your Data to Other ApplicationsWhen your device sends a message over the cellular network, its first destination is the Hologram Cloud. But the message’s journey doesn’t need to end there! Use the Cloud Services Router (CSR) to forward your data to Email, SMS, or any web application via HTTP.
NOTE
It's also possible to bypass the Hologram Cloud and send data directly to any internet destination. We describe this more advanced in Communication Protocols.
Many users will configure a webhook route to forward all messages to their own web application for storage and analysis. In this guide, we will instead configure an email route since it’s easier to set up and test.
Go to the Routes page on the Hologram Dashboard and click the Add new route button.
Complete the Add new route form as follows:
- Route type: “Email”
- Route nickname: Leave blank, or enter a description
- Subscribes to: To trigger on all messages sent from your devices, enter
_SOCKETAPI_
- Email recipients: Enter your email address
- Subject: The subject line for the email
Then click the Add route button at the bottom to save the route. Send another message from your Dash using the Serial Monitor. You will receive an email with the text and metadata for that message!
Next StepsThis guide has covered the basics of Hologram’s hardware, network, and cloud services. Our main documentation site has more detailed information about these topics. For more help, browse topics or ask a question at the Hologram Support Community!


Comments
Please log in or sign up to comment.