Have you ever wanted to have a toy car that can turn on from the push of a button and will prevent itself from hitting a wall?
We have created that very object! Using a simple ultra-sonic sensor for the vehicle and a button sensor for the remote, this little buggy springs to life!
There is a button on the Particle Argon board that is programmed to turn the system on. Afterward, it will immediately start moving forward, once the ultrasonic sensor detects an object in the path of the car, it will turn in a random direction to avoid it.
Because the car will go in a random direction after detection of an object, it will provide limitless enjoyment for an onlooker! The car will provide the user with a push notification for when it initiates a turn and will graph data on how many lefts turns it took versus right turns.
The CAD model provided is not used in the project due to unforeseen circumstances with the 3D printer that was in use.
The Particle program is the bulk of the design. One Particle Argon functions as a remote and controls the power on/off button by publishing events to the particle event log over the cloud from a KY-0004 button sensor. This same Argon will also subscribe to the vehicle's argon to flash the D7 LED pin on the remote argon after the vehicle makes a turn. The other Argon handles the drive functionality by subscribing to the events posted by the remote argon to start and stop the vehicle through IOT. An onboard ultrasonic sensor handles the collision sensing with discreet distances. Then through an IFTTT block program, the random turns taken by the car will be graphed in a histogram in an attempt to truly see the random nature of computer number generation. The graph of this live data is linked below:
Link to live graphing data Google Sheet
The inspiration for this project was largely based off the cheap roomba that my roommate from last year had which frequently turned on over long weekends and would find itself hidden and stuck somewhere when we got back. Being able to remotely restart the roomba would've helped in relocating it. Additionally the IOT was implemented to allow remote starting from your phone anywhere as long as you have internet: if you're bringing guests back home after a night out you can simply send a push notification to have the roomba start it's cleaning cycle early before you get back. If you're away and don't need to run the roomba you can remotely shut it off. The decision to graph the number of turns in each direction against each other came from noticing the strong bias the roomba seemed to have for turning in the same direction even if trapped in a corner or miraculously between some chair legs, causing racket, and ultimately interrupting a movie because you need to get up and get it unstuck like it's some child in another room.
Flow-Chart of bi-directional Argon Comms
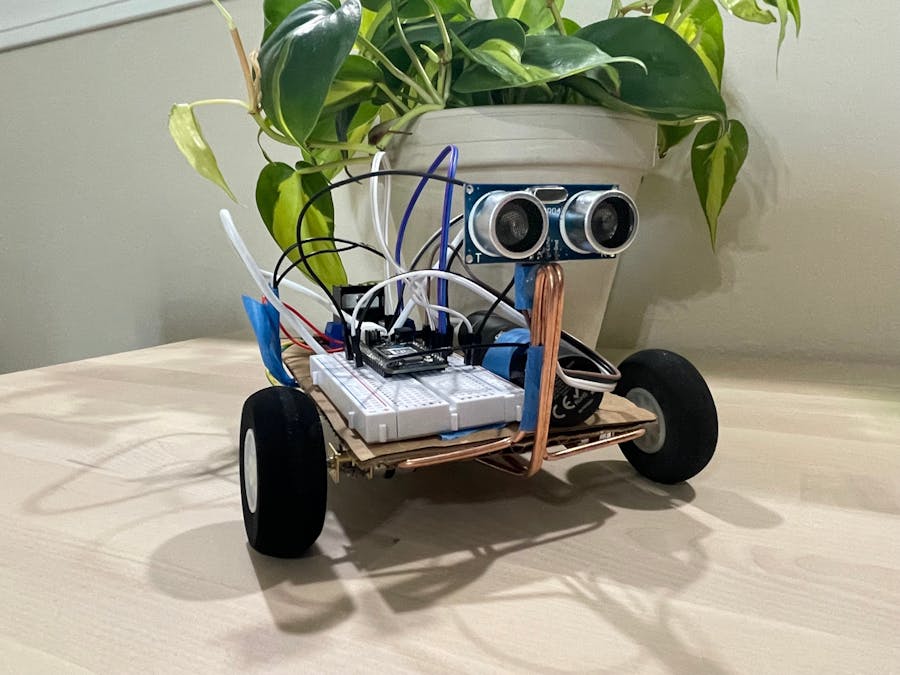
The construction of the miniature wall-e esque vehicle was very simple overall. A cardboard scrap was cut to a minimal size which still fit all the components. A wire was bent to form a frame that molded its way across the bottom and formed a v-shaped peg to balance the vehicle body. Motors and external power for the motor drivers were fixed to the bottom of the buggy and the breadboard, usb power supply, and motor driver were fixed to the top of the vehicle. The ultra-sonic sensor was connected to the argon pins on the breadboard with male-female jumper wires which allowed it to be hot-glued to the remaining wire frame which protrudes from the undercarriage.
Two 4 aa battery holders were linked in parallel to power the motors/motor driver
The original motors provided far too little torque to support the weight of the batteries required to supply the motor driver. Since the motor driver is required to provided bi-directional rotation to the motors, higher torque micromotors with built in 1:1000 gear ratios replaced them.
The quiet micro-motors pictured above provide upwards of 7kg-cm of torque at 6V. This was a significant step up from the prior DC motors, their only downside is their drastically slower speed. This downside tends to help the ultrasonic sensor which can struggle against steep slanted walls, or objects with lesser density.
The remote for controlling the power and handling the publish events is a much simpler and straight forward plan. With only 3 pins on the sensor, ground, vcc, and signal it's just 3 wires to the argon. The button was attached to a double sized breadboard because that's what we had and it looked more like a TV remote that way!


_zhWsCcSEcl.jpg?auto=compress%2Cformat&w=48&h=48&fit=fill&bg=ffffff)


_3u05Tpwasz.png?auto=compress%2Cformat&w=40&h=40&fit=fillmax&bg=fff&dpr=2)


Comments
Please log in or sign up to comment.