We are building an open source prototype for the Nile project.
BackgroundNile is a decentralized and commission-free shopping platform to empower local economies. Nile is redefining the status quo of e-commerce, by not building a giant corporation to rule the world, but instead empowering the people and communities to compete with those giants as strong and interconnected ecosystems. To do so Nile is going to connect local shops and customers with the help of usual people acting as suppliers. Thus, one of the most important processes is the order process, that gets started when a customer orders a product in a local store and wants a supplier to deliver it to his home. To keep track of orders and their status we want to provide a tool to create and read unique order identifiers with RFID cards. This article is supposed to guide you through the creation of such a tool step by step.
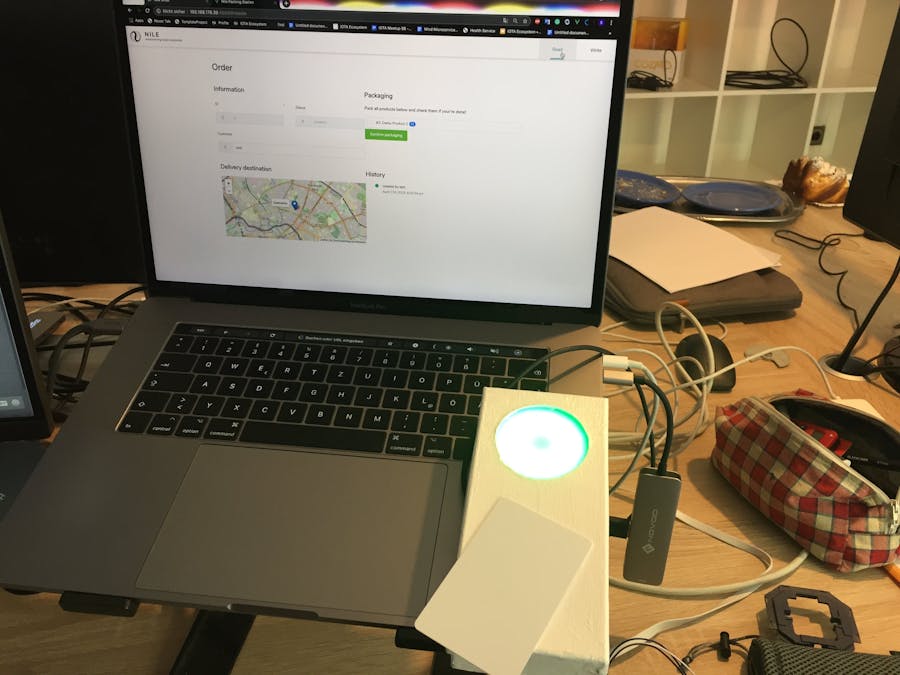
OverviewLike the hero image illustrates the goal of this tutorial is to build a tool to write and read data to RFID cards and visualise the process with the help of colour indicators from an LED ring. A MAM root is stored on the RFID card and a web application reads the MAM stream and shows the representative data of the order. We have six steps to guide you through:
1. Case preparation - Prepare the case to put all the hardware inside.
2. Setting up the Raspberry PiZero - Installing Raspbian, configure ssh and wifi as well as connect to the Pi via SSH.
3. Add RFID component - Connect the RFID module (Mifare RC522) to the Pi.
4. Add LED component - Connect the NeoPixel Ring - 12 x 5050 RGB LED module to the Pi.
5. Putting everything together - Here we are going to fix all the hardware within the case.
6. Get the code running - Last but not least we make the whole thing work by adding the code.
1. Case preparationWe want everything we need for the tool to be in one cool box. In order to prepare the case you need the following things:
- A box - to put everything inside
- A small glas - and...
- ... A pencil - to mark the wholes
- A knife - to cut out the wholes
- A piece of sandpaper - to refine the edges
- A squared piece of frosted glass - functioning as a window
- A brush - and...
- ... Some acrylic colour - to paint the box in your favourite colour
- A squared piece of frosted glass - for the window
- A hot glue gun - to fix the glass behind the box window
Having the case prepared we need to get started with the basic setup of our Raspberry Pi.
Step 1 - Install Raspbian
First we want to install Raspbian - we recommend to install Raspbian Stretch Lite (Download here). To do that plug the Pi's SD card in your computer and flash the Raspian Stretch Lite on it. Tip: To do that you can use Etcher.
Step 2 - Configure headless WiFi
After the flashing process finished, the SD card has been ejected from your computer. All you need to do is to plug it out and in to let the OS recognise it again. As soon as your boot drive has appeared open your terminal and execute:
$ cd /Volumes/boot
Now we want to enable SSH, which is disabled by default on the Raspberry Pi. We simply create a file called ssh within the boot drive. To do that execute:
$ touch ssh
Even if the file is empty it will enable ssh as soon as the Pi boots.
Lastly we also want the Pi to connect with wifi as soon as it boots. To do that we store the connection details at the boot drive of the Pi. Execute the following command:
$ nano wpa_supplicant.conf
Now go ahead and paste the following code in the file. Also enter your wifi connection details and press ctrl + x to save the changes.
ctrl_interface=DIR=/var/run/wpa_supplicant GROUP=netdev
network={
    ssid="YOUR_SSID"
    psk="YOUR_WIFI_PASSWORD"
    key_mgmt=WPA-PSK
}
Tip: If you intend to use the tool in different places you can easily setup multiple wifi configurations right now. By doing so you won't need to plug out the Pi's SD card when you change your location. If you want to do that just add the following code:
$ ctrl_interface=DIR=/var/run/wpa_supplicant GROUP=netdev
$ update_config=1
$
$ network={
$     ssid="SCHOOL_NETWORK_NAME"
$     psk="SCHOOL_PASSWORD"
$     id_str="school"
$ }
$
$ network={
$     ssid="HOME_NETWORK_NAME"
$     psk="HOME_PASSWORD"
$     id_str="home"
$ }
You can add as many networks as you want here by adding more network object.
Now we are ready to connect via SSH to the Pi.
Step 3 - Connect via SSH
To connect to the Pi via SSH you can execute the following command:
$ sshpass -p <PASSWORD> ssh -o StrictHostKeyChecking=no pi@<IP_ADDRESS>
Tip: To make this process easier if you intend to repeat this multiple times in the future, you can create an alias to access the pi with something like piz instead of the command above. To do so execute:
$ nano ~/.zshrc
Then simply create an alias be pasting this inside the file:
alias piz="sshpass -p <PASSWORD> ssh -o StrictHostKeyChecking=no pi@<IP_ADDRESS>"
Now, open a new tab and you are ready to connect to the pi by executing:
$ piz
We want to extend the Pi by an RFID writer and reader. We decided to use the Mifare RC522. This module can be interfaced using SPI.
Step 1: Enabling Raspberry Pi SPI
To enable SPI for the Pi go to the configuration settings by executing:
$ raspi-config
Now select interface options and then SPI. Confirm with yes when prompted and reboot your Pi with:
$ sudo reboot
As soon as your Pi is rebooted open config.txt by executing:
$ sudo nano /boot/config.txt
Now look for the following line:
$ dtparam=spi=on
If you find it, your SPI interface works just fine and you can move on to the next step.
Step 2: Installing RFID software
To install the RFID software we first need to install Python 2.7 dev. To do that execute:
$ sudo apt-get install python2.7-dev
Next we need to download and install the SPI tool for python.
$ git clone https://github.com/lthiery/SPI-Py.git
$ cd SPI-Py
$
$ sudo python setup.py install
Finally download the following python library to use the RC522 module:
$ git clone https://github.com/mxgxw/MFRC522-python.git
$
$ cd MFRC522-python
Step 3: Wiring diagram
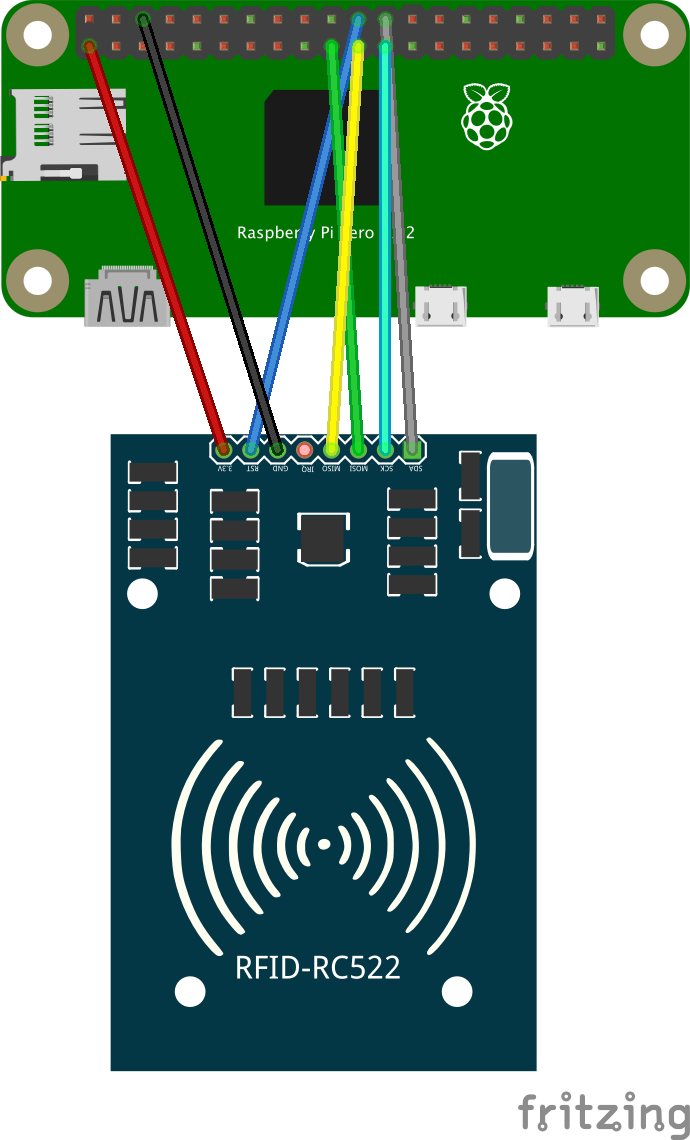
As a final step please follow this wiring diagram to connect the RC522 to the Raspberry Pi Zero.
Traceback
If you run into a traceback like the following image shows, please follow these instructions.
The problem is caused by the SPI python library and can easily be fixed by a roll back to a previous version of the same library.
$ git clone https://github.com/lthiery/SPI-Py.git
$ git checkout 8cce26b9ee6e69eb041e9d5665944b88688fca68
$
$ sudo python setup.py install
Make sure to run the setup again after the roll back. If you still have issues here is the related StackOverflow article.
4. Add light componentIt seemed important to us that the tool has some fancy instant user feedback. The simplest way to do that is by visual feedback with colours. So we decided to add a frosted glass window and a NeoPixel Ring - 12 x 5050 RGB LED to have some kind of coloured progress bar.
Schematic To add this component to the Raspberry Pi Zero follow the following schematic:
After we have built our case and put all the hardware components together we are ready to put everything in the case. The way you decide to position the elements within the box is really up to you. What we did was simply using some styrofoam and tape to fix all the elements within the box.
Tip: One thing that is really important from a visual point of view is to position the lights very closely to the window.
We need to run two applications, one for the shop and one for the packing-station. Follow the instructions on the representative Readme.md file to install the dependencies and run the applications.
Step 1: Shop application
Create your shop First, run the shop application - login with the demo user and navigate to the Shop page in the navigation. Now enter your shop name and location here. After you created the shop, the application creates a MAM root for you, where all information about your shop is stored.
The MAM root as well as the seed to publish new messages to the channel, both are only stored in your browser's local database. So there is no third party which holds you credentials.
New messages in the MAM stream represent changes to the shop's digital twin - if you change the shop name for example. With this approach, we get the entire change history of the shop. The order_request_address and catalog_root handles products and the order process, which are not part of this tutorial.
Create some products The next step is to create some products in the Products page. After that, we are ready to create an order. To simplify the workflow in this tutorial, we create the order directly in the shop application, instead of using also the customer application here.
Create an orderSo go to the Orders page, choose some products and create an order.
Step 2: Packaging Application
Write the RFID card We need the Packing Station Prototype to write the MAM root on an RFID card. Just copy it in the Shop application Order page and go to the packing station app to the Write page. Now paste the MAM root in the given input. After you did that, press the Write button. The light on the reader should now change its colour from blue to orange, which indicates to put the card on the box and wait some seconds until the light changes to green. That indicates that the writing process succeeded and we can read the card now.
Read the RFID card Now navigate to the Read page and wait for the light to change to blue. As soon as it is blue you can put the card on the box and will get the order information from the MAM root. The RFID reader reads the MAM root from the card, sends it to the frontend and fetches the current data on the stream. So whenever you do this procedure you will always get the latest data from the tangle.
This tutorial demonstrates a real world use-case using the Tangle as a distributed ledger to store important data about digital twins of local shops, their products as well as orders. In this tutorial the MAM channel represents the lifecycle of an order from the vendor to the customer. The smart package station only covers a small part of the ecosystem of devices we will need to built in order to serve the whole process, but still it is a first step.
We intend to further improve this use case and tutorial. If you have any issues please let us know!


Comments