


Hardware components | ||||||
| × | 1 | ||||
 |
| × | 1 | |||
 |
| × | 1 | |||
 |
| × | 1 | |||
 |
| × | 1 | |||
 |
| × | 2 | |||
 |
| × | 1 | |||
| × | 1 | ||||
| × | 1 | ||||
| × | 1 | ||||
Software apps and online services | ||||||
 |
| |||||
_4YUDWziWQ8.png?auto=compress%2Cformat&w=48&h=48&fit=fill&bg=ffffff) |
| |||||
The idea for controlling garage opener over the internet came to me after we went to the vacation, we were in rush and nobody of us didn't remember did we close garage or not. Fortunately it was closed. I looked over different implementations and decided to go with Matter, it is becoming a standard and all big guns implement it. I think the Matter/Thread is the best to use for the future. Of course I needed to buy a hub and chose the Google Nest Hub 2nd generation. Plus Google home app on Android OS supports natively the voice commands. I wanted to make it quick and without any installation/setups.
It is possible to build the Matter hub on Pi. Here is the link: https://docs.silabs.com/matter/latest/matter-thread/raspi-img
So, a Garage opener is built to leverage the latest Matter/Thread Home Assist technology. It should work on any hubs which implement Matter specification.
Not much boards supporting Matter were available at that time. Then I found Sparkfun MGM240P board with the tutorial (see below in the Software section) and it worked very well for me:
SparkFun Thing Plus Matter - MGM240P https://www.sparkfun.com/products/2027
Update: Recently new boards supporting Matter came to the market:
Arduino Nano Matter: https://store-usa.arduino.cc/products/nano-matter?srsltid=AfmBOooCixQUs6x3h2V9dXGTlH2QuYTcukYWfhl6jAQQT4WsRZeTnLCa
XIAO MG24: smaller and cheaper: https://www.seeedstudio.com/Seeed-Studio-XIAO-MG24-p-6247.html
Update: Tried XIAO-MG24. Works great. Note: the ports needs to be renamed to D0-D3 instead of PD0-PD3.
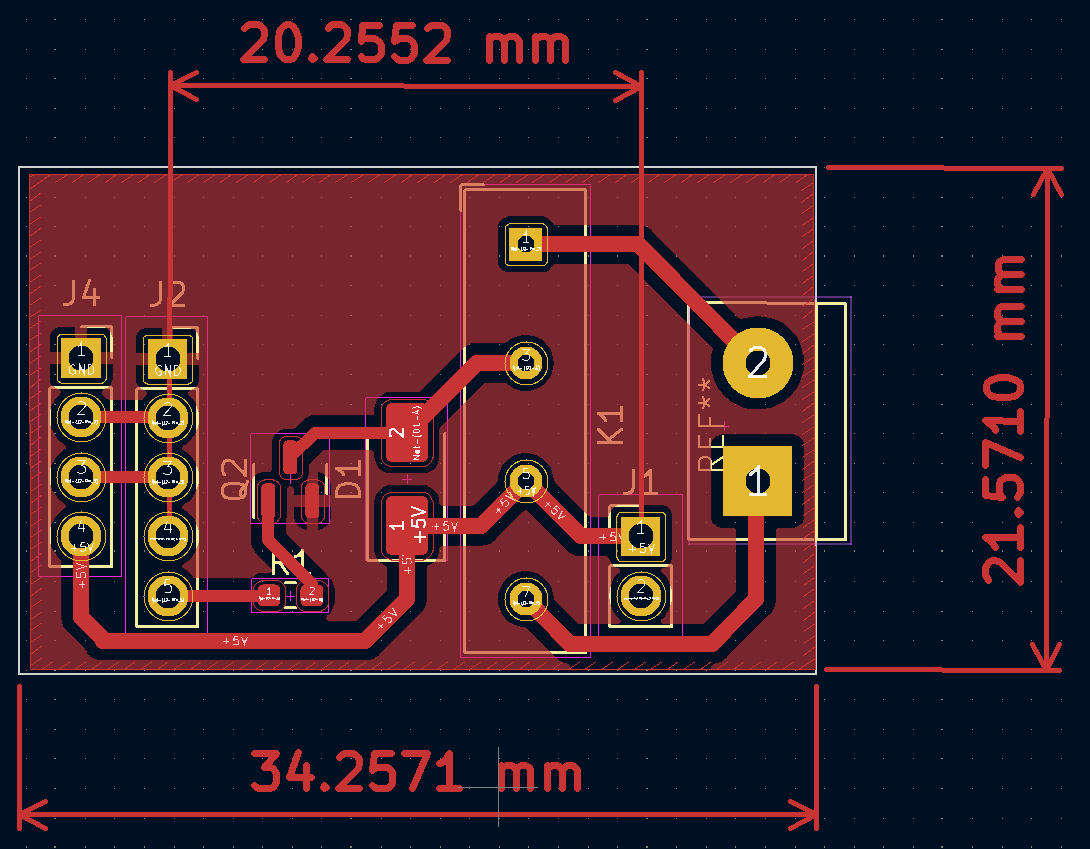
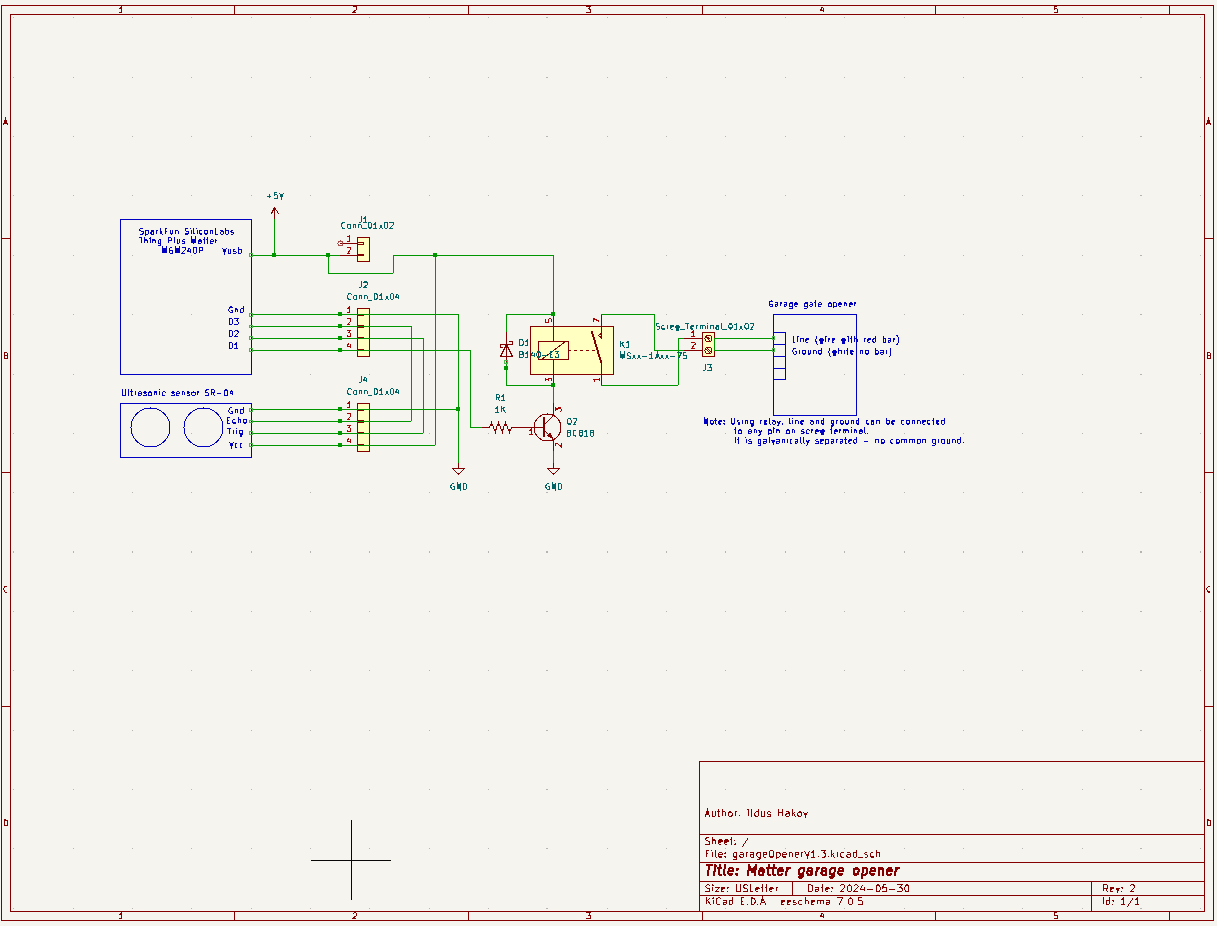
HardwareI saw some products which were using Ultrasonic Sensor or infrared, don't know exactly, but I think, that was a good approach to minimize the garage setup work for feedback (door status). I have made the board as a hat over Sparkfun MGM240P to minimize size and wired connections. The hat contains:
1. Ultrasonic Sensor to detect the garage door at certain distance and update the garage status
2. Compact reed relay (any common hobby relay can be used depending on your garage opener brand) to implement the open/close button connected in parallel to existing one.
3. Transistor to control the relay by Microcontroller (MC).
Made 3 boards:
1. Ver1. Built on proto board. Used transistor instead of relay. Switched to relay based for the setup simplicity.
2. Ver2. The single sided PCB board relay based prototype was done by using laser printer and PCB etching at home.
3. Ver3. Final PCB. Double sided manufactured by JLCPCB.
The code was developed on Arduino IDE with SiliconLab (SL) libraries. See the tutorial: https://learn.sparkfun.com/tutorials/sparkfun-thing-plus-matter---mgm240p-hookup-guide/all or easier approach is to follow Arduino Nano Matter setup just change the board to SparkFun SiliconLabs Thing Plus Matter MGM240P.
Arduino Nano Matter setup: https://docs.arduino.cc/tutorials/nano-matter/matter-relay-lightbulb/
For XIAO MG24 matter https://wiki.seeedstudio.com/xiao_mg24_matter/
The setup is the same for all 3 boards.
After trying the Sparkfun tutorial and SiliconLabs examples with the different devices, I was a little disappointed that there are no dedicated class for the garage opener device, so I decided to reuse the MatterLightbulb class to implement Garage opener. I took the SiliconLab MatterLightbulb example and made modifications for my needs.
The source code is available at bottom of the page.
The main loop is continuously monitoring the status of garage door locally by checking Ultrasonic sensor and remote status (in my case at Google) and making the action such as open or close garage. Local status changes if garage open/closed button pressed in the garage. Remote status changes if user click Open/Close button on the phone.
Distance to detect the door defined as:
#define DIST_DETECTION 70 //cm
change for your needs.
It also updates the built-in LED: ON garage open, OFF closed, useful to debug the board, once the Ultrasonic sensor detects any object at certain distance the led will be switched to ON and the changed status visible on the phone. And going OFF if the garage not detected or any object.
Clone the repo or download the ino file and follow the above tutorial using downloaded file. After sometime, it will appear in the Google home and ready to operate.
Note: Status changes will be delayed a little due to garage doors opens/closes (takes about 10 secs).
Customize Google HomeBy default the garage opener appears in Google Home app as Lights with ON/OFF statuses. It can be changed by editing the title in the app, unfortunately the status values are not modifiable from On/Off to Open/Close.
Settings-> Select your new Lights device->Click on the 'Name'-> Change the name to whatever you want. So, I changed, see below.
Pressing the garage icon will open garage and shows it in yellow with status on.
Link device to voice commands to the board in the Google Home app.
Automation-->Select I am Home->Add action-> Adjust Home Devices->select garage opener to Open or Close.
Automation->Select I am Home->Click to Mic icon and add your words to assistant something like 'Open garage'.
Do it for 'Leaving home' to add 'Close garage'.
So, saying 'Hey google. I am home or Open garage' will open garage.
'Hey google. I am leaving or Close garage' will close garage.
InstallationA 3D printed bracket to fasten the board to garage motor body is brand specific so I've designed it for my Craftsman. Was planning to create the 3D printed enclosure, probably later, don't have time.
I used the same type of wires to connect the board to Garage Door opener in parallel to the existing button in the garage.
Then put the wires back to Garage door opener connector - red wire to red terminal, white to white terminal.
The end.
Thank you.
PS I have 8 extra boards and some components. If interested, contact me.


_Ujn5WoVOOu.png?auto=compress%2Cformat&w=40&h=40&fit=fillmax&bg=fff&dpr=2)
_3u05Tpwasz.png?auto=compress%2Cformat&w=40&h=40&fit=fillmax&bg=fff&dpr=2)
Comments
Please log in or sign up to comment.