


Hardware components | ||||||
 |
| × | 1 | |||
| × | 1 | ||||
| × | 1 | ||||
Software apps and online services | ||||||
| ||||||
Recently I got a Wio Link prototype from a friend at Seeed Studio. It is an ESP8266-based little Internet of Things board. Has 6 Grove connectors for easy device connectivity, WiFi networking, and controlled over an app & the Internet. For a quick project I wanted to hook it up with Home Assistant, an open source home automation platform that lately I read a lot about. The main focus was to have a first impression of both of these parts, and build up some experience for future, more serious projects.
The target solution: light up an LED if a particular person is at home location. It's sort of a basic alarm system, though notice that the location of the LED was not mentioned – it can actually be anywhere in the world, as long as there’s Internet connectivity!
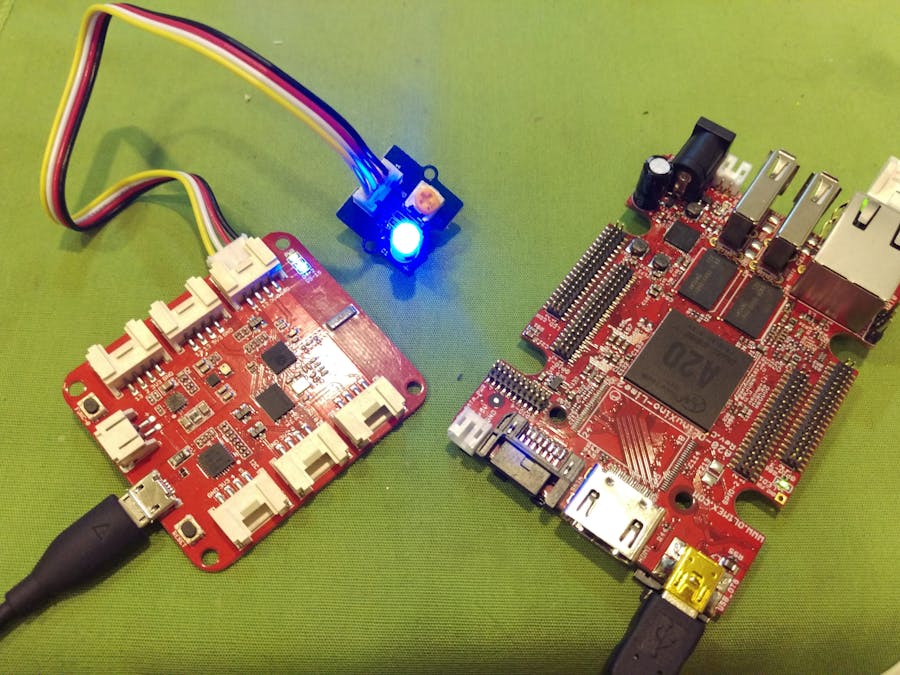
I’ve used the Wio Link, a Grove LED light, an Olimex OLinuXino Lime2 board running ArchLinux for the server, and a Buffalo router with DD-WRT system installed.
Wio LinkWio Link was introduced in Seeed’s Kickstarter campaign, where they have raised more than 8x of their original target. It looks like a neat little board, and was happy to try out when I got my hands on one.
Their wiki page has quite a bit of information, so it was easy to get started. Connect to power, hold down the configure button till the LED lights up in a “breathing” pattern, connect through their Wio Link app, set up the wireless network settings and so on. Once connected, can define what kind of devices are attached to the board, and it looks like most of Grove devices are represented there. I only had a Grove LED at hand, so added it (“Generic Digital Output”), updated the settings, which created a new firmware and pushed onto the device.
The first update took a couple of minutes, but it’s pretty straightforward. The device then also has an API link, which brings up a web page with all the options to query, control, and reset the attached accessories (in my case that’s the one digital output).
The API is pretty simple and usable, though definitely not perfect.
Since manual switching the light on and off worked like the charm, the next step was to enable automatic switching by the presence detection within the home automation system.
Home AssistantHome Assistant is an open source home automation system written in Python. There’s a lot to like about it, and a lot of people are checking it out since a number of other, closed system home automation providers are shutting down their services these days. On the other hand, figuring out the configuration to implement the automation steps I came up with is far from trivial.
Setting up Home Assistant is pretty simple. Create a new directory, add a new virtualenv environment, and install home assistant (I’ve added some bonus modules that the logs recommended):
$ virtualenv env
Using base prefix '/usr'
New python executable in /tmp/env/bin/python3
Also creating executable in /tmp/env/bin/python
Installing setuptools, pip, wheel...done.
$ source env/bin/activate
(env) $ pip install homeassistant
...
(env) $ pip install python-Levenshtein
(env) $ pip install colorlog
(env) $ hass --open-ui
Next step is adding the actual components (the pieces of the home automation). I’ve implemented the Wio Link light as a Command Line Switch. It has two commands for on and off, plus an extra for checking the on/off status (this latter is a very nice touch, and works well checking whether the switch took effect). In the configuration.yaml file in the ~/.homeassistant directory:
switch:
  platform: command_line
  switches:
    presence_light:
      name: Home Presence Light
      oncmd: "/usr/bin/curl -s -X POST https://iot.seeed.cc/v1/node/GenericDOutD0/onoff/1?access_token=<token>"
      offcmd: "/usr/bin/curl -s -X POST https://iot.seeed.cc/v1/node/GenericDOutD0/onoff/0?access_token=<token>"
      statecmd: "/usr/bin/curl -s https://iot.seeed.cc/v1/node/GenericDOutD0/onoff_status?access_token=<token>"
      value_template: '{{ value_json.onoff == 1 }}'

group:
  remote:
    - switch.home_presence_light
Here the URLs are coming straight from Wio Link API page, and you have to add your token value and the correct channels instead of GenericDOutD0 if you plugged your light into a different connector than me. I’ve also removed their -k command line parameter (allow insecure SSL connection), and added -s (silent mode). The last section starting with “group” is not really necessary, but could group devices to be controlled together.
Adding the presence detection through DD-WRT is just the same as in their example configuration, obviously add your own parameters.
device_tracker:
  platform: ddwrt
  host: 192.168.x.y
  username: <user>
  password: <password>
  interval: 10
Though, I don’t like that username/password is in clear text as it could give access to your network to anyone who can read that file. You better protect your Home Assistant host computer and this configuration file on it!
By the default configuration, after restarting Home Assistant this presence detection module will create a known_devices.yaml file in the ~/.homeassistant/ directory and add all new devices (see the device tracker component page for some more info). Here I had my smartphone, after connecting it to the home network.
xxxxxxxxxxxx:
  name: HTC One M9
  mac: xx:xx:xx:xx:xx:xx
  picture: http://www.gravatar.com/avatar/xxxxxxxxxxxxxxxxxxxxxxxxxxxxxxxx
  track: yes
  hide_if_away: no
That file then can be edited, for example adding device name, disabling tracking for some discovered devices (eg. the small server running the Home Assistant server itself), and adding an image. I’ve added an image using a Gravatar link, where the xxxx section is just the md5 hash of your email, get it by.
echo -n "my@email.com" | md5sum -
Alternatively, a recent update added local file support too, as it was discussed in the Home Assistant blog, so files in the ~/.homeassistant/www/ can be linked through the http://127.0.0.1/local/ path, so no online link is necessary (but I think Gravatar is a good unified approach).
After all this, the control interface will look something like this (the Sun is added as I had my home’s longitude/latitude information in the configuration). My icon will show Home/Away status, and clicking the switch on the presence light will trigger the light on the Wio Link.
The final step is the automation. This was the hardest step, as the Home Assistant automation documentation and their cookbook is pretty shallow, and often feel confusing. In the end, one working result is this pair of rules, which turn the light on when status change to home , and turn it off when changes to not_home for that particular device.
automation 1:
  trigger:
    platform: state
    entity_id: device_tracker.xxxxxxxxxxxx
    to: 'home'
  action:
    service: homeassistant.turn_on
    entity_id: group.remote

automation 2:
  trigger:
    platform: state
    entity_id: device_tracker.xxxxxxxxxxxx
    to: 'not_home'
  action:
    service: homeassistant.turn_off
    entity_id: group.remote
I’m sure it can be done differently, but I’m also just glad it works, as it took quite a few hours of checking documentation, trying things, and reading the Home Assistant source code to come up with a working solution.
It functions pretty well, though presence (arriving) is detected quicker than absence (going away), I guess that’s part of detection method and certain timeouts within DD-WRT.
For future development, there are more components defined than I could reasonably ever try in my life, just check the component’s page!
This abundance also means that the number of possible combinations are astronomical. I would wager, though, that the value of those combinations follow a power-low: most of the combinations are not interesting at all, while a relatively small number of combinations are the most useful in general! I guess the Cookbook would be a good place to highlight some more “common use cases”, not just covering the bases and filling in for the lack of documentation. There are some obviously more useful components, IFTTT component on its own can add a ton of functionality, or the RESTful components.
* * *
The original blog post about this project, including opinions and lessons learned: Home Automation Mix-and-Match.


Comments
Please log in or sign up to comment.