

Hardware components | ||||||
_ztBMuBhMHo.jpg?auto=compress%2Cformat&w=48&h=48&fit=fill&bg=ffffff) |
| × | 1 | |||
 |
| × | 1 | |||
 |
| × | 3 | |||
 |
| × | 1 | |||
 |
| × | 1 | |||
 |
| × | 1 | |||
| × | 1 | ||||
Software apps and online services | ||||||
 |
| |||||
This project is based on the DHT sensors which include the: DHT11, DHT21/AM2301 and DHT22/AM2302. In this example project, I'll be using the DHT22 Humidity and Temperature Sensor. We can use this project in a variety of applications such as: a weather station, a clock, a measuring device for a computer or car, etc.. The parts we will be needing are the following:
- 1 Arduino (the Keyestudio Uno is used in this example)
- 1 DHT22/AM2302 Humidity and Temperature Sensor
- 3 Jumper Wires
- 1 10K ohm resistor
- 1 breadboard
- 1 USB Data Cable (depends on the Arduino)
Please visit this link here for NextPCB's special offers.
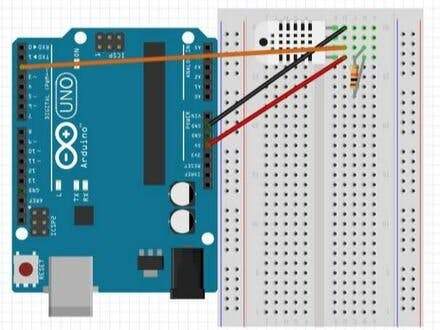
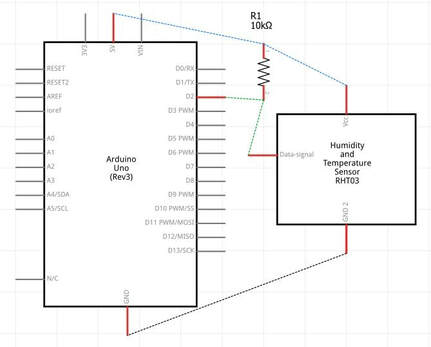
The circuit is very easy to build onto a breadboard. Make sure you remove power from any of the hardware before mounting the circuit. The sensor fits vertically on a diagonal breadboard, fitting into four separate rows. The pins are from left to right; 1 to 4. The first pin is to 5 volts on your Arduino. The second pin is your data pin for connection to digital pin 2, the third pin on your sensor is not used, but your fourth pin is to ground on your Arduino. Connect a 10K ohm resistor between the first (VCC) and second (DATA) pin. That's it for your hardware.
The codeThis code is named the DHTtester from Adafruit's DHT sensor library, compatible for the DHT11, DHT22 and DHT21. The code can be downloaded from the Github page: https://github.com/adafruit/DHT-sensor-library
It can also be copied into your Arduino IDE by the code below once the library is downloaded as it is one of its example codes. Within the first few lines of the code, it contains comments on defining your humidity sensor, whether it is the DHT11/22/21. Uncomment the line which specifies your sensor model by deleting the double slashes of your respective line. After the steps, you are ready to upload the code!
The code starts off with the DHT library being declared. Then, it defines the pin its connected to, and the board. It also has some additional comments stating important points and instructions. The next line which saysDHT dht(DHTPIN, DHTTYPE);, this line of code initialises the sensor and makes sure it adjusts itself to work on multiple processors with various speeds; this is not needed anymore. It the goes to the void setup phrase of the code where we begin serial communication from the sensor to the serial monitor. The sensor sends a command print "DHTxx test!" to the serial monitor, then it starts the sensor. The code takes us to the void loop phrase now where we first wait 2 seconds before the readings of the humidity and temperature as well as the heat index gets processed. The serial monitor then prints the readings for us to read. The readings will be displayed into the serial monitor every two seconds. This sums up our project!
Amazing opportunitiesUTSource.net Reviews
It is a trustworthy website for ordering electronic components with cheap price and excellent quality.
Also, be sure to check out PCBWay, a leading manufacturer and distributor in PCB design and manufacturing. They have amazing prices and excellent quality in their services, so don't miss out on them! Plus, PCBWay has an amazing website, online Gerber viewer function and a gift shop so make sure to check out their links below:
PCBWay Free Online Gerber Viewer Function: https://www.pcbway.com/project/OnlineGerberViewer.html
PCBWay Gift Shop: https://www.pcbway.com/project/gifts.html
Make sure you check out the review for this meter by clicking here.
Enjoy! Contact us for any inquiries!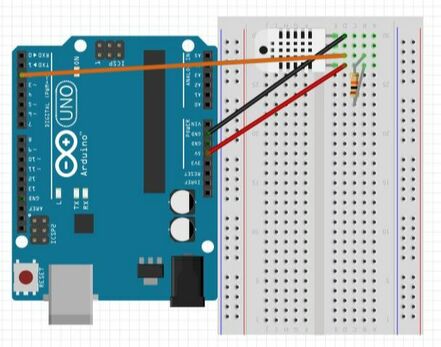


Comments