


Hardware components | ||||||
| × | 1 | ||||
 |
| × | 1 | |||
Software apps and online services | ||||||
| ||||||
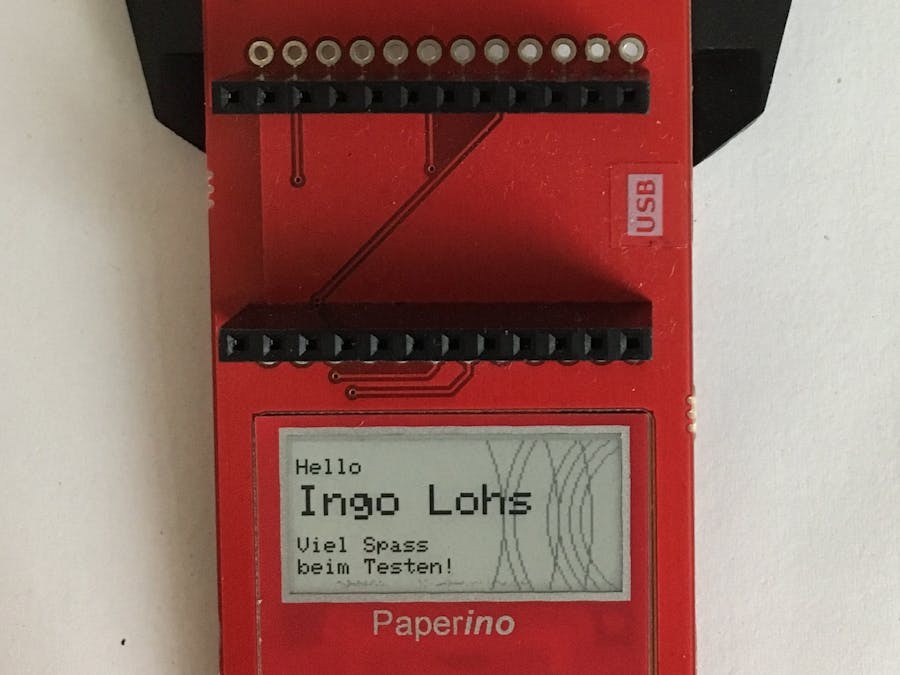
Robert kindly left me a Paperino Shield for Particle Photon / Electron and the Bluz DK, so today I'd like to share my experiences with it: it's one of four products that Robert introduced to market launch via Crowd Supply in early 2017. Already at this point the international link to the shop (I will not earn any advertising fees) for those interested. German reseller: Watterott.com
Product optionsThe 4 products differ as follows: on the one hand in the price and on the other hand in the field of application:
- in the case of a display damage, an exchange display ePaper Display is sufficient for $ 20
- Driver Board with ePaper for $ 30: A small driver module PCB, ready to be hooked-up to your own controller or incorporated onto your PCB. Including accelerometer, temperature sensor, and ePaper display. Soldering skills needed!
- Particle Shield (PnP) for $ 39: Plug and Play Micro ePaper shield for the Particle Photon, Electron, and Bluz from Bluz.io. Including accelerometer, temperature sensor, and ePaper display. This one was used here for the test. No soldering: fast start with your Device!
- Breakout Board for $ 39: A universal ePaper breakout board, ready to be wired-up on the breadboard with your own Arduino / compatible MCU (check the HookUp-Guide for different PIN-Mapping). Including accelerometer, temperature sensor, and ePaper display. No soldering: fast start!
A soldering or other accessories such as Wires/Jumper are not necessary: on the shield, the device can be plugged directly.
With this article I will introduce you to the first use of the Paperino and show the results of the 6 examples.
What is a PaperinoA Paperino by its name does not indicate the use of Arduino. Technically, the Paperino is designed for 3.3V and could be operated only indirectly with the 5V Arduino via Level-Shifting (then you would need seven channels for the full functionality plus 3.3V power supply - Link to HookUp-Guide). Fortunately, the younger Arduinos support 3.3V - with these models it should work: MKR1000, MKR1200, Genuino, Zero, Due, Fio, Pro.
Conversely, the particle community is the target audience for this display. To group the Paperino only as a e-ink display is not enough: rather, it can act as a button. By pressing on its plastic display, actions can be triggered: be it the awakening of a photon or the trigger for further action via the second PIN row to which additional sensors / actuators can be connected.
In summary: Paperino is not Donald Duck as you would say in Italian ;-)
DimensionsA comparison with a Kindle is inadmissible: rather it is about the display of information that is rarely to be changed, for example in the price range for the award of products. With its just 148 x 70 pixels at a size of 1.1 inches, the information can be read razor sharp even with the smallest font.
- Resolution: 148 x 70 px
- Pixel density: 150 ppi
- Grey levels: 4
Did you notice that the most recent output stops on the screen, even without another power supply?
Shield / ShieldWith male PINs on the back, the Paperino Shield itself can be combined with a Particle Power Shield, making it suitable for outdoor mobile use.
Flash the "Hello World"-Example from GitHub or Particle Libary:
Based on the examples, I have the following impression:
- Even the smallest font was razor-sharp (quite similar to an OLE display).
- a colored representation is not possible, but it is possible to represent shades by gray tones.
- a partial update of single pixels is possible.
- The touch-sensitive display not only reacts to finger pressure, but can also be triggered by a fountain pen.
- The examples also include photon wake-up functionality, so that a particularly energy-saving project can be initiated. The low power consumption was also reflected in the fact that my power bank switched off in the operation of the examples ...
- the sensitivity is set to the highest value, so the counter already reacts to fine taps and / or slight movements
"Ryanino" - individual sizes and check the videos
In fact: the alternative "Waveshare" works not with the Paperino Libary PL_microEPD
ProjectsI have recreated Robert's Rain Forecast Project and here are 2 additional help:
- here a service provider, which determines from Google maps the necessary Latitude and Longitude for the desired place: http://www.mapcoordinates.net/en
- Pay attention to a correct link in the Webhook creation - a dot or comma too much and the results are not usable
Yes, you can also use OLE- or LC displays, but with the Paperino only the current Rain Forcase via Webhook is retrieved and brought to the display: then the photon goes to sleep and the values are still shown on the display.
Outlook into the futureRobert deals with the development in 2 points:
- On the one hand the first successes with Particle / Bluz DK have to be made accessible to the Arduino disciples and he is criticizing that the display is too small and follows the
- test of larger displays, so-called "EPD" (E-Paper display) in size 2.1" or 3.1".
In the next few days, 2 sample codes will be available: they deal with
- the functions of the accelerometer and
- use the internal temperature sensor - this is not very accurate, but let yourself be surprised
Robert has provided the following sample sketch, which shows the room temperature updated every 3 seconds on the Paperino. The sensor is not a very precise sensor, but for a first assessment it is enough!
/******************************************************************************************
Example sketch to measure the temperature and show it on the E-Paper screen, together with
previous MAX and MIN values. Temperature value is measured via the display-ICs internal
temperature sensor.
Created by Robert Poser, Mar 10th 2018, Dresden/Germany. Released under BSD license
(3-clause BSD license), check license.md for more information.
We invested time and resources providing this open source code, please support Paperino and
open source hardware by purchasing this product @Crowd_supply @Watterott @Plasticlogic
******************************************************************************************/
#include <PL_microEPD.h>
#include <Adafruit_GFX.h>
#define EPD_RST     A0
#define EPD_BUSY    A1
#define EPD_CS      A2
PL_microEPD display(EPD_CS, EPD_RST, EPD_BUSY);
unsigned long lastTime = 0;
int temp_min = -99;
int temp_max;
int t;
void setup() {
   Time.zone(+2);
   Time.setDSTOffset(1);
   Time.beginDST;
   Time.setFormat(TIME_FORMAT_DEFAULT);
   SPI.begin();
//   SPI.beginTransaction(SPISettings(4000000, MSBFIRST, SPI_MODE0));//and 6.6Mhz (reading)
   display.begin();
}
void loop() {
   if (millis() - lastTime >= 3000) {
       lastTime = millis();
   t = display.readTemperature();
   if (t < temp_min || temp_min == -99) temp_min=t;
   if (t > temp_max) temp_max=t;
   display.clear();
   display.setTextSize(5);
   display.setCursor(47,19);
   display.print(t);
   display.drawCircle(112,24,5,0);
   display.drawCircle(112,24,4,0);
   display.drawCircle(112,24,3,0);
   display.setCursor(122,19);
   display.print("C");
   display.setCursor(43,60);
   display.setTextSize(1);
   display.print("Min: ");
   display.print(temp_min);
   display.print("C");
   display.setCursor(98,60);
   display.print("Max: ");
   display.print(temp_max);
   display.print("C");
   display.setCursor(2,5);
   display.print(Time.timeStr());
   display.update();
   }
}
Regarding the acceleration sensor here are two nice demos: - TapCounter: https://robpo.github.io/Paperino/exampleTapCounter/ - TapCounter with Deep-Sleep: https://robpo.github.io/Paperino/exampleWakeOnTap/
Good News: The library for the larger displays is ready so far ... so we can start soon. Orders are welcome!


Comments
Please log in or sign up to comment.