Are you someone who has better things to do than going to your P.O. Box that is unfortunately located far from your apartment or home? Tired of getting out in the bad weather to hope that your important mail from family, that hopefully has money inside of it, has actually been put in that small metal box? Lastly, are you tired of missing the payments of your bills because you are too lazy to walk/drive out to your P.O. Box? The unknown can now be known with Mail Alert. With this system you will be notified exactly when the Post Office worker has delivered your very precious mail.
How it WorksThis project uses two Particle Photons, one to detect and report the opening of a mailbox using a PIR sensor, and the other to notify the owner of the mailbox to the activity. The intention of the project is to allow the user to monitor a remote mailbox, and to consistently keep up with deliveries without having to manually check the mailbox for new mail.
The P.O. Box PhotonThe P.O. Box photon detects activity using the PIR sensor and immediately publishes an event to the cloud, while also sending usage data to Google Sheets, where it is plotted in real time. The published event is detected by the second photon, which will publish its own event in response, establishing two-way communication between photons, and illuminating the red LED on the P.O. Box photon.
The first photon's IFTTT applet to update Google Sheets
1 / 2 • Google Sheets Data which is updated in real time
Click this, to view the data being sent in real time: GOOGLE SHEETS
The In-Home PhotonThe in-home photon responds to the activity of the P.O. Box photon by flashing its green LED to notify the user of mailbox activity. The user will also receive a mobile notification from this photon via the IFTTT app. In addition, the in-home photon will publish an event to illicit a response from the in-mailbox photon.
1 / 2 • "In-Home" Photon that flashes the green LED to confirm that Motion was detected
1 / 2 • Notification applet for second Photon
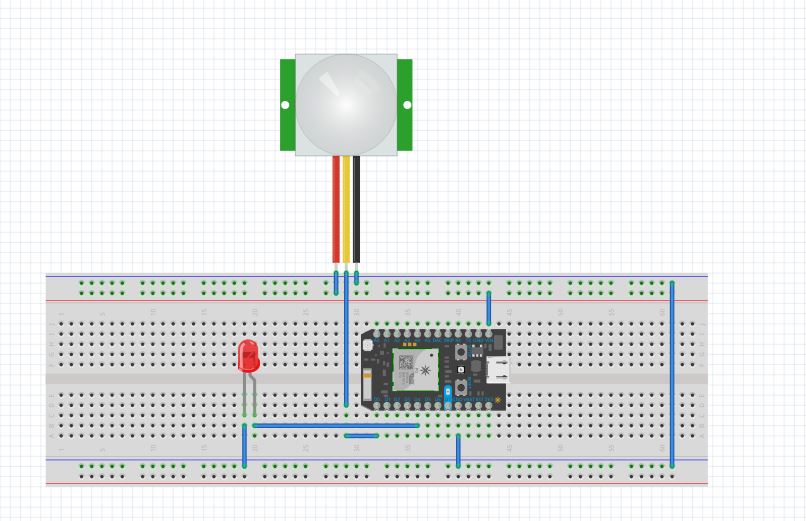
P.O. Box Photon
- Insert the Particle Photon into a small breadboard
- Connect the PIR +V pin to the Voltage output from the Photon using a jumper cable. Connect the ground pin to a grounded rail on board, and the PIR output to a digital input on the Photon.
- Connect the red LED to the breadboard in an uncluttered area, using jumper cables to connect it to both a digital output on the Photon as well as the ground rail.
- Provide power to the Photon, a power bank works great and was used for testing.
- Apply any necessary updates, and flash with the code provided for the P.O. Box photon.
In-Home Photon
- Insert the Particle Photon into a small breadboard
- Connect the green LED to both the Photon ground and a digital output.
- Provide power to the Photon, a power bank works great and was used for testing.
- Apply any necessary updates, and flash with the code provided for the in-home photon.
The TestingFor the testing of this project we ventured down to our P.O. Boxes, to not only test the project but to see if we forgot the mail again. The P.O. Box Photon was powered with a generic power bank, and placed in the box. With the door closed the In-Home Photon was powered by the computer pictured and Google Sheets was pulled up to make sure the P.O. Box's photon was sensing motion properly. The mail box door was then open to simulate mail being delivered and the In-Home photon was seen blinking its green LED. In response to the In-Home Photon the P.O. Box Photon's red LED turned on to show that the bi-directional communication was working.


Comments