


Hardware components | ||||||
_zhWsCcSEcl.jpg?auto=compress%2Cformat&w=48&h=48&fit=fill&bg=ffffff) |
| × | 3 | |||
 |
| × | 3 | |||
| × | 3 | ||||
 |
| × | 1 | |||
Software apps and online services | ||||||
 |
| |||||
 |
| |||||
 |
| |||||
iRockPaperScissors is a new version of the game “Rock, Paper, Scissors” created by Team 3 that integrates modern technologies like the Particle Argon, IFTTT app, and Google Sheets. By using the Particle Argon, a simple keypad entry is transmitted over the internet to IFTTT and Google Sheets. Our game allows people to connect and play one of their favorite childhood games even during the COVID-19 pandemic.
Project Video:https://www.youtube.com/watch?v=6xSNry3zkSE
Setup Outline:
Particle setup on phone and testing (flashing LED using D7) - 20 minutesWhen you purchase your Particle Argon, follow the set up instructions.
Member Setup Videos:
Kenneth's Setup Video:
Jameson's Setup Video:
Harrison's Setup Video:
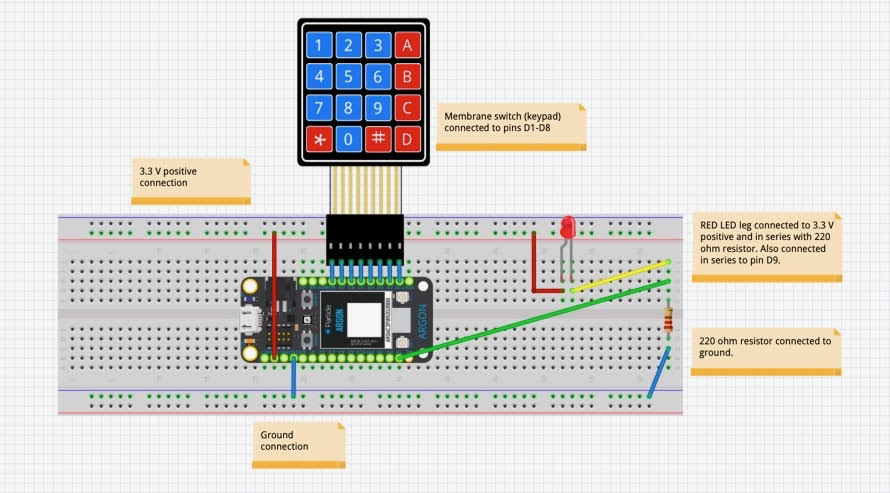
Circuit setup - 10 minutesSee circuit diagram image and project video(listed at the end of this story).
Writing the Code - 20 minutes (replace name in code with your name or any word)Copy and Paste the code into the web IDE for Particle Argon at build.particle.io
Creating the Google sheet - 60 minutesToview our completed Google Sheet for the game example project visit: https://docs.google.com/spreadsheets/d/1K7dinF4QOJT2b_-RBtXkxcv9cs0_lWuMLeTrBqfAQXw/edit?usp=sharing
Steps:
Create a blank Google Sheet.
Your first blank Google Sheet will be where the Particle uses IFTTT to send the number you press into a new row on the spreadsheet. In our example IFTTT instructions this spreadsheet was called “harrisonkey” (you can name the spreadsheet anything you want, however be sure to use this name when creating your first IFTTT applet).
Create a second Google Sheet that is styled to your preferences. This is your "game" sheet. This sheet is NOT connected to IFTTT. On the second Google Sheet identify where you want to put your “keypressed” numbers from your first spreadsheet, and use the “importrange” function to automatically update your second spreadsheet based on entries from the first spreadsheet.
List all of the possible win conditions on your gamespreadsheet, then use the “VLOOKUP” function to monitor the number of occurrences of each win condition. Set up the sheet as shown below:
https://docs.google.com/spreadsheets/d/1K7dinF4QOJT2b_-RBtXkxcv9cs0_lWuMLeTrBqfAQXw/edit?usp=sharing
If you like the cyan colors from our sheet here are the color hex codes that we used: #9eeadb #c0efea
Create a graph or table to automatically update the winner’s totals in a visual manner.
On your (initially blank) IFTTT linked spreadsheet use another “importrange” function to automatically update the total number of wins "imported"from your game spreadsheet. This is used in a second IFTTT applet that will flash the LED every time someone wins.
Creating IFTTT applets - 30 minutesFollow the IFTTT applet image instructions.
Editing Google sheet (+customization) - 40 minutesCustomize the google sheet to display data entries.
Testing & Troubleshooting - 30 minutesSome common issues:
- Ensure all wires are connected securely.
- Your Particle Console will update fast depending on your Wi-Fi connection and the number you press will appear quickly. However, it sometimes takes IFTTT a while to complete an “ifttt-trigger-event-check”. It can take anywhere from 1-3 minutes to update.
- Sometimes the LED does not flash instantly, typically it takes IFTTT about 1-2 minutes to call the particle function. To check if your LED function works, you can type in your command (in our project our command was “LOW”) in the “function” box of your Particle console. You can also type in your function command on the Particle app to make sure the LED is working.
- If you have trouble with IFTTT: re-flash the code on your Particle Argon, disconnect/turn off each IFTTT applet and then turn it back on. If that does not work, try restarting the Particle Argon by disconnecting and reconnecting the power. (on-and-off is the golden rule of technology) [Be sure to reflash your code after doing so.]
- If your data does not appear in your IFTTT linked Google Sheet, IFTTT may have created a seperate Google Sheet on its own.
After complete setup, try playing your game! A completed game will be able to do the following:
- Take number entries from your Particle Console from the keypad
- Paste the entries into a Goggle Sheet via IFTTT
- Turn those entries into rock (R), paper (P), or scissor (S) entries
- Decide who a winner is via win condition list and the VLOOKUP function
- Assign points to the individual and total scores based on number of wins
- Update a graph showing winner data in real time
- Update the number of wins causing the LED to flash using the second IFTTT applet.
If your project can do all of the above, you have successfully completed the project!
IFTTT Setup:IFTTTfor keypad ---> Google Sheet data entry:
Sign up for IFTTT account.
On "Home" page click "Create"
Click "Add" on the "If This" tab. Then type in "Particle" on the next page.
Click "New event published". This is where IFTTT will take data from the Particle.
Type in your "event" name. This is the name of your event in your code. This could be any phrase. Just make sure your Particle Code and your IFTTT event name match so that there are no errors when trying to transmit data from the Argon.
Click "Add" next to "Then That."
Type in "google" and click "Google Sheets".
Click "Add row to spreadsheet".
Type in a spreadsheet name. This is where all the numbers you press on your keypad will go initially. If you don't have a spreadsheet already made, IFTTT will make one for you. Only leave "EventContents" in the "Formatted row" box. This is will be the numbers you press. You don't have to have a Google Drive folder, but it is nice to add. For this example the Google drive folder, it is named "events".
Click "Continue".
You can change the name of the Applet. However, you can also just leave it as the default. Click "Finish". Now, when you press a button on the keypad, it will create a new row in your Google sheet (you must have the circuit and code configured first).
IFTTT for LED function calling:
Sign up for IFTTT account.
On "Home" page click "Create"
Click "Add" on the "If This" tab. Then type in "Google Sheet" on the next page.
Click "Cell updated in spreadsheet"
Erase information listed in "Enter the folder path" and "add enter the filename". Paste your IFTTT linked Google Sheet URL. This is the same Google Sheet that has all of your personal data (keypressed) entries, NOT the game Google Sheet.
In the "cell to monitor", type in the cell number from your IFTTT linked Google Sheet that has the total number of wins listed. See image below for example:
Cell C1 uses the importrange function to update the total number of game wins from the game spreadsheet. This cell updates every time someone wins the game. In our example game spreadsheet, we blacked out the cell that calculated the total number of game wins. However, it is still present and we have referenced it for our IFTTT linked spreadsheet to light up the LED.
Click "add" next to "Then That".
Type in "particle" in the search bar and click the blue Particle icon.
Click "Call a function".
The function used in your code should automatically populate. However if it does not, use the dropdown to find your function name. In the "with input (Function Input)" section type in the word you used for your function command. Remember, this is case sensitive and must be the same exact word you used in your code on line 58. [EXAMPLE: if(command == "LOW")].
Click "Continue".
You can change the name of the Applet. However, you can also just leave it as the default. Click "Finish". Now, when the game spreadsheet updates a new total number of wins, IFTTT will trigger and enter the command to flash your LED.
Youtube Channel Link:Circuit Schematic


Comments