
_9yNwYvpv9Y.gif?auto=format%2Ccompress&gifq=35&w=400&h=300&fit=min)

Hardware components | ||||||
 |
| × | 1 | |||
 |
| × | 1 | |||
Software apps and online services | ||||||
 |
| |||||
It's time to make a brand new instrument! This instrument is inspired by the trumpet but is waaaaayyy cooler. Why? Because you can program it, and it has lights! How can we make an instrument with code and LEDs? I'm happy you asked! We're able to do all this because of an awesome electronics learning platform by Adafruit called the Circuit Playground Express! It has buttons, LEDs, a speaker, and tilting tracker (formally called an "accelerometer") and much more!
With your new instrument you'll be able change the pitch and volume by tilting the Circuit Playground Express in various directions. Pretty cool!
In this project you will learn:
- Beginner programming concepts with MakeCode.
- How to interact with hardware such as LEDs, an accelerometer, buttons, and a speaker.
- How to play a brand new instrument!
How to Use
When all is said and done, to use the Tilt Trumpet you can orient the Circuit Playground Express so that your index finger (left or right) lies on button A and your middle finger lies on button B as seen below.
You may hold the Tilt Trumpet however you like but this is the orientation I find most comfortable.
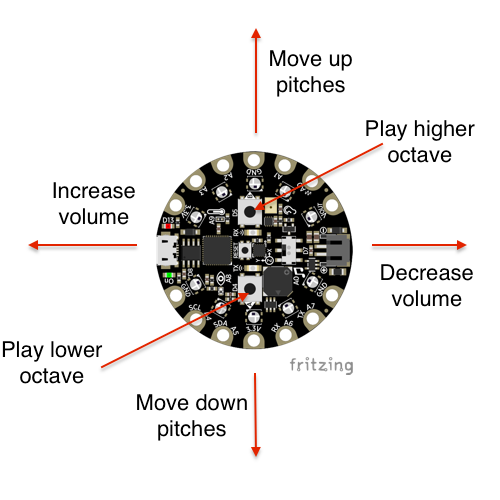
Changing Pitch
To start playing a tone, press either of the buttons. The closer button (A) will play a lower tone where as the farther button (B) will play a higher tone.
If you tilt the board away from you while holding either of the buttons, the pitch will increase. If tilted toward you, the pitch will decrease.
Changing Volume
If tilted to the left, the volume will increase.
If tilted to the right, the volume will decrease.
What you'll need:
- A Circuit Playground Express
- A micro-USB cable (to connect Circuit Playground Express to computer)
- Access to a computer (any operating system will do)
Let's get started.
Step 1: Programming with MakeCodeWhat is MakeCode?
MakeCode is a web based code editor for physical computing made by Microsoft.
What does that mean for you? It means you can program your Circuit Playground Express to do almost anything you can dream up right from a website! You can code with blocks similar to the language Scratch, or you can do more advanced coding with Javascript. We'll be sticking to the block-based programming for this project.
More on MakeCode for Adafruit boards here.
Above is a simple example of what can be done in MakeCode. In the example, every half second (500ms) the board's NeoPixel LEDs change from red to blue then back to red etc. forever.
Create a New Project in MakeCode
Head over to https://makecode.adafruit.com/ and create a new project.
Once you click "New Project" your screen should look something like this.
This is your code editor. Whatever we code on the right will affect the Circuit Playground Express Board on the left! That way we know our project should work before we upload the code to the board.
Conditional Statements
To begin let's create the basic functionality for button A. Such that when button A is pressed, we play a pitch out of the speaker that corresponds to how far forward or back we are tilting the device.
To do this we need a "conditional statement" for when button A is pressed. We want to say "If button A is pressed, then play a pitch".
Grab an "if" statement from the "logic" tab and drag it inside the forever loop.
Next grab a "button A is pressed" statement from the "input" tab and replace it with the "true" element next that's part of the if statement.
Adding Sound
Next we will define what we want to happen when button A is pressed. To start let's say when button A is pressed, a middle C will sound.
Go to the music tab and grab a "play tone at middle C for 1/2 a beat". Place it inside of the if statement.
Now we can test out what we have so far by pressing button A on the virtual Circuit Playground Express on the left. Try pressing button A and see what happens (make sure your volume is on). Neato!
The Accelerometer
Now it's time to program the initial tilt functionality!
The board's accelerometer allows us to sense which way the board is tilted.
What is an accelerometer? Most smart phones have accelerometers. They are used for example every time you turn your phone sideways or upright again and the screen adjusts accordingly because it knows which orientation it's experiencing thanks to the accelerometer.
The way the accelerometer on the board works is that it can sense the amount of "gravity" it feels in 3 different axis.
The three axes I'm talking about are the x, y, and z axis shown on the board above.
The gravity on the x axis is what we'll use to determine the pitch. The gravity on the y axis is what we'll use to determine volume.
So how do we measure gravity? In Gs!
1 G is equivalent to Earth's gravitational pull at a resting point.
In this case we'll actually be using mgs which are milligravities! Meaning 1000mg is 1 G. So if the board is tilted all the way in the x or y direction we will assume the accelerometer is feeling close to 1000mg or 1g in that direction. In this case we won't worry about the z axis which feels a constant 1G when the board is at rest as the Z axis is perpendicular to gravity.
Now, with the accelerometer on the board, we can use gravity or mgs as an input to determine each pitch.
Learn more about the accelerometer on the Circuit Playground Express here.
Mapping Gravity to Pitches
Now that we know what values of gravity we may want to try with the board, we need to figure out how many and which pitches we want from 1 G (The board tilted all the way forwards) to -1G (The board tilted all the way backwards).
In this project I decided to make the pitches all in the C major scale or "key signature" however the beauty with programming is you may change the pitches to whatever key or crazy pattern you'd like.
The notes in the C major scale are quite simply all the white notes from C up to B. More about the C major scale and key signature here.
Let's say we want 8 pitches, the notes C, D, E, F, G, A, B, then the high C.
With 8 pitches we will put 4 in the negative x direction (tilting back) and 4 in the positive x direction (tilting forward).
Rather than starting at -1000 mg for the low C I decided to start at -775mg because it gave more control and room to play without really having to twist my arm to play the lowest or highest notes.
Starting at -775mg for the low C and ending at 775mg for the high C will be the range will program all the other pitches in between. Each pitch will have a range of 225mg.
With that said, let's map out the logic for when we want each pitch to be played:
Tilted backward:
- Low C will be played when acceleration in the x direction is less than -775mg
- Low D will be played when acceleration in the x direction is greater than -775mg but less than -550mg
- Low E will be played when acceleration in the x direction is greater than -550mg but less than -225mg
- Low F will be played when acceleration in the x direction is greater than -225mg but less than 0mg
Tilted forward:
- Low G will be played when acceleration in the x direction is greater than 0mg but less than 225mg
- Low A will be played when acceleration in the x direction is greater than 225mg but less than 550mg
- Low B will be played when acceleration in the x direction is greater than 550mg but less than 775mg
- High C will be played acceleration in the x direction is more than 775mg
Programming the Accelerometer
Lets start with the low C. As defined above, "Low C will be played when acceleration in the x direction is less than -775mg"
Again there are two conditions that must be met for the low C to be played. The first is that button A must be pressed. The second is that the acceleration in the x direction is less than -775mg. To do this we must add a second if statement that checks for accelerometer value within the first that checked for button A being pressed.
Add an if statement within the first if statement we made.
Next we need a comparison operator to check the condition of the accelerometer value.
Go to the logic tab and grab a comparison operator and drag it where "true" is next to the if statement.
We now need to determine what we are comparing. We want to compare the acceleration in the x direction to -775mg. If it is lower than -775mg, the low C should be played.
Go to the input tab and grab an "acceleration (mg)" statement.
Make sure the axis is set to x.
Change the operator sign to be less than (<).
Then change the value in the white oval to be -775.
Now that our logic is sound, we can go ahead and tell the program to play a low C if all the above conditions are met.
Add the Middle C from the music tab then click on the "Middle C" white oval and select the lower C on the piano.
Next we will program the next note to play between -775mg and -550mg.
Click the plus sign on the bottom of the inside if statement. An "else" should have popped in as part of the statement.
Now click the plus sign again. You will see an "else if then" pop into the statement.
The else if part of the statement will allow us to check for the other desired accelerometer positions.
Because we need to check if the accelerometer is between two values, we need an extra statement that will do this for us.
Go to the logic tab and grab the first "boolean" operator and drag it in the empty slot next to the else if statement.
Since we want the accelerometer value to be greater than -775mg and less than -550mg, choose the "and" operator.
To create the two comparisons you can copy and paste the same one we made from above and change the values to be > -775mg and < -550mg
Then, drag another music tone into the new condition and change it to low D.
Rinse and Repeat
Now that you know how to create new conditional statements within the inner if statement, continue the process for the rest of the pitches and accelerometer values.
Remember you can copy and paste entire elements and groups of elements!
Your code should look like this when all is said and done... Pretty!
You can change the character of the tone by changing the length of the beat. My settings play each pitch for an 1/8th of a beat repeatedly but you can change yours to whatever you wish. Because this code is always looping, although it only plays a part of a beat, it will continue playing that same part of a beat as it gets looped simulating a constant flow of sound.
Adding Button B
Now that we have the lower pitches worked out with button A, let's make the upper pitches with button B.
We now need to add an else if statement to our outer if statement to check for button B presses.
Click the plus sign that the bottom of the outer if statement twice to make the "else if, then" statement appear.
Now copy and paste the button A is pressed from above and drag it into the else if condition. Click the drop down and change it to button B.
Most of the code for button B is going to be the same as the code we wrote for button A. The pitches will just be one octave higher.
Copy and paste the entire block of code of the inner if statement we made earlier.
Now drag it inside the button B if statement.
Now lets change the pitches to be one octave higher.
As mentioned earlier you can click on each note and change it by clicking your desired note on the piano.
Programming Volume
Most instruments have a way to control the volume of their instrument. Whether it's a trumpet and the instrumentalist simply uses more air at a faster speed to play louder or a piano player that strikes the keys with more intensity, instrumentalists need to some way to play louder and quieter.
We just programmed the board to change pitch based on how far forward or backward it is tilted on the x axis. Can we use the y axis and tilt the board left and right to do something else? How about changing volume!
Lets add another if statement after the first massive one we just programmed. Grab an if statement and drag it under our first one.
This if statement block will check the accelerometer value of the y axis to dictate volume.
I wanted to have more variability in volume control so I decided to make 11 different volume levels mostly because of the simpler math that splitting the mgs into gave me.
Here is a map of the logic we will use to program the volume on the y axis of the accelerometer.
Tilting to the left:
- If acceleration is less than -900 mgs, play the loudest volume at 220
- If acceleration is in between -900 and -700 mgs play volume at 200
- If acceleration is in between -700 and -500 mgs play volume at 180
- If acceleration is in between -500 and -300 mgs play volume at 160
- If acceleration is in between -300 and -100 mgs play volume at 140
Not tilted (level)
- If acceleration is in between -100 and 100 mgs play volume at 120
Tilting to the right:
- If acceleration is in between 100 and 300 mgs play volume at 100
- If acceleration is in between 300 and 500 mgs play volume at 80
- If acceleration is in between 500 and 700 mgs play volume at 60
- If acceleration is in between 700 and 900 mgs play volume at 40
- If acceleration is greater than 900 mgs play volume at 20
Lets start by grabbing another comparison operator from the logic tab.
Go ahead and place that in the new if statement we created.
Now go to the input tab and take an acceleration input to put into the first part of the comparison. Next make sure the comparison is less than (<). Lastly change the value of the white bubble to be 900.
Next we'll set the volume for this condition. Go to the music tab and grab a "set volume" element. Drag it inside the new if statement and set the volume to 220.
Now let's click the plus sign twice like before so we can continue to build out this if statement.
For the next condition it will be much faster to copy and paste a condition we wrote earlier for the first if statement. Once you copy, paste and drag the new conditional statement into the new if else statement, make sure you change the values to reflect the new statement. Then copy and paste a "set volume" element, throw it in the new if else and change it to 200.
Like before, repeat this process until all the conditions are accounted for.
Adding NeoPixel Awesomeness
The NeoPixel LEDs on the Circuit Playground Express are too great not to be used in my opinion so I decided to integrate them into the instrument giving the player super cool performance lighting.
I chose a rainbow ordered color scheme and decided to set the brightness of the leds based on the loud ness of the note.
In my code I have a different color that is shown for each pitch.
To set or change the color of the LEDs, go to the light tab and grab a "set all pixels to" element. Now drag it up to the button A if statement and inside of the first inner if else, under the lowest note. Now choose your desired color.
Copy, paste and repeat until all pitches on buttons A and B have colors assigned.
To set the brightness let's utilize the last if statement we wrote to control volume. We can set lighting levels where we set sound levels so they match.
Go to the light tab, grab a set brightness element and place it under the first set volume element in the volume if statement. Set the brightness to 220.
Repeat for all volume levels.
One last thing we need to take care of before finishing up with the code is making sure the NeoPixels turn off if neither button is bring pressed. To ensure this happens, we place a "set all neopixels" element in the "else" part of the pitch if statement. Change the color to black.
All done with code!
If you'd like to download this file without writing the code, scroll down to the bottom of the page and download the file entitled "circuitplayground-Tilt_Trumpet.uf2" then follow the instructions on how to upload the code to your board in the next section.
Step 2 : Configure Circuit Playground ExpressNow that we have the code for the project, we need to upload it to the Circuit Playground Express.
Lets name our file and download it.
Choose a name at the bottom of the page. Then click the pink download button.
A pop up like this should come on your screen after clicking the download button.
Follow the directions and connect your Circuit Playground Express to your computer via the usb cable. Click the reset button once to go into programming mode.
Next, look for your file in your downloads folder and drag it onto your CPLAYBOOT drive that should have showed up when you plugged in your board and entered programming mode.
You should now see the CPLAYBOOT disappear.
Go ahead and try out your new Tilt Trumpet!
If you are having issues getting things to work check out this extended guide here.
Step 3: Powering the Tilt TrumpetI power my Circuit Playground with a micro USB cable and external battery.
However, if you want to make the project more portable, you can grab a lithium rechargeable battery and a switch that will fit nicely inside the case. Directions on that here.
I hope you enjoyed this project and that you learned a few things about coding! You are way closer to being able to code in more complex languages where you will be able to have more control. For now, I would say MakeCode is pretty useful!
So what other features can you dream up for the Tilt Trumpet with the Circuit Playground Express sensors?
Now that you upped your coding skills, it's time to start honing your Tilt Trumpet skills!
Time to practice!


Comments
Please log in or sign up to comment.