Weather around the world seems to be getting more extreme and more unpredictable, with 2019 setting myriad extreme weather records. So what are people who still wish to be able to enjoy the great outdoors to do? Enter Campable - the Internet of Tents! Thanks to Particle's 3rd generation of IoT hardware and its compatibility with Adafruit's Feather Specification, creating cloud-enabled sensors to help monitor our environment is easier than ever! 🤖🔎🌦️
Getting Started 🔰 👩💻The Particle Argon Kit comes with everything you need to get started, and you can find a handy setup guide in the Argon Quick Start. Once you're comfortable blinking LEDs, the real fun can begin! Particle Build lets you get started right away, with a powerful web-based IDE, cloud compiler, and OTA updates - but a full-blown local IDE experience is also possible via Particle Workbench - available as a standalone app, or as an extension pack if you already have Visual Studio Code.
Note to Linux users like myself: if you encounter ARM gcc issues when trying to build locally, try this:
sudo apt-get install gcc-multilib libncurses5:i386
You can also use particle usb configure to help with any udev rules issues.
With local builds and flashing set up, it's really easy to start iterating on new features! 💾➡️♻️
Development Process 💪 💻With the development and firmware flashing tools all ready to go, it's time to start fleshing out the functionality! Let's start with the hardware!
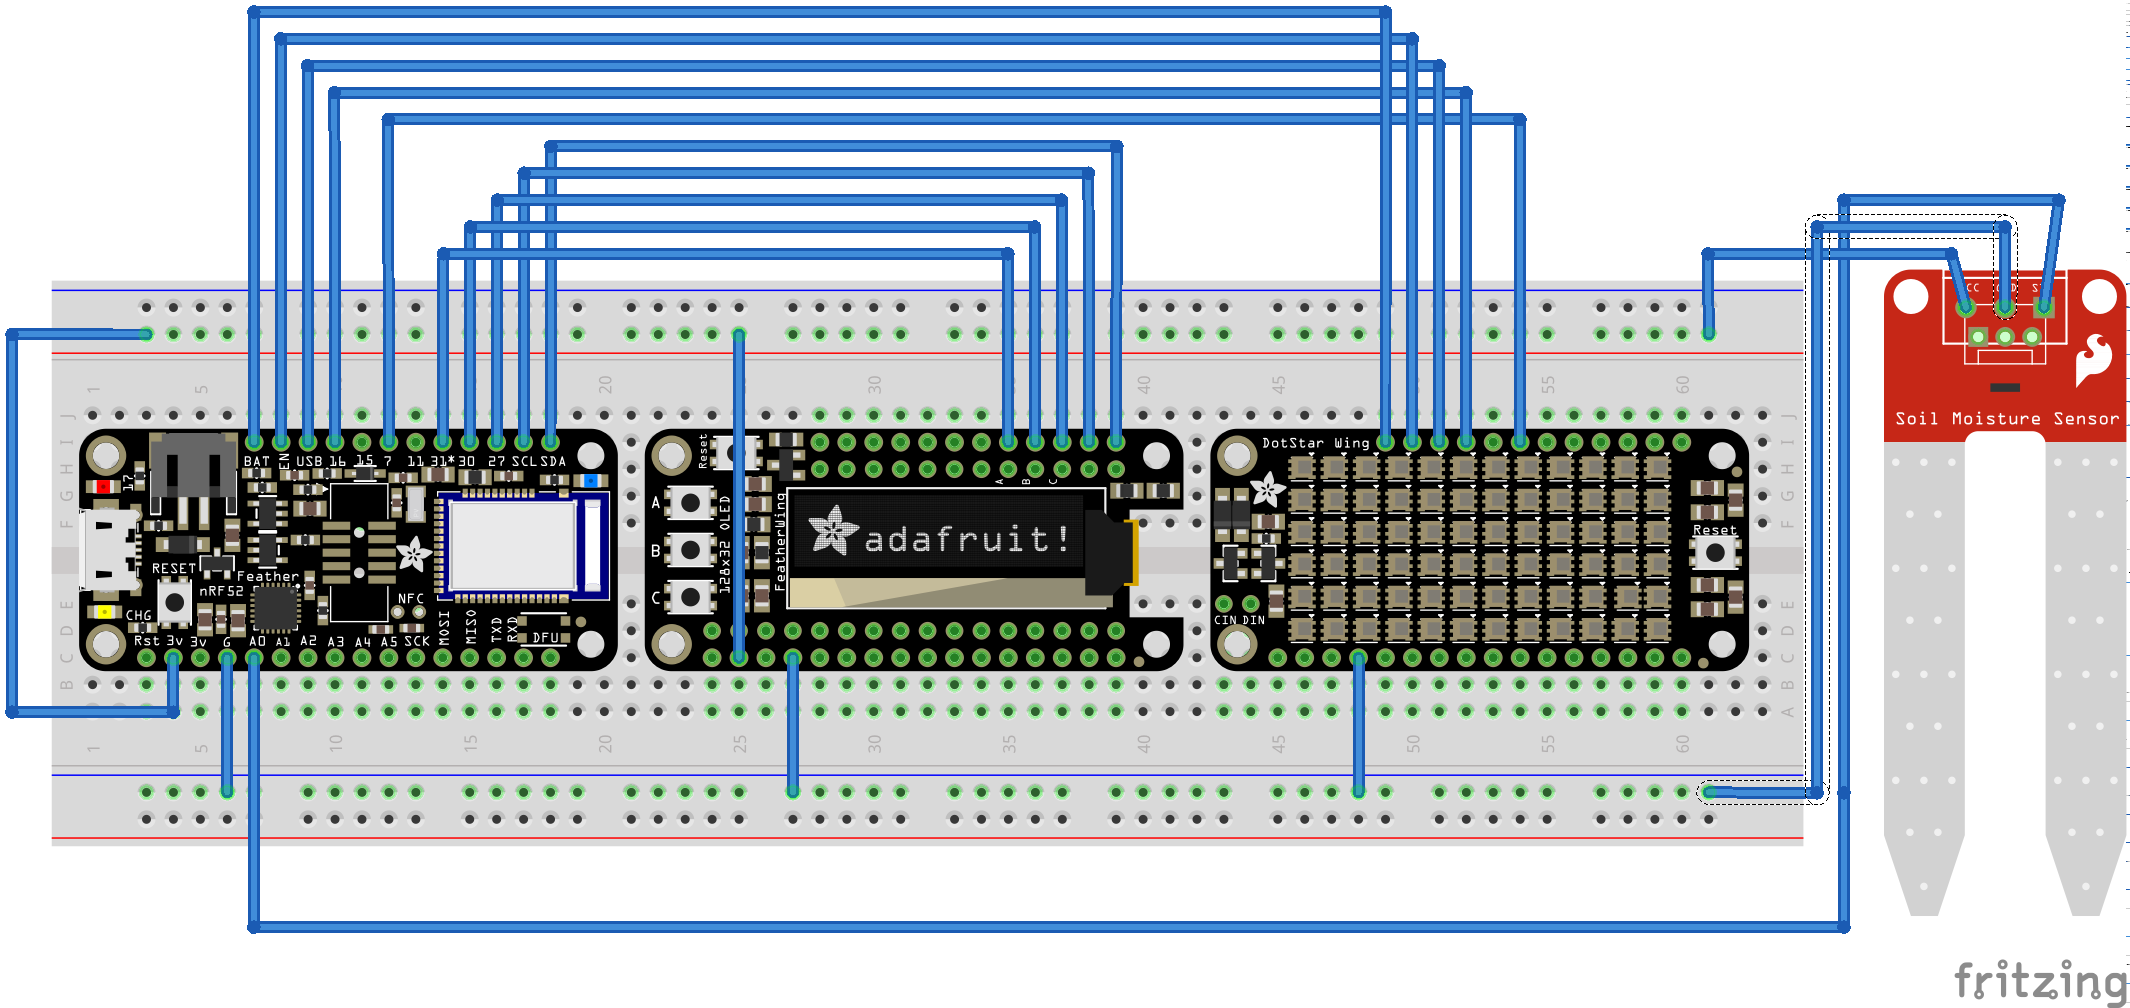
First, add the Adafruit OLED FeatherWing; if you have a FeatherWing Doubler or Tripler, this is trivial, but even if you don't, the FeatherWing standard makes it simple, since you always know that the required pin on the `Wing goes to the same pin on the Argon. The OLED FeatherWing just needs power, I2C, and three digital inputs for the buttons; I made up my own numbering/notation where when the Argon/FeatherWing is oriented with the mUSB connector "up", pin 1 is on the top left, and pins are then counted anti-clockwise. The numbering doesn't matter since you just need to connect whichever pin to the same location on the opposite board, but here's how I notated that:
- pin
2to pin2(3v3) - pin
4to pin4(GND) - pin
17to pin17(SDA) - pin
18to pin18(SCL) - pin
19to pin19(D2) - pin
20to pin20(D3) - pin
21to pin21(D4)
The OLED display provides a crisp, but small UI - but for longer-range monitoring, the Adafruit DotStar FeatherWing provides 72 ultra-bright RGB LEDs. Again, it's pin-to-pin on the identically-laid-out boards; this time using SPI, although via software, since the hardware pins are already in use:
- pin
4to pin4(GND) - pin
23to pin23(SPI_MOSI) (soft) - pin
25to pin25(SPI_SCK) (soft) - pin
26to pin26(USB) - pin
27to pin27(EN) - pin
28to pin28(VBAT)
Finally, let's add the Capacitive Soil Moisture Sensor v1.2; it's a simple analog output, so we connect it to power and ADC0:
VCCto pin2(3v3)GNDto pin4(GND)AOUTto pin5(ADC0)
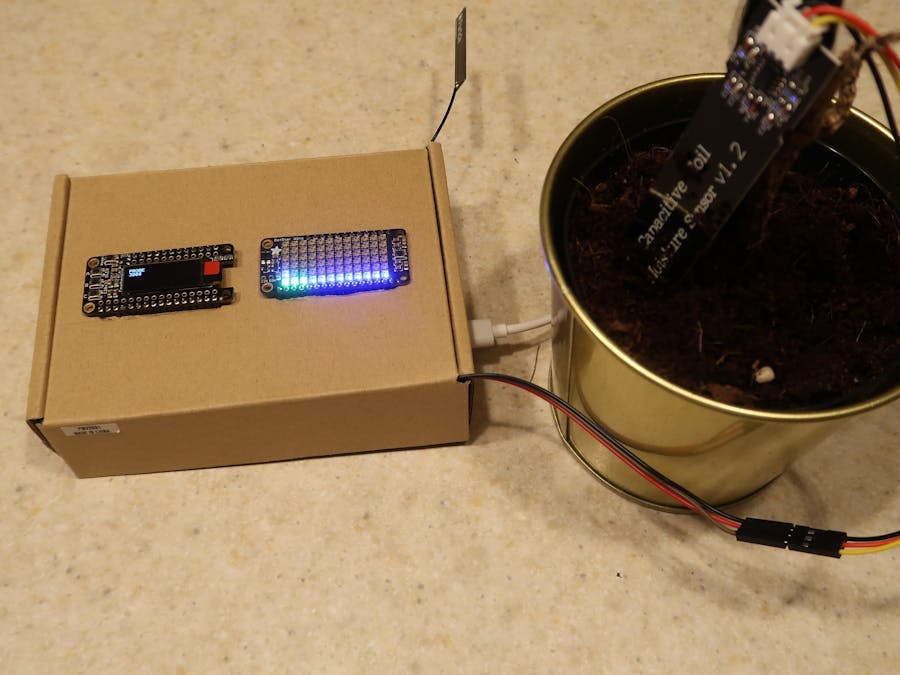
I had intended to 3d-print an enclosure, but in the end my cardboard box prototype worked so well that I just stuck with that:
That's it for hardware - now let's make it all work, with a lick of software!
Much like the simplicity gained on the hardware by using the Feather form factor, Particle makes it easy on the software side too, by providing ports of the libraries for common FeatherWings (shout out to @rickkas7! 💙). First, select Particle: Create New Project via the VS Code Command Palette. Then, choose Particle: Configure Project for Device and select deviceOS@1.1.0, argon, and then leave the last prompt blank. Next, import oled-wing-adafruit and Adafruit_DotStarMatrix_RK using Particle: Install Library. Then update your .ino file thusly:
/* * Project IoTents * Description: Particle Argon goes glamping * Author: ishotjr * Date: 201908xx */#include <oled-wing-adafruit.h>#include <Adafruit_DotStarMatrixRK.h>// for Adafruit_DotStarMatrix#define DATAPIN    D6#define CLOCKPIN   D8#define BRIGHTNESS 20#define MAX_BRIGHTNESS 100Adafruit_DotStarMatrix matrix = Adafruit_DotStarMatrix( 12, 6, DATAPIN, CLOCKPIN,                                  DS_MATRIX_BOTTOM     + DS_MATRIX_LEFT +                                  DS_MATRIX_ROWS + DS_MATRIX_PROGRESSIVE,                                  DOTSTAR_BGR);const uint16_t colors[] = { matrix.Color(255, 0, 0), // red matrix.Color(0, 255, 0), // green matrix.Color(0, 0, 255), // blue matrix.Color(0, 0, 0)    // black};
//SYSTEM_THREAD(ENABLED);OledWingAdafruit display;
#define DAMP 3300#define WET 3000#define NOTIFY_INTERVAL 60 * 1000int moisturePin = A0;int moistureValue = 0;unsigned long lastNotify = 0;
enum modes { NONE,  // none selected PROBE, // realtime soil analysis LOCAL, // visual alert REMOTE // visual alert + IFTTT};enum modes mode = NONE;void setup() { display.setup(); display.clearDisplay(); display.display(); matrix.begin(); matrix.setBrightness(BRIGHTNESS); pinMode(moisturePin, INPUT); }void loop() { moistureValue = analogRead(moisturePin); display.loop(); display.clearDisplay(); display.setTextSize(1); display.setTextColor(WHITE); display.setCursor(0,0); if (display.pressedA()) {    mode = PROBE;  } if (display.pressedB()) {    mode = LOCAL;  } if (display.pressedC()) {    mode = REMOTE;  } switch(mode) { case PROBE: probe(); break; case LOCAL: local(); break; case REMOTE: remote(); break; default: display.println("A: probe"); display.println("B: here"); display.println("C: away"); matrix.fillScreen(colors[3]);  } display.display(); matrix.show();}
void probe() { display.println("PROBE"); display.println(moistureValue); matrix.setBrightness(MAX_BRIGHTNESS); matrix.fillScreen(colors[3]); // dynamic moisture "graph"  byte pixelsTotal = 12 * 6;  byte pixelsLit = 0;  byte offset = 3; for (byte i = 0; i < offset; i++) { matrix.setPixelColor(i, 0, 255, 0);  } if (moistureValue < WET) { // fill remaining pixels for (byte i = offset; i < pixelsTotal; i++) { matrix.setPixelColor(i, 255, 0, 0);    }  } else if (moistureValue < DAMP) { // illustrate range between damp and wet    byte dampness = moistureValue - DAMP;    pixelsLit = (float)((float)dampness / (DAMP - WET)) * (pixelsTotal - offset); for (byte i = offset; i < pixelsLit; i++) { matrix.setPixelColor(i, 0, 0, 255);    }  } else { // do nothing - just initial green offset  }}void monitor(bool notify) { unsigned long now = millis(); if (moistureValue < WET) { display.println("WET"); matrix.setBrightness(MAX_BRIGHTNESS); matrix.fillScreen(colors[0]); if (notify) {  if ((now - lastNotify) >= NOTIFY_INTERVAL) { // reset interval to prevent SPAM        lastNotify = now; display.println("!!!NOTIFY!!!"); // send SMS via IFTTT Particle.publish("WetWetWet");      }    }  } else if (moistureValue < DAMP) { display.println("DAMP"); matrix.setBrightness(BRIGHTNESS); matrix.fillScreen(colors[2]); // reset interval    lastNotify = now;  } else { display.println("OK"); matrix.setBrightness(BRIGHTNESS); matrix.fillScreen(colors[1]);    lastNotify = now;  } display.println(moistureValue); }void local() { display.println("LOCAL"); monitor(false);}void remote() { display.println("REMOTE"); monitor(true);}
(hrm - something went really wrong with the formatting here - maybe just grab a ready-made project including libraries from https://github.com/ishotjr/IoTents !)
Compile and flash your Argon, and you should see the following displayed on the OLED screen:
In order for the SMS to work, you need to create a new IFTTT applet using the Particle service, using If (Event Name)WetWetWet and selecting your Argon device, then Send an SMS to {your phone number}.
Let's walk through how it works in the next step!
Field Testing 👨🔬📐💧There are three modes of operation, corresponding to the three buttons A, B, and C. The first mode, probe, allows campers to analyze soil in real time for moisture levels, in order to select a nice dry area to set up a tent. In addition to displaying the raw analog value on the OLED display, a far more usable indication is given via the RGB LEDs, which start at green when soil is dry, then increase across the matrix as moisture increases while still damp (blue), eventually turning red when soil is measured as wet, and thus inappropriate for camping.
Pressing the B button initiates local mode, intended as a passive monitor once your tent has been set up. When the soil is dry or damp, the LEDs glow a dim green or blue respectively, but when it becomes wet from precipitation, a bright red glow alerts you to the situation (the probe is remote, so with the display inside your tent at night, you can easily stay appraised of external conditions).
remote mode, entered by pressing C, behaves identically to local mode, but also sends an SMS message after 60 seconds of sustained wet measurements, alerting you to problematic conditions while you are away from your tent.
Check out the embedded video above to see it all in action!
Results and Conclusions ⚗️ 📊Particle's 3rd-generation IoT hardware and Device Cloud make it easy to internet-enable FeatherWings of all types, and combined with the power of VS Code, the ability to quickly iterate using world-class tools makes development a blast! 🚀
Next Steps/Future Enhancements 🔜 🔮The outdoor application of Campable gave me all kinds of ideas for further use of current and additional FeatherWings. The DotStar LEDS could be used for all manner of visual display, for example to broadcast an SOS message. The IFTTT integration brings almost limitless possibility, but for starters I thought it would be nice to pull weather information for display and incorporation into environmental monitoring. And I'd like to port the Music Maker FeatherWing to Argon for an audio component - e.g. as another way to alert users to inclement environment conditions, or to play white noise at night to help you sleep, or bird calls to attract avian friends or as an audio repellent against insect foes! 💡🤯


_zhWsCcSEcl.jpg?auto=compress%2Cformat&w=48&h=48&fit=fill&bg=ffffff)


Comments
Please log in or sign up to comment.