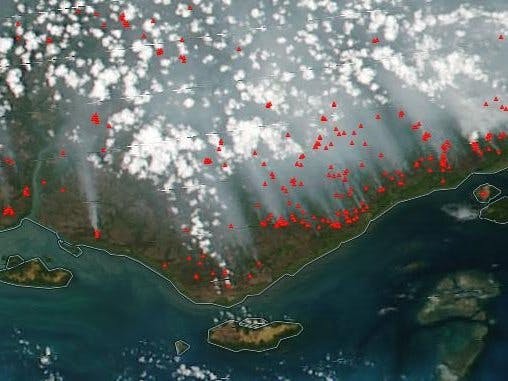
Forest fires result from a combination of high temperatures, oxygen, and available fuel. Removing dry bushes and shrubs, as well as dead trees, reduces fires' ability to start and spread. Stata Mater protects forests by identifying flammable materials and mapping their locations, providing direction for ground teams who can eliminate their buildup. 🚫🌲🔥🚒
Getting Started 🔰 👩💻NXP provide a detailed guide and series of videos for setting up the KIT-HGDRONEK66, and this project assumes that you have already assembled, configured, and flown your HoverGames drone. Note that this is a lengthy, complicated process, so please be sure to budget significant time for it. 🤓🕰️
With the extensive hardware setup out of the way, it's time to move onto software! The HoverGames drone uses NXP's RDDRONE-FMUK66 flight management unit, which runs PX4 Autopilot software. Drones are extremely complicated amalgamations of hardware and software, and it's important to understand that there is no "blinking an LED" equivalent when this many individual moving parts have to work together seamlessly in order to prevent catastrophic property damage and injury. The PX4 toolchain can be run on all major OSes, though I chose Ubuntu 19.10 since that's what I run on my primary dev machine. This resulted in significant manual setup and hair-pulling, so I would recommend following their advice to use 16.04 or grabbing the HoverGames VM which contains all of the required tools. 💾🚀
With the toolchain up and running, it's time to build! First clone - or fork and clone if you want to keep your track your changes under version control (recommended) - thePX4 Firmware repository:
git clone https://github.com/PX4/Firmware.git PX4-Firmware
cd PX4-Firmware
I cloned into PX4-Firmware since Firmware seemed like it could get confusing among all of my other projects. The FMUK66 platform is already part of the main PX4 codebase, so we can build right away on the master branch:
make nxp_fmuk66-v3_defaultIf this works, you should end up with the file build/nxp_fmuk66-v3_default/nxp_fmuk66-v3.bin - this is a binary containing the FMUK66 firmware which we just built. Uploading it to the board requires the J-Link EDU Mini and adapter board included with the kit, and JLinkExe, which you installed when flashing the bootloader during initial setup. There's no need to replace the bootloader when building new firmware, so this time instead of writing to memory address 0x0, you will start at 0x6000 (update your binary path accordingly):
connect
MK66FN2M0xxx18
s
4000 kHz
loadbin "/home/ishotjr/dev/PX4-Firmware/build/nxp_fmuk66-v3_default/nxp_fmuk66-v3.bin" 0x6000Cool! You've updated the firmware - probably with something fairly identical to what was already on there - but now the fun begins! 🎉
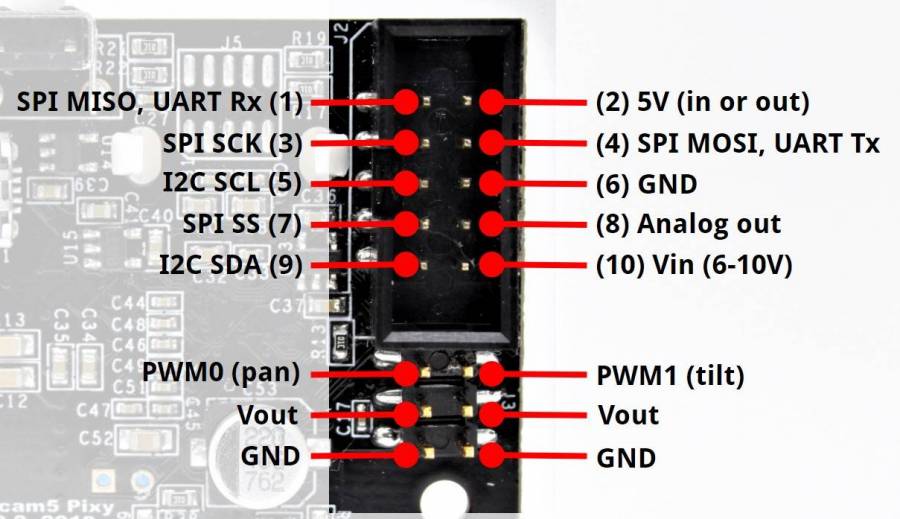
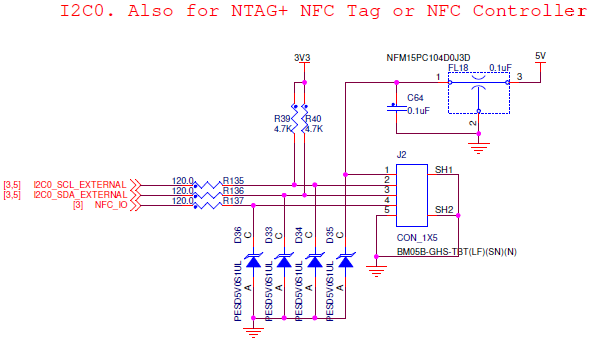
Development Process 💪 💻With a working firmware build process in place, innovation can begin! The included Pixy2 provides powerful, easy-to-use object recognition and tracking, and can be interfaced with the FMUK66 via I2C using the included 10-pin to JST-GH adapter cable, connected to the I2C/NFC port:
Prior to receiving the PixyCam, I'd intended to use machine learning for identifying flammable material, but the included software makes it really easy to pick dry materials from lush forest using color alone. Take a quick jaunt through the Pixy2 Quick Start to install PixyMon, and then connect to the camera via USB and use PixyMon to teach Pixy2 to recognize some pieces of dried old wood, using Action > Set signature 1. Verify that only the intended regions are being detected using the camera image - I found that tuning the range down slightly helped reduce false positives. Finally, use PixyMon to configure the output interface to use I2C, accepting the default address of 0x54:
With setup complete, use the included brackets to affix the camera to your drone via tilt pivot mount:
That was easy! But...you can't stay connected to your laptop via USB when the quadcopter takes off! So we need to integrate the functionality into the onboard firmware!
NXP provides example code to get you started, but there are all kinds of problems with it. The latest commit seems to be untested, as it contains a flagrant typo that prevents building:
res = m_line.init();
Unfortunately m_line does not exist, so you can try correcting it to m_link, as it should be, but even then the code won't work, based on the extensive time I spent wrestling with it, so I suggest reverting to 021b349, the status quo for the past few months, until the new broken commits were added a few days ago. However, the PX4 includes in pixycam.cpp are incompatible with recent PX4 versions, so should be updated as in my fork:
#include <px4_platform_common/px4_config.h>
#include <px4_platform_common/tasks.h>
#include <px4_platform_common/posix.h>
By forking and fixing the NXP example, you've just created your first PX4 module! But how do you use it? One way (I actually ended up just adding PixyCam as a Git submodule in the end) is to copy the source into the PX4 repo, e.g.:
cp -R ~/dev/PixyCam ~/dev/PX4-Firmware/src/examples(adjust paths as needed). Then, let PX4 know it's there by adding PixyCam to the end of the EXAMPLES list in the boards/nxp/fmuk66-v3/default.cmake file. Now you can re-build the firmware:
make nxp_fmuk66-v3_defaultand flash it again as above. You can use QGroundControl, installed during initial setup, to access the MAVLink console and view the resultant debug output, but what I found more handy during iterative development was the MAVLink Shell which boots quickly and doesn't require all the GUI wrangling of QGC; to connect over Telemetry, simply enter:
cd ~/dev/PX4-Firmware
sudo pip3 install pymavlink pyserial
./Tools/mavlink_shell.py /dev/ttyUSB0
(adjust repo and device paths as needed, and don't install the dependencies every time/if you already have them obviously!) with your drone powered on (but blades off and all other safety precautions taken please!). In the shell, type help, and you should see your own pixycam module on the list of commands - so go ahead and enter it - or pixycam & to run it as a background process, and you should see something like:
help
pixycam
Detected 1
block 0: sig: 1 x: 169 y: 138 width: 70 height: 35 index: 127 age: 255
Detected 1
block 0: sig: 1 x: 166 y: 145 width: 64 height: 21 index: 127 age: 255
Detected 1
block 0: sig: 1 x: 169  sig: 1 x: 174 y: 138 width: 52 height: 35 index: 127 age: 255
Detected 1
block 0: sig: 1 x: 168 y: 144 width: 68 height: 23 index: 127 age: 255
if you wave some bits of dried wood in front of the camera!
That's pretty cool! But how do we do anything with it? That's where uORB comes in! uORB is an asynchronous pubsub messaging API that many PX4 applications use to communicate. The easiest way to get started with it is via the Hello Sky tutorial. This uses the built-in vehicle_attitude topic for convenience, but the vehicle_attitude_s struct isn't ideally suited to Pixy blocks, so you'll want to create your own. This is done by adding a .msg file in the msg/ directory, and adding its name to msg/CMakeLists.txt. The .msg file is just a list of C/C++ types and variables, and the easiest way to capture the output of the Pixy2CCC.h print() function is with a string:
char[100] blockYou can then use this to replace your vehicle_attitude topic and actually send the block data! (bonus points for creating a message with individual fields for each of the values that print() outputs instead of just bunging it all in a character array!) Awesome! But still...how to actually get at this data? Remember all of that cool MAVLink stuff? Well there's a whole bunch of SDKs that let you do all kinds of amazing things using that, so let's up our game and turn our uORB messages into MAVLink messages! 📤
First, you'll need to clone the MAVSDK:
cd ~/dev
git clone https://github.com/mavlink/mavlink.git
cd mavlink
git submodule update --init --recursive
Then, you need to Create a new Dialect File for your message:
<?xml version="1.0"?>
<mavlink>
<include>common.xml</include>
<!-- <version>9</version> -->
<dialect>3</dialect>
<enums>
<!-- Enums are defined here (optional) -->
</enums>
<messages>
<message id="14000" name="PIXY">
<description>Pixy blocks!</description>
<field type="char[100]" name="block">block</field>
</message>
</messages>
</mavlink>
And finally, generate a C library from the XML file:
PYTHONPATH="${HOME}/dev/mavlink"
echo $PYTHONPATH
python3 -m pymavlink.tools.mavgen --lang=C --wire-protocol=2.0 --output=generated/include/mavlink/v2.0 message_definitions/v1.0/pixy_messages.xml
(as always, update your path/filename/etc.) You can then copy the generated code into the PX4 codebase, e.g.:
cp -R generated/include/mavlink/v2.0 ~/dev/PX4-Firmware/mavlink/include/mavlinkAnd update src/modules/mavlink/mavlink_messages.cpp to include your new topic:
#include <uORB/topics/pixy_messages.h>
#include <v2.0/custom_messages/mavlink.h>
Now add a new class MavlinkStreamPixyMessages to src/modules/mavlink/mavlink_messages.cpp based on the MavlinkStreamCaTrajectory example. Add a corresponding new StreamListItem to streams_list at the bottom of the file:
new StreamListItem(&MavlinkStreamPixyMessages::new_instance, &MavlinkStreamPixyMessages::get_name_static, &MavlinkStreamPixyMessages::get_id_static),Finally, enable the stream via MAVLink:
mavlink stream -r 50 -s PIXY -u 14556Hooray! You know have Pixy2 blocks streaming as MAVLink messages, ready for ingestion into MAVSDK, MAVSDK-Python, and a whole host of other MAVLink-based tools, allowing you to for example log and correlate Pixy and lat/long coords to generate a graphical representation of detected flammable materials! 📍🔥
One of my motors was defective, and after the extensive assembly and configuration, refused to do anything more than twitch slightly. Not being familiar with multicopters prior to this contest, I did all sorts of ESC configuration and debugging and tried pretty much everything under the sun before realizing that the motor itself may be at fault and ordering more. After replacing the visibly defective motor, I discovered that one of the other motors has a less noticeable issue resulting in slower rotation than the other 3, preventing stable flight. I was not able to diagnose this issue before the end of the contest, so all of my development and testing was done on the bench. I look forward to finally getting properly airborne during the next challenge! 🚁🔜
Results and Conclusions ⚗️ 📊I've been unable to locate the original quote, but I recall during my extensive poring over docs, guides, APIs, gists, and source code seeing a friendly disclaimer somewhere about how challenging this stuff was - unlike most Hackster contests where you have one board, one language, one API, etc. and can start with blinking an LED and iteratively build your project and understanding - PX4/HoverGames development requires advanced experience with C/C++, Python, Java, XML, and more in order to work with the firmware, MAVSDK, simulators, messaging dialects and many other tools and frameworks required to even scrape the surface. After spending months on this project, it's really only the last few days or perhaps weeks that I've felt anything close to the level of mastery required to understand e.g. how PX4 talks to uORB and uORB talks to MAVLink and MAVLink talks to QGroundControl in order to start to execute my ideas. And even once concepts are grasped, hours and hours are continually lost due to having too new of a version of a particular tool or library, and nothing works until you track down the version mentioned in some 2017 GitHub issue in order to proceed. I've spent ninety-something percent of the copious time I've invested in the project coping with broken tools, outdated docs, untested examples, and generally smashing my head into stuff, with only the smallest sliver actually spent executing my ideas - but all that tracing and debugging has given me incredible insight into how the tiny subset of functionality that I've encountered so far works, which feels great! I almost feel like this first round of the HoverGames was just a warn-up, and the next round will let me stop crawling and start sprinting toward my ideas! 🏃💡
Next Steps/Future Enhancements 🔜 🔮All of the time spent wrestling with the tools and buggy examples resulted in the output possible in time for the contest deadline not accurately reflecting my mastery of the related concepts, so I'm really looking forward to the post-contest evolution of my project. I'd like to extend the Pixy2 integration with a companion MAVSDK-Python script that automatically generates maps from MAVLink messages. Now that I understand MAVLink, perhaps an even fancier, real-time client could be developed to render the PixyCam's findings. I would also like to get further into Missions to ensure complete coverage when surveying an area. Finally, it would be nice to transform the lat/long data to accurately represent the location of the identified flammable materials, vs. where the drone was when it saw them. And I can't wait to apply the extensive knowledge and experience I've gained from this challenge in whatever the next round brings!! 💪👨💻


Comments
Please log in or sign up to comment.