


Hardware components | ||||||
 |
| × | 1 | |||
 |
| × | 1 | |||
| × | 1 | ||||
Software apps and online services | ||||||
 |
| |||||
 |
| |||||
The humidity in your home can be a huge problem, you can use my other project, but that is just for monitoring.
If you want to make a better solution, use this project that will monitor the humidity for you and it will also try to regulate it with the fan that we will make smarter with NETIO smart power socket.
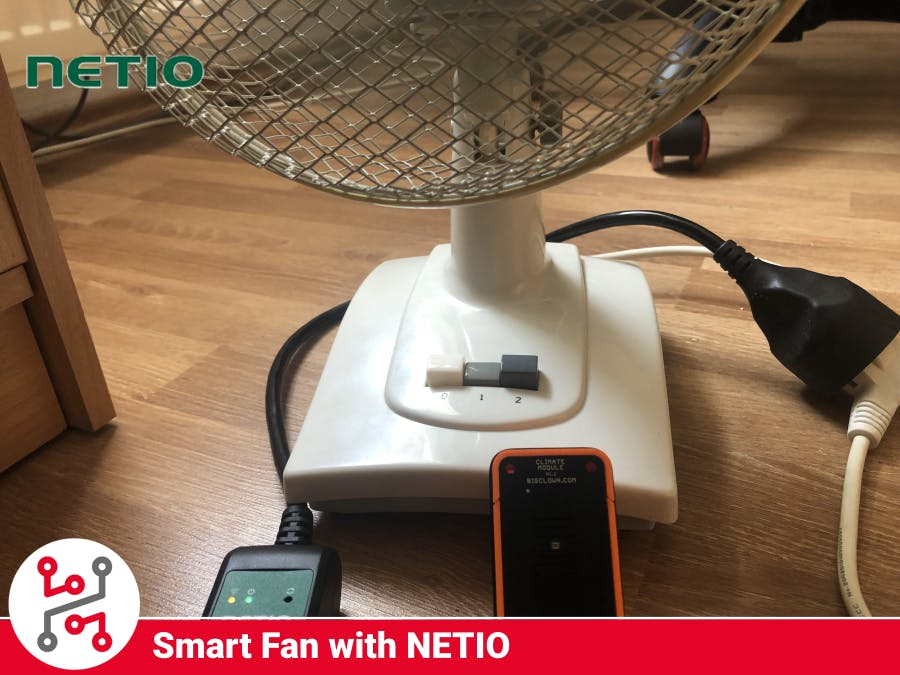
1. Build hardwareYou will need just the Climate Monitor Kit from HARDWARIO IoT Kit and NETIO smart socket, for this project it will be PowerCable REST 101x, For the assembly of Climate Monitor Kit you can watch the video below but it is really simple. Just put all the modules together.
Put all of that into the 3D-printed enclosure and you are done with the hardware for now.
The fan part is even easier. Take the fan, plug it out of the socket and put the NETIO smart socket in between.
Put the switch on the fan into the position when it is on and spinning, because the default state of the smart socket is on it should startup. If your fan has more than one speed I recommend to use the higher one.
If the fan didn't go on please check if the LEDs on the smart socket is on, if not you should try another power socket or contact NETIO support.
2. Flash firmware- Download HARDWARIO Playground.
- If you bought the ClimateMonitor Kit you will receive the Core Module with the firmware on it.
- Otherwise you can see documentation page on how to flash the firmware with HARDWARIO Playground.
- You will need the bcf-radio-climate-monitor firmware for this project.
You need to pair the Core module with the Radio dongle that you are using, follow the instructions below to see how it is done.
The same thing will go if you are using a Raspberry Pi as a server, just access the Raspberry through the IP address instead of the Playground
- Connect your USB Radio Dongle to your computer.
- Open HARDWARIO Playground
- Click Start Pairing the LED on the dongle should start blinking
- Connect the device that you want to pair into your computer or insert the batteries.
- Wait for the device to appear in the table
- It should add the device with the Alias: climate-monitor:0
- Click Stop Pairing
After you did all this you can unplug the device from the computer and insert the batteries, it will run on them without a problem. Next steps will be done on the computer, so you can leave the device and focus on the Playground.
4. Import functionOpen Node-RED in the Playground or Raspberry Pi and import the flow from the Attachments. In the Menu -> Import -> Clipboard. Do not forget to hit "Deploy" in the top right corner to apply the changes.
This function gets the relative humidity from the Climate Module and reacts to it. If the humidity is too high it turns the fan on until it is all right again.
Optimal values are between 40-50%. But if you want to make your own rules just open the Switch node and change the values there.
The first line is when the fan should be on and the second line where it should turn off.
So in this configuration, the fan will turn on when the relative humidity is higher than 55% and stay on until it drops under 44%.
You will have to change the IP address of your socket but more on that later.
5. Set up the NETIO smart socketYou should get the manual with the socket but if you are struggling with the set up you can follow the guide below.
- Plug the socket into the ordinary socket to power it up
- Click the network button.
- In the list you should see the network with name PowerCable-AP-xx.Instead of the "xx" there will be some numbers.
- Connect to this network and go to the IP address 10.0.42.1 in your browser. You should see something like this.
- Select your network and click Next. In the next step just fill in your password and click Next again.
- Get the IP address of the device on your network
- Log into the device. Default log in values are: "admin" and "admin".
- Go to M2M API Protocols tab
- Check all the boxes that will be needed. If you want you can fill up the Username and Password or you can leave it empty.
- Click Save Changes.
- You should have everything mandatory for this project ready now.
Now that you know the IP address of the socket you can finish setting up of the flow.
All you have to do is to open the HTTP Request (GET) and HTTP Request (POST) nodes and change the URL value.
Change the value according to this format:
http(s)://username:password@"IP-Address"/netio.xml
If you left your username and password blank at the previous step it will look like this:
http(s)://"IP-Address"/netio.xml
7. Test your deviceYou can put the Climate monitor kit into some humid room or you can try to blow on it with your hot breath, that can simulate the humidity, so you can see if the fan goes on or not.
Summary
The firmware that we are using sends a lot more information. You can make more graphs from the values like temperature, atmospheric pressure, etc.
You can plug almost anything into this socket, so you can maybe make a smart heating system, smart lights and many more There are a lot of possible projects.
Make your projects with devices from those two companies. With the sensors from HARDWARIO IoT Kit and smart sockets from NETIO you can make great stuff.
Feel free to ask any questions about this project.
- Visit HARDWARIO page on hackster.io for more interesting projects or go directly to their website
- Go to HARDWARIO documentation to learn more about their modules and other possibilities of the platform.
- Try more firmware from HARDWARIO Playground or write your own, it is easy to start.
- Because everything is Open source you can get all firmware on GitHub, get some inspiration and try to make your own applications.
- Get your own HARDWARIO Hub to replace your computer in this project so you have always access to your applications.
- Check out more applications that can be used with HARDWARIO IoT Kit in Integrations section.


Comments
Please log in or sign up to comment.