


Hardware components | ||||||
 |
| × | 1 | |||
 |
| × | 1 | |||
| × | 1 | ||||
| × | 1 | ||||
| × | 1 | ||||
| × | 2 | ||||
 |
| × | 23 | |||
 |
| × | 1 | |||
Software apps and online services | ||||||
| ||||||
 |
| |||||
Hand tools and fabrication machines | ||||||
| ||||||
| ||||||
| ||||||
Sometimes, it can be nice to know the climate and weather conditions around you. Perhaps you are in a hurry to get somewhere and want to know how warm it is outside. Or maybe you are worried about the humidity causing poorer air quality, and want to know whether you should still go for that run. Regardless of the purpose, people want to know this data. The Personal Air Monitor aims to bring this to them.
The Personal Air MonitorThe Personal Air Monitor is a convenient way to get real-time local sensor data directly to your phone or laptop. Conveniently located inside a portable, enclosed sensor station, the Personal Air Monitor provides a way to instantly know the weather and air conditions around you based on direct sensor measurement. Simple connectivity using Cayenne provides an easy to read dashboard interface for looking at different conditions, and events can be configured every hour to report conditions.
SparkFun Thing Dev ESP8266 Microcontroller
The board driving the sensor station is a SparkFun Thing ESP8266 Dev Board, which conveniently breaks out the pins of the ESP8266 into rows that lead down the board. The ESP8266 is a microcontroller that has on-board wireless connectivity, which Cayenne uses for data transmission.
Cayenne, Sensors, and Data Transmission
The sensor station has a few on-board sensors to measure the world around it. These include:
- Temperature
- Humidity
- Barometric Pressure/Altitude
The enclosure of the sensor station is waterproofed on the top and bottom, but the enclosure is lined with vents so the sensors inside can get accurate readings. However, the case is larger at the top than it is at the bottom, so rain does not enter the ventilated sides.
Every five seconds, data from the sensors on the device is transmitted over WiFi to Cayenne, where it is visible on the Cayenne dashboard. You can access this from either your phone or computer.
How to BuildYou will need the following components to build the sensor station:
- SparkFun ESP8266 Thing Dev Board
- 400 Tie Breadboard with Power Rails
- DHT22 Temperature and Humidity Sensor
- BMP180 Barometric Pressure Sensor*
- 10k Ohm resistor (pull-up for the DHT22)
- 23 jumper wires (more or less) of various sizes; see the Fritzing diagram
- Male USB Micro B to Male USB A cable
- Electrical Tape and Scissors
- Plastic ventilated enclosure
*: The BMP180 is a retired product. You may be able to find a few in certain places, but if you want to find the replacement, look for the BMP280. The libraries are slightly different, however, so you will need to replace all the functions for the BMP180 in the code with functions for the BMP280.
To build the sensor station, first assemble the circuit according to the following Fritzing diagram.
To attach the SparkFun Thing Dev, take a small solid core jumper wire, straighten it out, slide it through the pin you want to use, and bend the top down over the side of the board. You can also do this for the BMP180. If you'd like, you can solder these pins down.
After building the circuit, proceed through the following steps:
1. Plug a USB Micro cable into the SparkFun Thing Dev. It should be a fairly flexible cable.
2. Secure the SparkFun Thing Dev and BMP180 to the breadboard using electrical tape. This will allow them to be slightly more stable and prevent erratic jumper movement.
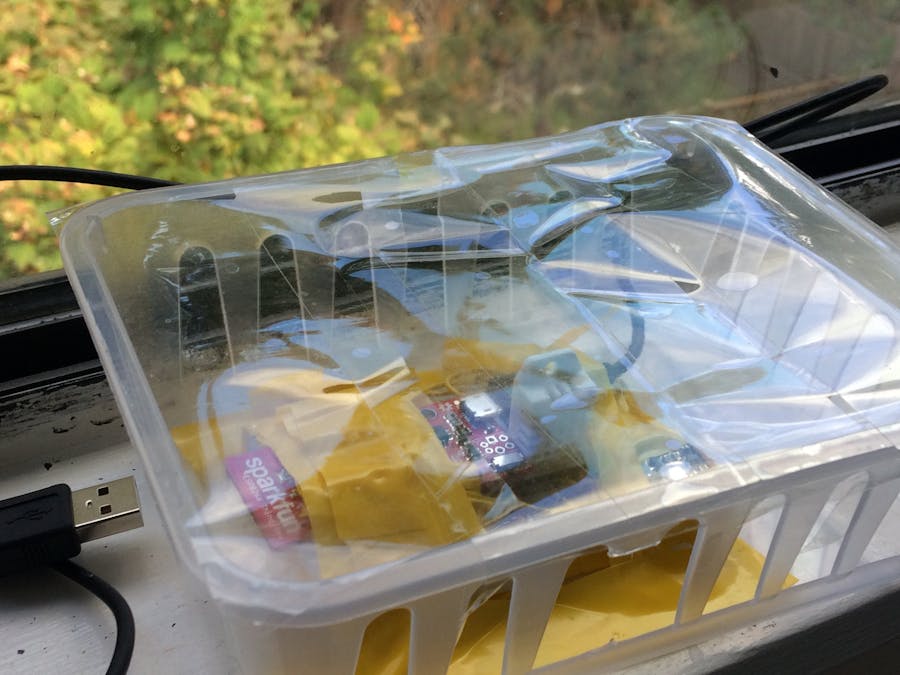
3. Insert the unit into the craft box and secure with electrical tape. Cut a small hole on the side so you can access the power switch. Thread the end of the USB cable through an available vent, or cut one of the tops of the vents and slide the cable in.
4. Seal the top of the craft box with clear tape.
5. Plug it in to your laptop and you're ready to program!
To program the sensor station, we use the Arduino IDE, which you can find over at arduino.cc
Download the latest version for your operating system.
In order to program the SparkFun Thing Dev with the program for the sensor station, you will need to do the following additional things:
1. Open File-Preferences and go to the box that says Additional Boards Manager URLs.
2. Type in the following into the box and then hit OK at the bottom of the preferences page:
https://raw.githubusercontent.com/sparkfun/Arduino_Boards/master/IDE_Board_Manager/package_sparkfun_index.json
This will allow you to upload the SparkFun ESP8266 package in the Boards Manager.
3. Close preferences and open Tools-Board-Boards Manager. Scroll down until you find SparkFun ESP8266 Boards. Click on it, and hit "Install". Wait for installation to finish, and close the boards manager.
4. Open Tools-Board and scroll down until you see SparkFun ESP8266 Thing Dev. Click on it, and then go back to Tools. When you plug in your board, you should be able to open port and find something that says COM #, where # would be the port the device is connected to.
5. Now you need to get the extra libraries. Go to Sketch-Include Library-Manage Libraries and search for the following:
- Adafruit Unified Sensor
- Adafruit BMP085 Unified
- Cayenne-MQTT-ESP8266
Click the install button for each to get the library.
You will need to find the DHT library online. Download it from this link:
https://github.com/adafruit/DHT-sensor-library
Then unzip the file (some OS' will do this automatically) and copy it into the libraries path of your Arduino IDE. This should be in your folder in your computer containing all your codes (the path would be in documents-Arduino). If it doesn't already exist, create a folder called libraries in the Arduino folder, then open it and paste the DHT library inside. Once you're done, you're ready to go!
Let's look at what we will be uploading. First, we include the sensor libraries:
#include <Adafruit_Sensor.h>
#include <DHT.h>
#include <DHT_U.h>
DHT_Unified dht(12, DHT22);
#include <Wire.h>
#include <Adafruit_BMP085_U.h>
Adafruit_BMP085_Unified BMP180 = Adafruit_BMP085_Unified(18001);
<Adafruit_Sensor.h> is a library used by the DHT22 and BMP180 sensors. It provides some common functions across all libraries.
<DHT.h> and <DHT_U.h> are libraries used for the DHT22 Temperature and Humidity sensor. The DHT22 has four pins, power, data, N/C and ground. Only one line is used for communication, and this line sends both temperature and humidity data. The Adafruit library provides a convenient way to read this data.
We create an object called dht and set it to pin 12, defined as a DHT22 unit.
<Wire.h> and <Adafruit_BMP085_Unified.h> are libraries for the BMP180. <Wire.h> is a library for Inter-IC Communication, or I2C, which is a two-wire control interface that allows multiple devices to be connected to one master. In this case, we are using a BMP180. <Adafruit_BMP085_Unified.h> is compatible with both the older BMP085 and the BMP180. It handles commands between the user and the Wire library, which in turn sends commands to the BMP180.
We create an object called BMP180 and give it an arbitrary ID number. You can change this, if you'd like.
Next, let's look at the Cayenne setup.
#include <CayenneMQTTESP8266.h>
char ssid[] = "SSID";
char wifiPassword[] = "password";
char username[] = "username";
char password[] = "password";
char clientID[] = "clientID";
<CayenneMQTTESP8266.h> is the library that handles communication between the SparkFun Thing Dev and Cayenne. It uses MQTT (message queue telemetry transport) for sending and receiving data. As it uses MQTT, it needs some identification information:
- ssid[] is your network ssid, or the name of your network. Type this in instead of "SSID".
- wifiPassword[] your network password. Replace "password" with it.
- username[], password[] and clientID[] are all Cayenne information, which you will learn how to find a bit later in this project. Once you get this information, replace "username", "password" and "clientID" with the actual information.
Remember to leave quotations around the information!
After defining these things, we can proceed to the setup for the sensor station. This function will run once.
void setup() {
 BMP180.begin();
 dht.begin();
 Cayenne.begin(username, password, clientID, ssid, wifiPassword);
}
This starts the BMP180, the DHT22, and Cayenne with begin() functions. Cayenne begins using the ID that you declared earlier.
Once the setup runs once, we go into an infinite loop. Before starting the loop, we declare a few variables.
boolean humidityStatus;
boolean temperatureStatus;
float humidityValue;
float temperatureValue;
float bmpTempValue;
float pressureValue;
float altitudeValue;
boolean bmpStatus;
float temperature;
These variables are used to make calculations and hold data in the loop.
- humidityStatus, temperatureStatus and bmpStatus are boolean variables. Boolean variables return either true or false. In this case they will be used to let the code know whether a sensor has returned data or not, or is available for checking.
- humidityValue, temperatureValue, bmpTempValue, pressureValue, altitudeValue and temperature are float variables. These are floating-point integers, which return two decimal places in Arduino. They will be used to hold the actual sensor values, and for the temperature variables make calculations.
Now we get into the loop! We start the loop by calling Cayenne.loop() to handle Cayenne operations.
void loop() {
Cayenne.loop();
Then we make a sensor event for the BMP180 so we can check if data is available.
sensors_event_t event;
BMP180.getEvent(&event);
if (event.pressure)
{
  bmpStatus = true;
  pressureValue = event.pressure;
  BMP180.getTemperature(&temperature);
  float seaLevelPressure = 1013;
  altitudeValue = BMP180.pressureToAltitude(seaLevelPressure, event.pressure);
}
else
{
  bmpStatus = false;
}
This block of code then uses an if statement to confirm that data is available. If it is, then the status is set to true and values are stored. In this case, these values are pressure, temperature, and altitude. Note that in order to calculate the altitude, the BMP180 has to do a bit of math involving current pressure and a sea level pressure. The seaLevelPressure value is where you can type this in. The Mean Sea Level Pressure is 101.3 kPa (1013 hPa for the code), but if you have a local sea level pressure (look it up online!), go ahead and type that in for much greater accuracy.
If there was no data, if perhaps the sensor was not available, the status variable is false.
After getting BMP180 data, we get the DHT22 data. The DHT22 returns both temperature (in Celsius) and humidity (in percentage).
sensors_event_t event1;
dht.temperature().getEvent(&event1);
if (isnan(event1.temperature)) {
  temperatureStatus = false;
}
else {
  temperatureStatus = true;
  temperatureValue = event1.temperature;
}
dht.humidity().getEvent(&event1);
if (isnan(event1.relative_humidity)) {
  humidityStatus = false;
}
else {
  humidityStatus = true;
  humidityValue = event1.relative_humidity;
}
Here we have one sensor event used to get the temperature and humidity events. isnan() is a mathematical function that checks if the data returned was a number. If it is a number, status will be set true and data will be recorded. Otherwise, status will be set false.
Now that we have the data, we can send it to Cayenne. First, we'll send humidity.
if (humidityStatus == true)
 {
   Cayenne.virtualWrite(0, humidityValue);
 }
This will only run if the humidity status variable was set to true. The function Cayenne.virtualWrite() is a function that can be used to upload data to Cayenne. The first variable, 0 is the channel number o be used. It will show up in the Cayenne dashboard, which we will go over later. The second variable is the data you wish to upload. In this case, its the humidity value being sent to Cayenne.
Second, let's send the temperature. As we have two on-board sensors, we can do a bit of mathematics here.
if (temperatureStatus == true)
{
  if (bmpStatus == true)
  {
    float averageTemp = (temperature + temperatureValue) / 2;
    Cayenne.virtualWrite(1, averageTemp);
  }
  else
  {
    Cayenne.virtualWrite(1, temperatureValue);
  }
}
else if (bmpStatus == true)
{
  Cayenne.virtualWrite(1, temperature);
}
First, we check if temperature from the DHT22 was available. If it was, we conduct a second check to see if BMP180 temperature data was available. If it turns out that data from both sensors was available, we take the average of the two by summing their values and dividing by half. However, if the BMP180 data was not available, we just use the DHT22 data. But if the DHT22 data was not available and the BMP180 data was, we use that to send to Cayenne. Channel 1 is used for temperature.
After that, we send the last two data values, which are pressure and altitude.
if (bmpStatus == true)
{
  Cayenne.virtualWrite(2, pressureValue);
  Cayenne.virtualWrite(3, altitudeValue);
}
Pressure takes channel 2, and altitude takes channel 3.
Finally, we end the loop with a 5 second delay. This is done to allow some time in between data uploads to Cayenne, as rapid updating can cause refresh problems and skip data values. The DHT22 also needs at least 2 seconds between sensor checks to allow all data to be received.
delay(5000);
}Now you are ready to configure Cayenne for the sensor station. We set this up using a computer for an easier configuration process. First, head to the website at https://mydevices.com/ and log in at your account if you have one. If you don't, click sign up and create an account with your name, email, and a password for your account. If you have an account click sign in and log into your account. After that, you should be able to get the choose device page. To find the SparkFun Thing Dev, search under "All Devices". You should then be able to find a username, password and client ID. These are the last few pieces of information you need to finish the code. Copy these and paste them in place of username, password and clientID in the code. Now you can upload the code to the SparkFun Thing Dev. This should only take a moment.
During uploading, two orange LEDs should be rapidly flashing on the SparkFun Thing Dev. Once they stop, open the Cayenne dashboard you finished configuring. You should then see a dashboard appear on the screen with four numbers on it. This is the Personal Air Monitor!
Now that you have the Personal Air Monitor set up, you can create some triggers for it. Click on Add New-Trigger, and you will be directed to a page where you can set up a trigger for your board. Give it a name, and drag the SparkFun Thing Dev to the if box. Then select your if statement. This could be a simple threshold of a sensor, or even the device being turned on or off. After that, hit setup notification and check the send email box if you want an email, or send text message if you want a text message. Hit "add custom recipient" to direct your message to another email account or phone number. Once you are done, hit save to create your trigger.
If you want to share your live data with other people around you, you can give them a link to your dashboard. First, click create project and give it a name. Then, drag the SparkFun Thing Dev into the overview and check it off. The data should then appear in your project overview. Once this appears, go to Sharing and check off Overview. Copy the given link and send it to your friends, and they can click on it to access your data.
If you'd like to see my data (if it happens to be online), click here: https://cayenne.mydevices.com/shared/59c809fd0733570755fefbf0
You can also access Cayenne on your mobile device for when you are on the go. To do so, look for the Cayenne app on your mobile device application store. Download the app (it's free!) and open it. Click add new device and look for the SparkFun Thing Dev. You should then be able to access your dashboard!
The convenient thing about using Cayenne for the Personal Air Monitor is that the sensor data is globally online. This means that it can be accessed and shared anywhere in the world! Therefore, if you were on vacation somewhere and wanted to know the air conditions for when you got back home in advance, you could open up Cayenne and read them! The same could also work in reverse, as you could actually have multiple sensor stations connected to your Cayenne account, or multiple Cayenne accounts, anywhere! This would allow you to create a global network of monitors, each set responsible for a particular area. This network would be able to simplify the connected world and provide a fast, simple and convenient way to get direct weather and air data right at your fingertips. The possibilities for the Personal Air Monitor with the power of Cayenne and the Internet of Things are endless.


_3u05Tpwasz.png?auto=compress%2Cformat&w=40&h=40&fit=fillmax&bg=fff&dpr=2)


Comments
Please log in or sign up to comment.