


Hardware components | ||||||
 |
| × | 1 | |||
A simple how-to guide to set up the ePWM module of your LaunchPad and increase / decrease the duty cycle with the two user buttons.
This can be a start point for your motor controller, LED dimmer or other PWM applications.
EXPERIENCE ZONE:- Education: a simple step-by step guide to get a working example.
- PWM signal with adjustable duty cycle
- all HALCoGen steps covered
- a few lines of code
- fully functional.
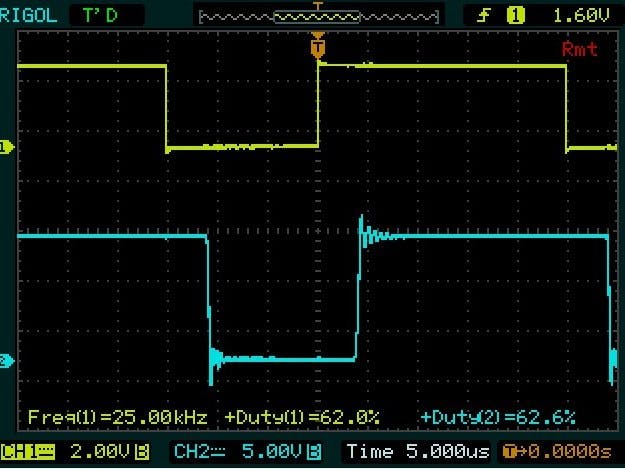
The project uses HALCoGen to set up a PWM signal of 25 kHZ (on the RM46) with 50% duty cycle on pin ETPWM1A (pin 16 on J11)
The user button A increases the duty cucle percentage with 1, and user button B decreases it with 1. The code takes care that the 0 and 100% border conditions are properly handled, and has a basic debounce feature.
It's only a few minutes of setup work in HALCoGen and less than 20 lines of user code, but you get a design that you can put tu use immediately.
HALCoGen setup:There are a few steps in HALCoGen to make the project work. I've split up in 4 parts:
- driver enable and PINMUX
- ePWM
- button A
- button B
We enable the GIO driver because it has the API to check button state, and because user button A is on GIO port B pin 2. NHET1 is enabled because user button 2 resides on NHET port 1, pin 15 (we don't use the NHET API in this project). ETPWM is enabled because that's our main functionality. We'll be using the API, and we set the characteristics for pin ETPWM1A.
The settings below will give us a clock of 25 kHz (period 40000 nanoseconds) and 50% duty cycle. This is how our LaunchPad will be configured at startup.
This one resides on GIO port B, pin 2. The caveat for button A is that it requires a setting on the Special PINMUX tab (see above) to work.
Because this pin is input, there isn't any additional HALCoGen config to do, except disabling the internal pullups. The LaunchPad has an external pullup,
Button B is on HET port 1, pin 15. You need to enabke HET1, so that the port definitions are generated by HALCoGen. The same remarks apply for the internal pull resistors.
That's it for HALCoGen. You can now generate the code.
Code Composer Studio:Here is the code you need in sys_main.c:
/* USER CODE BEGIN (4) */
bool buttonCheck() {
   volatile static uint32 uBtn_Usr_Bounce = 0U;
   if ((!(uBtn_Usr_Bounce & BTN_USRA)) && !gioGetBit(gioPORTB, 2)) {
       uBtn_Usr_Bounce += BTN_USRA;
   }
   if ((!(uBtn_Usr_Bounce & BTN_USRB)) && !gioGetBit(hetPORT1, 15)) {
       uBtn_Usr_Bounce += BTN_USRB;
   }
   if ((uBtn_Usr_Bounce & BTN_USRA) && gioGetBit(gioPORTB, 2)) {
       uBtn_Usr += BTN_USRA;
       uBtn_Usr_Bounce -= BTN_USRA;
   }
   if ((uBtn_Usr_Bounce & BTN_USRB) && gioGetBit(hetPORT1, 15)) {
       uBtn_Usr += BTN_USRB;
       uBtn_Usr_Bounce -= BTN_USRB;
   }
   return (uBtn_Usr > 0);
}
void adjustDutyCycle() {
   if ((uBtn_Usr & BTN_USRA) && (uDutyCycle < 4000U)) {
       uDutyCycle += 40;
   }
   if ((uBtn_Usr & BTN_USRB) && (uDutyCycle > 0U)) {
       uDutyCycle -= 40;
   }
   etpwmSetCmpA(etpwmREG1, uDutyCycle);
   uBtn_Usr = 0;
}
/* USER CODE END */
I have used this design in a project to fix a 1958 turntable.


Comments
Please log in or sign up to comment.