Number of passwords we have to remember is greater every day. Ever wanted some device that would remember all those passwords for you or even type them out without you even touching the keyboard?
This project presents one possible solution to this problem using Azure cloud ecosystem for password safekeeping and management and Azure Sphere IoT device for secure password delivery right to your fingertips.
This diagram shows basic building blocks of this project and their interconnection. Usernames and passwords are securely stored in Azure KeyVault. These items are accessed and managed using a web application running on Azure App Service. On user's request selected login details are sent via Azure IoT Hub to Azure Sphere IoT device. From there login data can be sent either immediately or on press of a button to USB keyboard emulator which would 'type' them on target device.
This way we can use advanced Azure cloud security features on complete chain from password storage to its delivery to target system. We can enter login data to any device supporting USB keyboard input.
Project setupThis project consists of a few independent parts and applications which have to be installed and precisely configured so that they can work together. We start by setting up Azure services.
Create Resource Group
This resource group will be used for holding all Azure related project parts neatly in one place.
Login to Azure Portal and set up new Resource group according to following slides:
Create KeyVault
KeyVault will hold all your secrets and passwords securely encrypted.
See slideshow below on how to create KeyVault. At step 3 select service region closest to you geographically, also make sure that Pricing tier is set to Standard. Take note of KeyVault name as you will need it later.
CreateIoT Hub
IoT Hub takes control of your Iot Devices and in this project will enable connection to your Azure Sphere kit.
The slideshow below shows all steps necessary to create Azure IoT Hub service. At step 3 select service region closest to you geographically. At step 4 make sure that Pricing tier is set to Free, if you this is your first IoT Hub and you just want to test this project. Also IoT Hub name will be needed later.
Now your resource group will look like this:
Create IoT Device
Create IoT device as shown on slides below. Take note of IoT device name (Device ID) as you will need it later.
Obtain Connection strings
For this project we will need IoT Hub service Connection string and IoT device Connection string. You will find those strings at locations shown below, copy them to some text file as you will need those later.
DeployWeb Application
Clone project repository to a local directory. Note: this project uses Git submodules, clone using --recurse-submodules:
git clone --recurse-submodules https://github.com/jgroman/azsphere_pwd_man.gitMake sure your Visual Studio 2019 has ASP.NET and Azure development workloads installed. Open SpherePasswordManager solution, open appsettings.json file and put your KeyVault name as KeyVaultName value.
Now you can publish the webapp as shown on slides below. When creating new App Service at step 3, make sure correct Azure account is selected. Note: if step 6 - webapp publishing - fails, you may need to install Microsoft Web Deploy tool.
Enable WebApp access to KeyVault
Before you can use your newly published WebApp, KeyVault access rights have to be granted to it.
Configure WebApp
You will now set Web App configuration and enter IoT Device name and IoT Hub Service Connection string. If you encounter errors opening WebApp configuration page, you might have forgotten to edit appsettings or grant WebApp permissions in previous step.
Secure WebApp access
Now the WebApp has to be secured so that only you can use it.
Install Pro Micro Application
Pro Micro board is in this project used as a simple I2C to USB keyboard bridge. Any character received from I2C is sent to USB as an emulated keypress.
If you are not familiar with ATmega32U4 Pro Micro boards, you can read tutorial here. Connect Pro Micro board using USB cable to your computer, open i2c_usb_keyboard.ino sketch in Arduino IDE and flash it to Pro Micro.
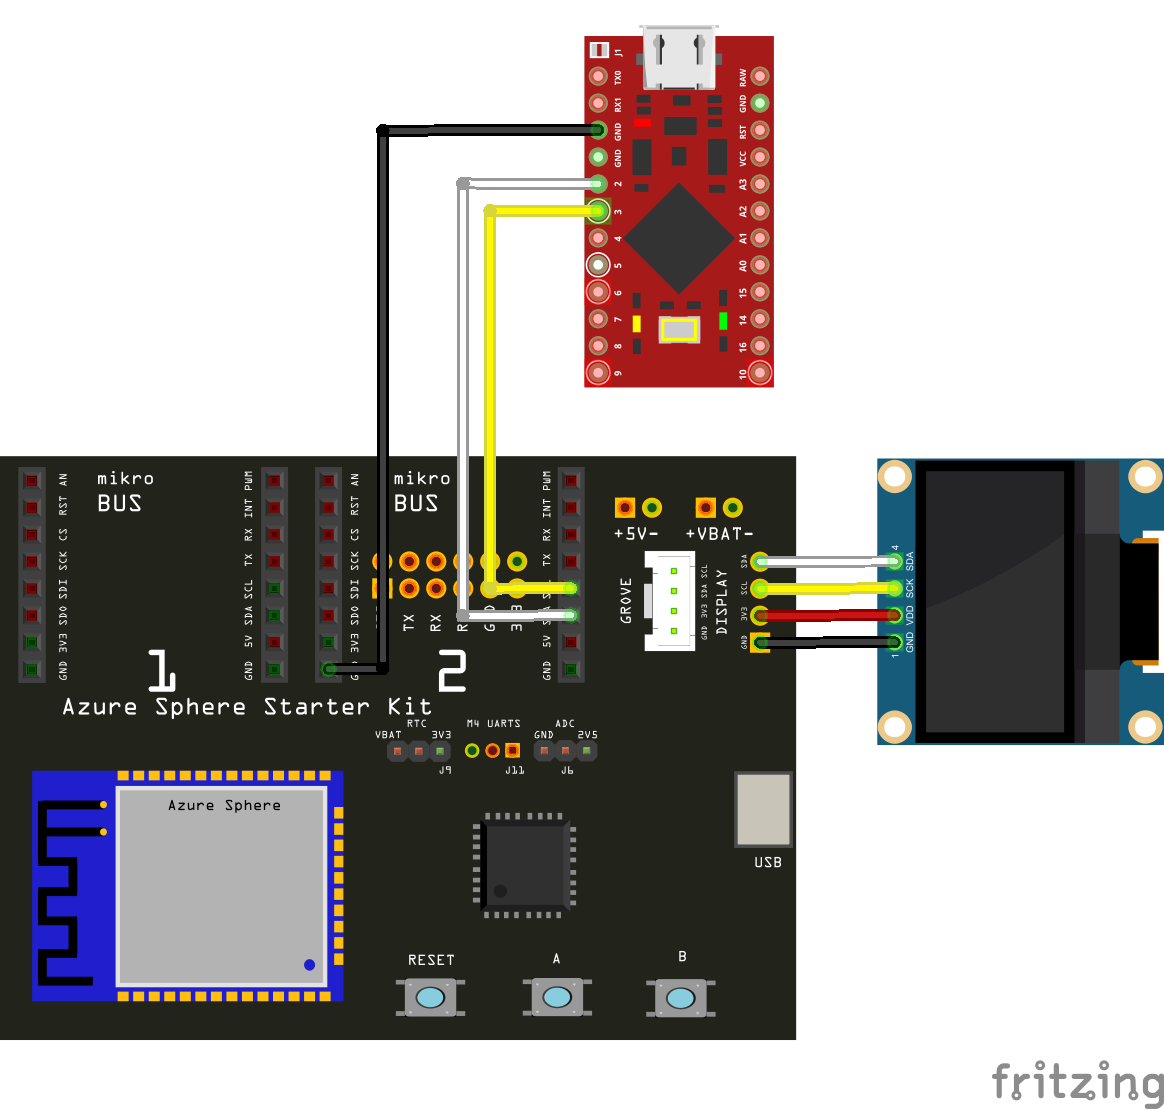
Now you can connect Azure Sphere Starter Kit and Pro Micro board according to schematic on bottom of this page.
InstallAzure Sphere Application
Make sure you have Azure Sphere SDK installed on your computer, start Visual Studio 2019 and open azsphere_pwd_man solution. Put IoT Device Connection string as MY_CONNECTION_STRING value in connection_strings.h. Put IoT Hub name to AllowedConnections in app_manifest.json.Build and upload application to Azure Sphere kit.
Now the application is running and you should see Ready message on the display. And the project is, indeed, ready to use.
Open the WebApp in a browser. Add new items using New Item menu option:
Only Item Name and Password are mandatory, adding Username is optional. You can also insert Enter after Username and/or Password. Optionally Username and Password can be typed out in one block separated by TAB character - this can be useful for web login forms. Username and Password can be preloaded to Azure Sphere and typed out on a click of a button. Optionally they can be also typed out immediately after clicking the item in WebApp - this is great when controlling WebApp from your phone as you just position cursor to login form and click the required item in WebApp UI.
Azure Sphere seems to forget preloaded item after a few minutes
This is actually a built-in security feature. You can set this delay length by editing PERIOD_TO_FORGET_SEC in main.c.
Problemsduring system operation
Common operational errors are displayed in WebApp. For example if the Azure Sphere is disconnected, you'll see timeout error:


_3u05Tpwasz.png?auto=compress%2Cformat&w=40&h=40&fit=fillmax&bg=fff&dpr=2)

Comments
Please log in or sign up to comment.