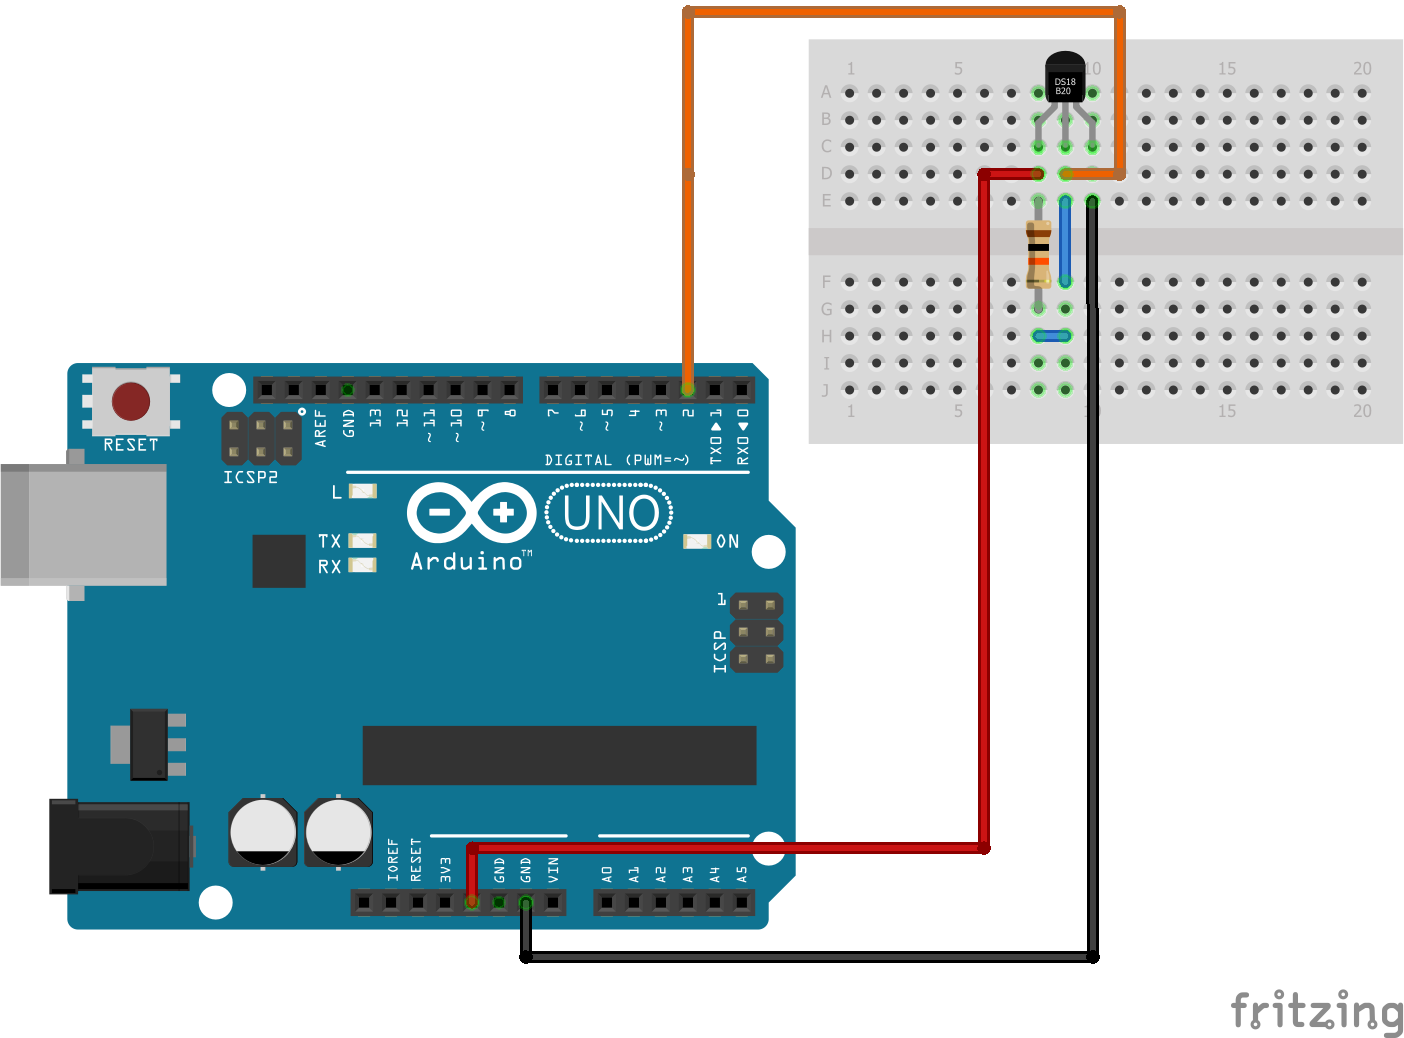
Ok, so oled is optional. Lets come to interface:
So if you use DS18B20 waterproof probe, the :-
*red is vcc
*black is gnd
*yellow is data(digital).
And if you use other one, this is labeling
I am using the waterproof probe(using other one in diagram)
For connection I am giving a 5v supply to probe, and connecting the data pin to pin 2 in arduino UNO(and gnd to gnd).
And you have to connect a 10k resistor from the vcc pin of probe to the data pin of probe(a 4.7k resistor will also work). Then do the connection.
(This one for non oled version)
Lets come to software part:-
You need to install library. For that, go in library manager (in arduino IDE) then search " DS18B20 ". You will find one with the name " Dallas Temperature ". Install it.
Then go to examples > Dallas temperature > Single
then upload that example. (After it open serial monitor and you should see the result)
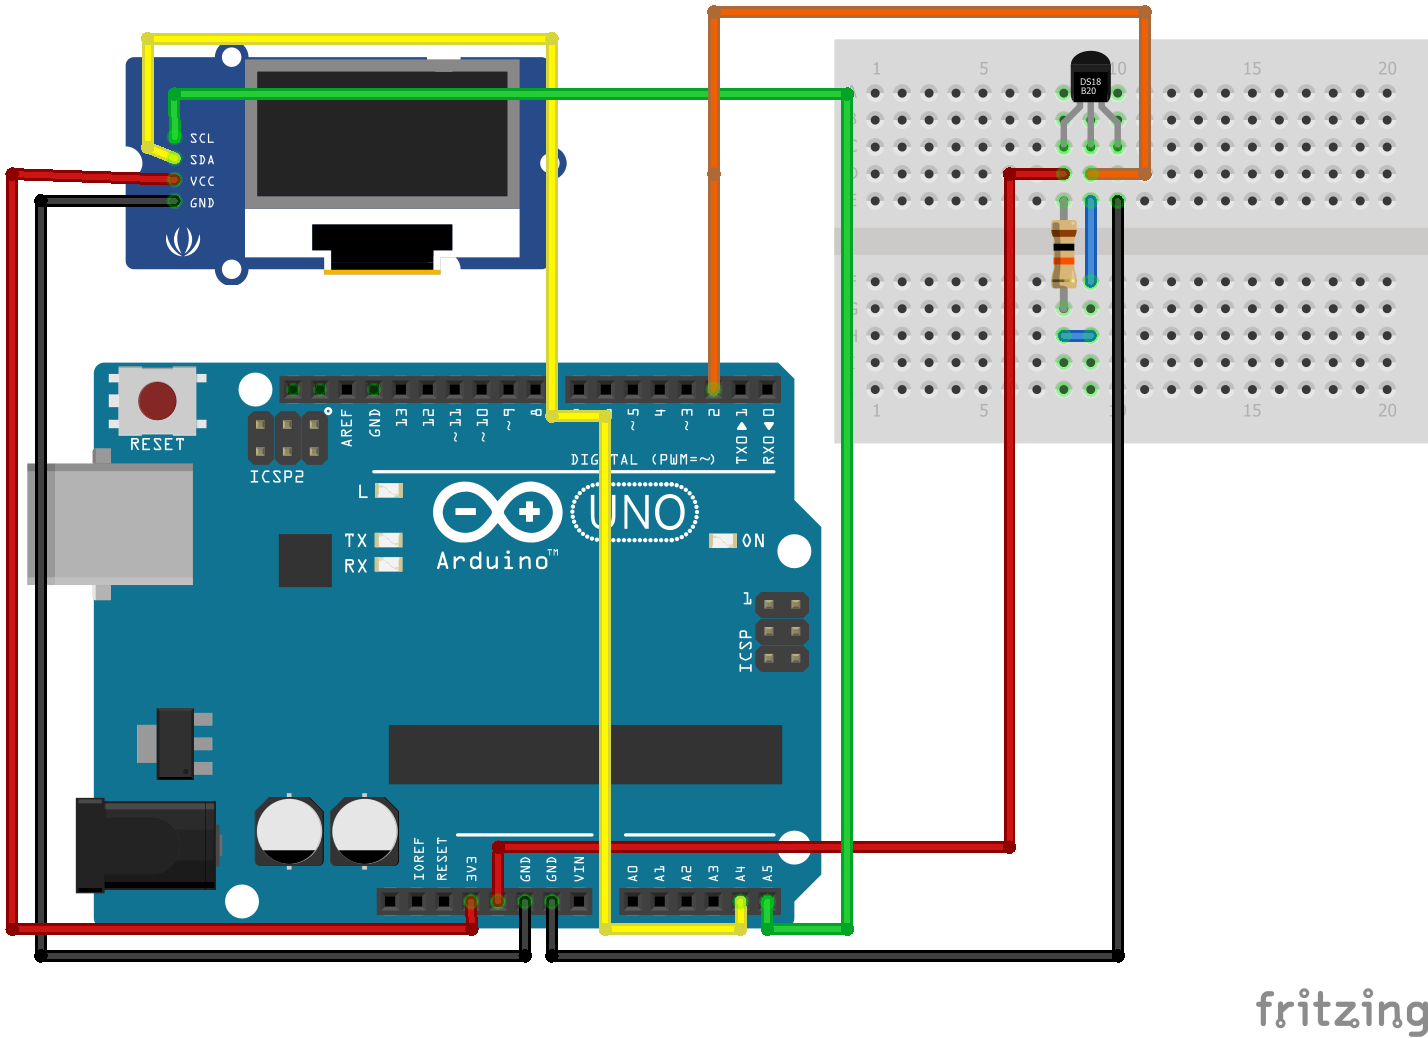
OLED(I2C) VERSION!Now, for this, I modified the example code(you will see output in *C only).
This will be the circuit:-
This will be the code:-
// Include the libraries we need
#include <OneWire.h>
#include <DallasTemperature.h>
#include <SPI.h>
#include <Wire.h>
#include <Adafruit_GFX.h>
#include <Adafruit_SSD1306.h>
#define SCREEN_WIDTH 128 // OLED display width, in pixels
#define SCREEN_HEIGHT 32 // OLED display height, in pixels
#define OLED_RESET     -1 // Reset pin # (or -1 if sharing Arduino reset pin)
#define SCREEN_ADDRESS 0x3C ///< See datasheet for Address; 0x3D for 128x64, 0x3C for 128x32
Adafruit_SSD1306 display(SCREEN_WIDTH, SCREEN_HEIGHT, &Wire, OLED_RESET);

// Data wire is plugged into port 2 on the Arduino
#define ONE_WIRE_BUS 2

// Setup a oneWire instance to communicate with any OneWire devices (not just Maxim/Dallas temperature ICs)
OneWire oneWire(ONE_WIRE_BUS);

// Pass our oneWire reference to Dallas Temperature.
DallasTemperature sensors(&oneWire);

// arrays to hold device address
DeviceAddress insideThermometer;

/*
 * Setup function. Here we do the basics
 */
void setup(void)
{
  // start serial port
  Serial.begin(9600);
  Serial.println("Dallas Temperature IC Control Library Demo");

  // locate devices on the bus
  Serial.print("Locating devices...");
  sensors.begin();
  Serial.print("Found ");
  Serial.print(sensors.getDeviceCount(), DEC);
  Serial.println(" devices.");

  // report parasite power requirements
  Serial.print("Parasite power is: ");
  if (sensors.isParasitePowerMode()) Serial.println("ON");
  else Serial.println("OFF");

  // Assign address manually. The addresses below will beed to be changed
  // to valid device addresses on your bus. Device address can be retrieved
  // by using either oneWire.search(deviceAddress) or individually via
  // sensors.getAddress(deviceAddress, index)
  // Note that you will need to use your specific address here
  //insideThermometer = { 0x28, 0x1D, 0x39, 0x31, 0x2, 0x0, 0x0, 0xF0 };

  // Method 1:
  // Search for devices on the bus and assign based on an index. Ideally,
  // you would do this to initially discover addresses on the bus and then
  // use those addresses and manually assign them (see above) once you know
  // the devices on your bus (and assuming they don't change).
  if (!sensors.getAddress(insideThermometer, 0)) Serial.println("Unable to find address for Device 0");

  // method 2: search()
  // search() looks for the next device. Returns 1 if a new address has been
  // returned. A zero might mean that the bus is shorted, there are no devices,
  // or you have already retrieved all of them. It might be a good idea to
  // check the CRC to make sure you didn't get garbage. The order is
  // deterministic. You will always get the same devices in the same order
  //
  // Must be called before search()
  //oneWire.reset_search();
  // assigns the first address found to insideThermometer
  //if (!oneWire.search(insideThermometer)) Serial.println("Unable to find address for insideThermometer");

  // show the addresses we found on the bus
  Serial.print("Device 0 Address: ");
  printAddress(insideThermometer);
  Serial.println();

  // set the resolution to 9 bit (Each Dallas/Maxim device is capable of several different resolutions)
  sensors.setResolution(insideThermometer, 9);

  Serial.print("Device 0 Resolution: ");
  Serial.print(sensors.getResolution(insideThermometer), DEC);
  Serial.println();
  if(!display.begin(SSD1306_SWITCHCAPVCC, SCREEN_ADDRESS)) {
    Serial.println(F("SSD1306 allocation failed"));
    for(;;); // Don't proceed, loop forever
  }
}

// function to print the temperature for a device
void printTemperature(DeviceAddress deviceAddress)
{
  // method 1 - slower
  //Serial.print("Temp C: ");
  //Serial.print(sensors.getTempC(deviceAddress));
  //Serial.print(" Temp F: ");
  //Serial.print(sensors.getTempF(deviceAddress)); // Makes a second call to getTempC and then converts to Fahrenheit

  // method 2 - faster
  float tempC = sensors.getTempC(deviceAddress);
  if(tempC == DEVICE_DISCONNECTED_C)
  {
    Serial.println("Error: Could not read temperature data");
    return;
  }
display.clearDisplay();
display.setTextSize(2);
display.setTextColor(SSD1306_WHITE);
display.setCursor(0,0);
display.print("Temp(*C):-");
display.setCursor(0,17);
display.print(tempC);
display.display();
}
/*
 * Main function. It will request the tempC from the sensors and display on Serial.
 */
void loop(void)
{
  // call sensors.requestTemperatures() to issue a global temperature
  // request to all devices on the bus
  Serial.print("Requesting temperatures...");
  sensors.requestTemperatures(); // Send the command to get temperatures
  Serial.println("DONE");

  // It responds almost immediately. Let's print out the data
  printTemperature(insideThermometer); // Use a simple function to print out the data
}

// function to print a device address
void printAddress(DeviceAddress deviceAddress)
{
  for (uint8_t i = 0; i < 8; i++)
  {
    if (deviceAddress[i] < 16) Serial.print("0");
    Serial.print(deviceAddress[i], HEX);
  }
}
Enjoy! (peace)
Working Video:-


_ztBMuBhMHo.jpg?auto=compress%2Cformat&w=48&h=48&fit=fill&bg=ffffff)


Comments
Please log in or sign up to comment.