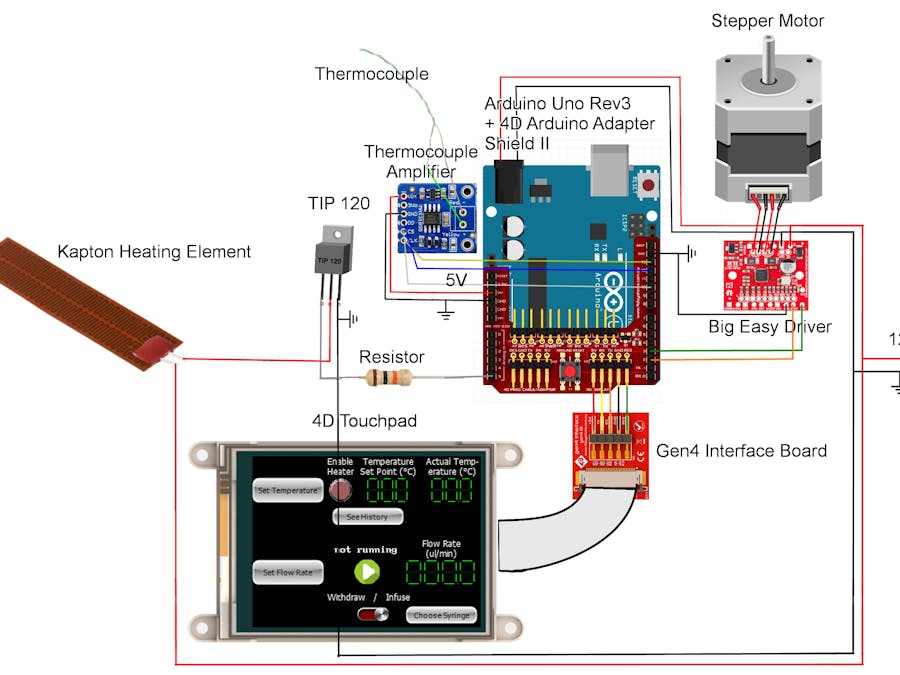
We are constructing a handheld syringe pump with an included heating element for microfluidic applications. An Arduino is used as the central controlling element. It adjusts the temperature via a mantle-type heating element wrapped around the syringe, and sets the flow rate and target volume by regulating the rotation of a stepper motor. The settings can be changed and parameters displayed with an interactive touchscreen. A 3D-printed structure is used making the device light, inexpensive, and easy to replicate. The temperature control provides a novel feature, making the device an ideal tool for microfluidic cell culture applications.
Hardware documentation and part list
The device is powered by a 12 V power supply. All the components which draw a lot of power (i.e., the Arduino, the stepper motor and the heating element) were chosen so that they can work with that exact voltage. The power supply simply has to be powerful enough to handle the current, so we chose a 60W power supply which should be easily enough. The mechanics for withdrawing and infusing the syringe rely on the following open-source project: http://www.appropedia.org/Open-source_syringe_pump. One can download the parts for printing here: https://www.youmagine.com/designs/syringe-pump.
The heating element comprises of a temperature sensor (k-type thermocouple, connected to a thermocouple amplifier (Max31855 Breakout) and a 12 V kapton heating element. The temperature data between the amplifier and the arduino is sent using hardware SPI, so only the PINs shown in the schematic below can be used. The power send to the heating element can be controlled using the analog output A5 of the Arduino and a transistor (TIP 120), which opens the channel between Collector and Emittor when the analog output of the Arduino is HIGH. A resistor is inserted between the Arduino and the Base of the transistor to protect it from too high currents. Due to the PWM nature of the analog output of the Arduino, the transistor rapidly switches between ON and OFF states thus effectively creating analog states from 0 (0% heating power) to 255 (100% heating power).
The syringe is wrapped in aluminum adhesive tape to improve heat conduction and the thermocouple is attached at the front of the syringe. The kapton heating element is wrapped around the aluminum tape using velcro.
The 12V bipolar stepper motor for controlling the liquid flow is driven by the Big Easy Driver (http://www.schmalzhaus.com/BigEasyDriver/) and controlled via the digital outputs 2 (connected to STEP) and 3 (connected to DIRection) of the Arduino.
The following hardware is used in our setup:
Item
Supplier
Catalogue Number
Price in £ (Oct. 2017)
Arduino Uno Rev 3 RS Components 715-4081 15.16 4D Systems gen4-uLCD-32DT-AR TFT LCD Colour Display / Touch Screen, 3.2in, 240 x 320pixels RS Components 125-8022 46.00 RS pro 60 W plug in power supply RS Components 816-0090 26.35 Stepper Motor - 4-wire 200 steps/rev, 12V 400mA ModMyPi MMP-0255 21.49 Polyimide Heater Mat, 25mm x 100mm x 0.2mm RS Components 798-3753 34.44 ON Semi TIP120G NPN Darlington Pair, 8 A 60 V HFE:1000, 3-Pin TO-220 RS Components 774-3653 0.38 Big Easy Driver Digikey 1568-1066-ND 15.40 2x SKF Linear Ball Bearing RS Components 284-9138 24.48 Coupler MCLX-5-5-A id 5 mm od 15mm RS Components 435-1150 22.08 Threaded rod M5 stainless steel RS Components 280-385 15.62 Bearing Miniature Ball Bearing 625-2Z 5mm I.D RS Components 618-9907 1.31 Code documentation
4D touchpadThe code used to interact with the touchscreen is programmed with Workshop using Visi Genie (http://www.4dsystems.com.au/product/4D_Workshop_4_IDE/). The main file "syringepump.4DGenie" and the supplementary files containing images and the keyboard layouts in the folder "syringepump.ImgData" are uploaded to the 4D touchscreen.
The program allows for setting the following parameters:Temperature set point, Heater ON/OFF, flow rate (in ml/min), choice of syringe (1, 3, 5, 10, 20, 30 ml BD Plastipak), motor rotation ON/OFF, withdrawal/infusion mode.
The screen displays the current temperature, also in a plot over time, the flow rate, the choice of syringe, and the motor status.
ArduinoThe code in "SyringePump.ino" is uploaded to the Arduino.
Interaction with 4D Systems touchpadThe ViSi-Genie-Arduino Library is necessary to send information via a serial port (souch as flow rate, the set point for the temperature, the current temperature, etc.) between the Arduino and the 4D touchpad, see https://github.com/4dsystems/ViSi-Genie-Arduino-Library.
PID heating controllerThe data between the thermocouple amplifier is sent using hardware SPI (quicker than software SPI, and frees up resources on the Arduino compared to software SPI), so the library SPI.h (standard in Arduino IDE) is used. The library Adafruit_MAX31855 (https://github.com/adafruit/Adafruit-MAX31855-library) is used to simplify reading temperature values from the thermocouple. The temperature control uses a PID algorithm (https://en.wikipedia.org/wiki/PID_controller), which has been implemented in this library: https://github.com/br3ttb/Arduino-PID-Library/. The temperature data from the thermocouple is used as the input for the algorithm, and the PID output is sent to the analog output PIN as a PWM wave, updated once every second. In this way the power to the heating element can be controlled from 0 to 100% in 255 steps.
Stepper motor controlThe setting of the rotational speed of the stepper motor is done by implementing the AccelStepper library (https://github.com/waspinator/AccelStepper). The stepper motor rotational speed (in motor steps per second) is calculated from the parameters flow rate (in ml/min) and syringe diameter (in mm) using the formula
rotational speed = flow rate / (60 · 3.14159 · diameter · diameter · 0.001/4 · 0.8) · 3200.
The factor of 3200 = 200 · 16 is needed, since the used stepper motor needs 200 steps for a full rotation, and the Big Easy driver uses a 16 microstepping mode in the standard configuration. The factor 0.8 mm is the slope of the M5 threaded rod. For withdrawing the syringe, the rotational speed is multiplied by -1, inverting the rotational direction of the stepper motor.
Biomaker Challenge 2017: Team 19
 Jim Haseloff


Comments
Please log in or sign up to comment.