

Hardware components | ||||||
| × | 1 | ||||
| × | 1 | ||||
| × | 2 | ||||
 |
| × | 2 | |||
| × | 1 | ||||
| × | 1 | ||||
| × | 1 | ||||
Software apps and online services | ||||||
 |
| |||||
Hand tools and fabrication machines | ||||||
 |
| |||||
 |
| |||||
In the year 1958 – fourteen years before the 1972 debut of Pong — a physicist named William Higinbotham demonstrated a remarkable video game called Tennis for Two. I have attached an article from Creative Computing - 1982 - 10 if you want to read more about what is probably the first video game.
Windell Oskay from Evil Mad Scientist Laboratories recreated this game in 2008 for a ATmega168 processor (See Resurrecting Tennis for Two, a video game from 1958).
This project is a redesign of this game. It uses a more modern microprocessor, a custom PCB and a 3D printed case.
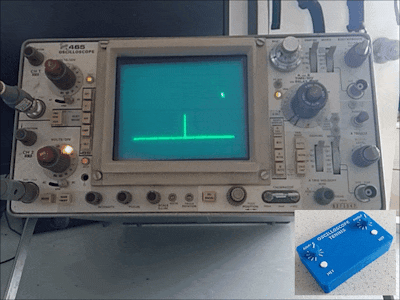
DemonstrationEach player has a button to hit the ball and a control to determine what angle the "racket" will hit the ball at. The racket isn't shown on the screen. Pressing your button while the ball is on your side of the court will send the ball back towards your opponents side at the angle set by your control. Pressing your button while the ball is on the opponents side of the net will cause you to immediately lose the point.
"Tennis - Box.stl" - 0.2mm layer height, no supports
"Tennis - Lid.stl" - 0.2mm layer height, no supports
"Tennis - Text.stl" - 0.2mm layer height, no supports, change to a contrasting filament at the start of layer 4.
"Tennis - Knobs.stl" - 0.2mm layer height, no supports, change to a contrasting filament at the start of layer 41.
Join "Tennis - Text.stl" to "Tennis - Lid.stl" using double-sided tape or glue.
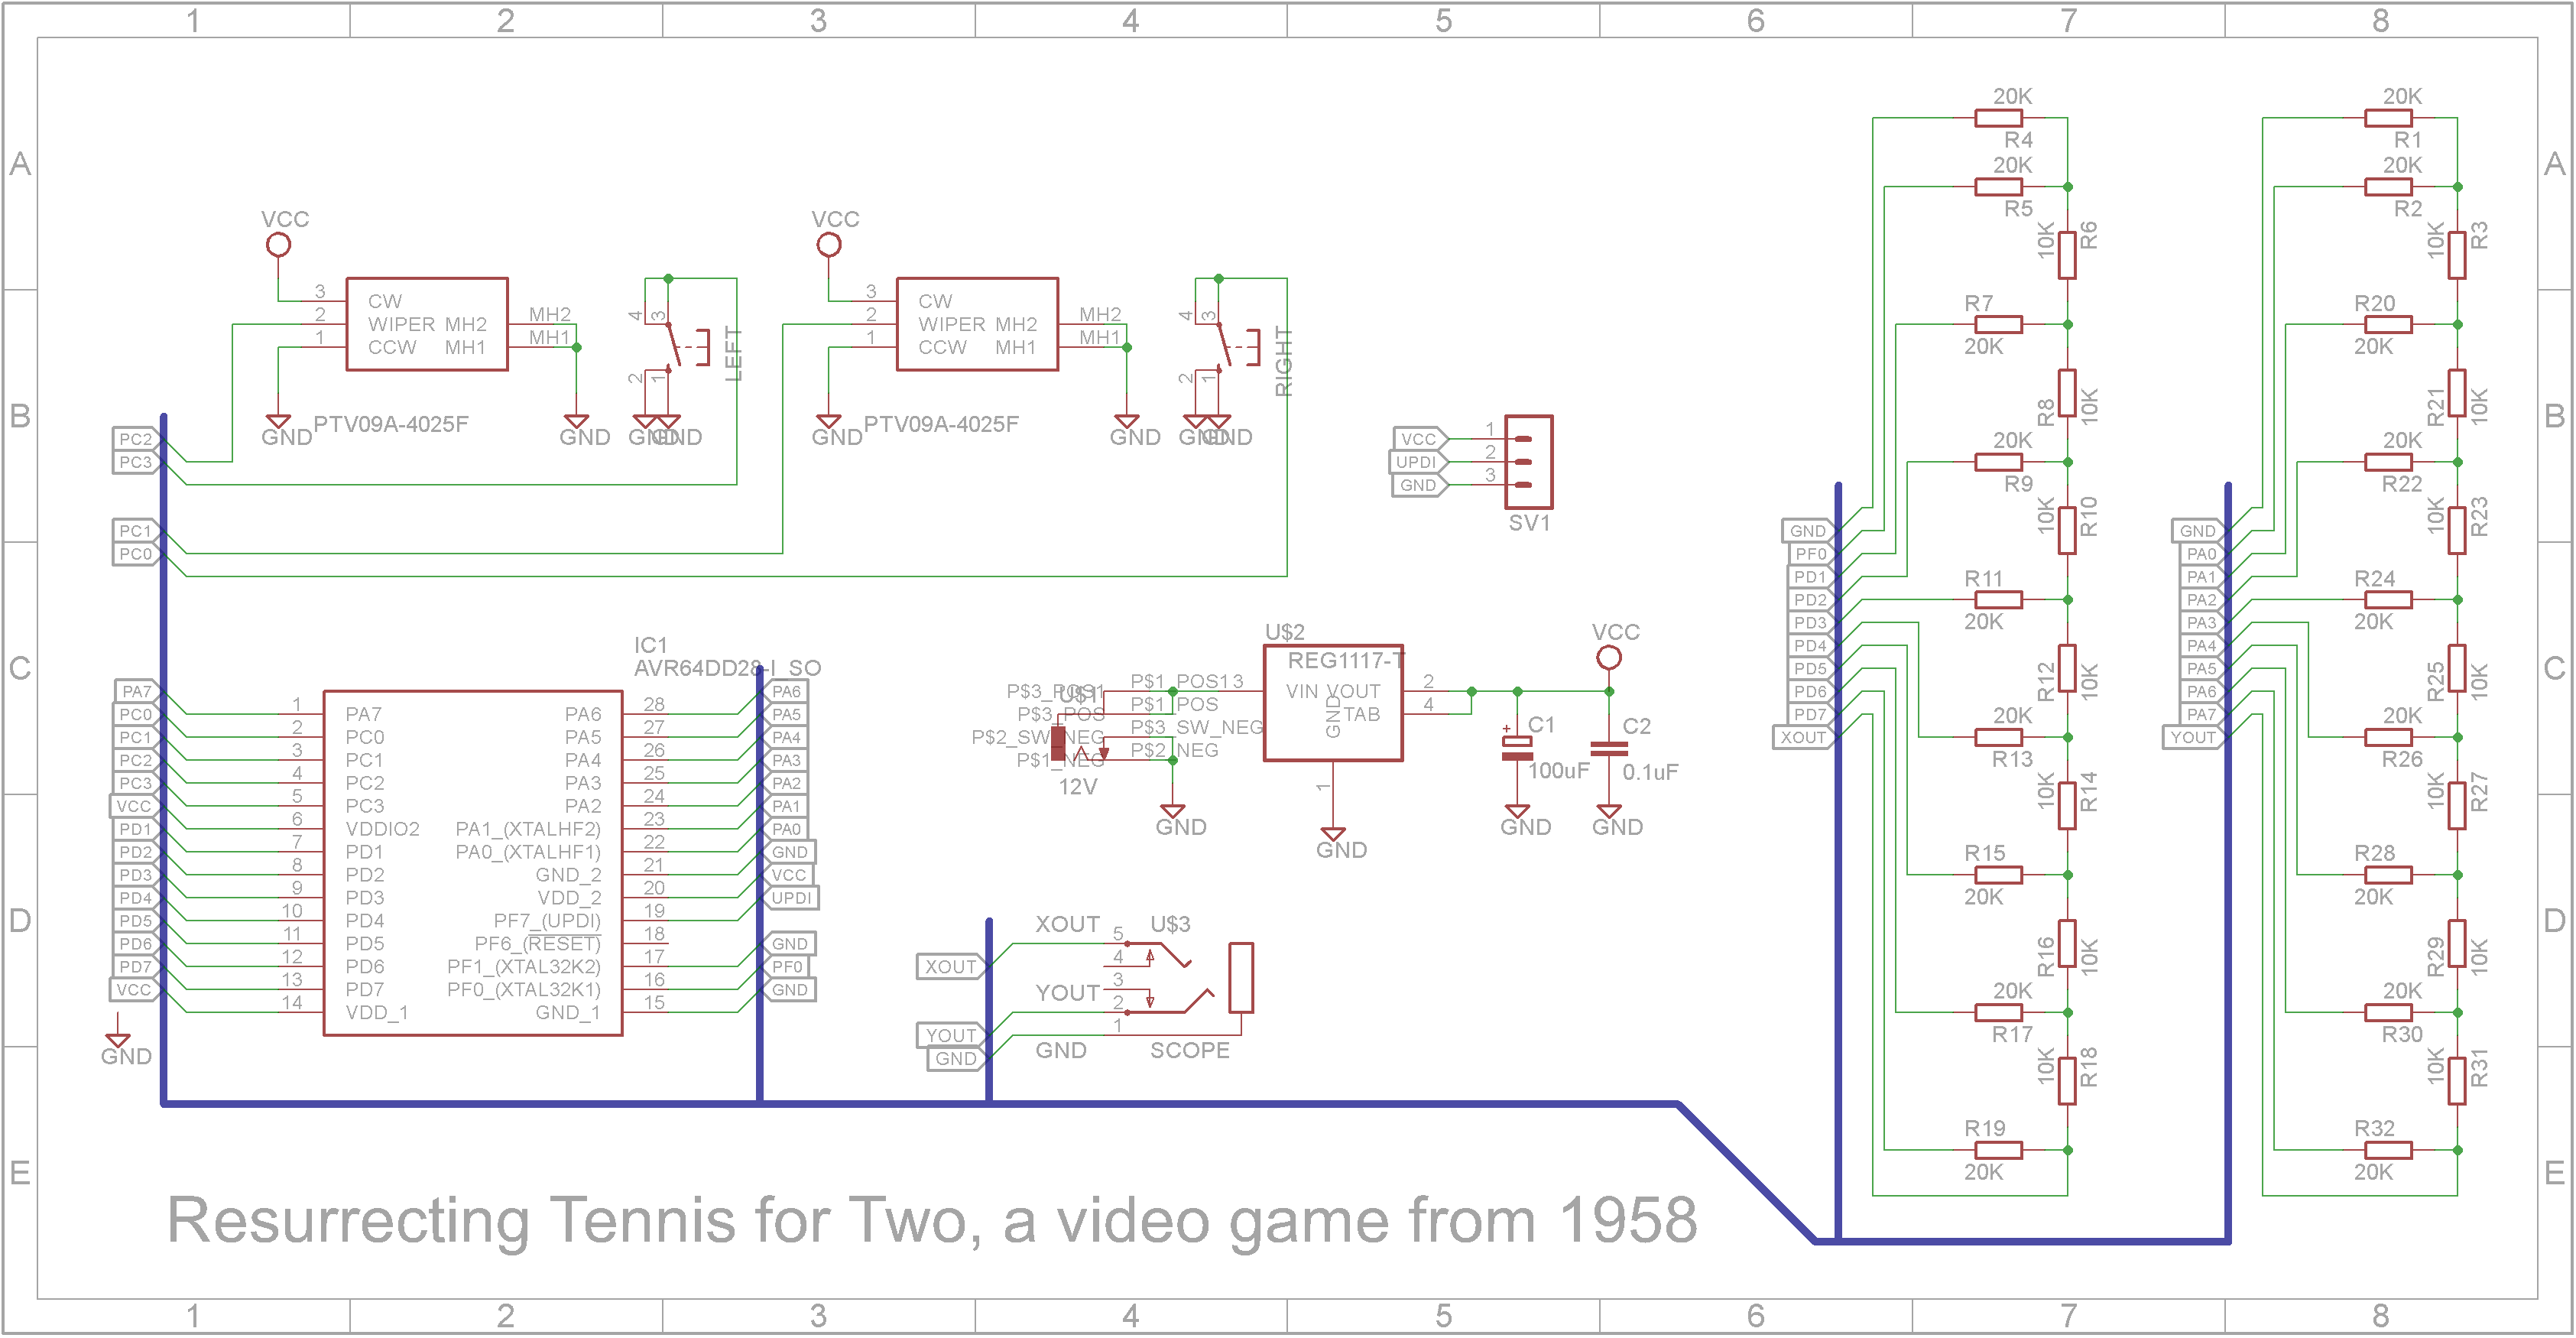
Circuit designThe major change to the Evil Mad Scientist Laboratories version is replacing the ATmega168 microprocessor with the recently released AVR64DD28 microprocessor. This processor has 64KB Flash memory and 8KB static RAM and comes in a 28 pin SOIC package.
Even though the AVD64DD28 comes with a built in Digital-to-Analog Converter (DAC), I didn't use it and instead used two R-2R ladder networks to create the analog outputs for the X and Y axis for the oscilloscope. The oscilloscope is configured to operate in X-Y mode.
One of the goals of this project was to test out the new AVR DD series microprocessors from Microchip. Since the game wasn't intended to be played on a regular basis, both player controls were added to the main PCB rather than using separate plug-in controllers.
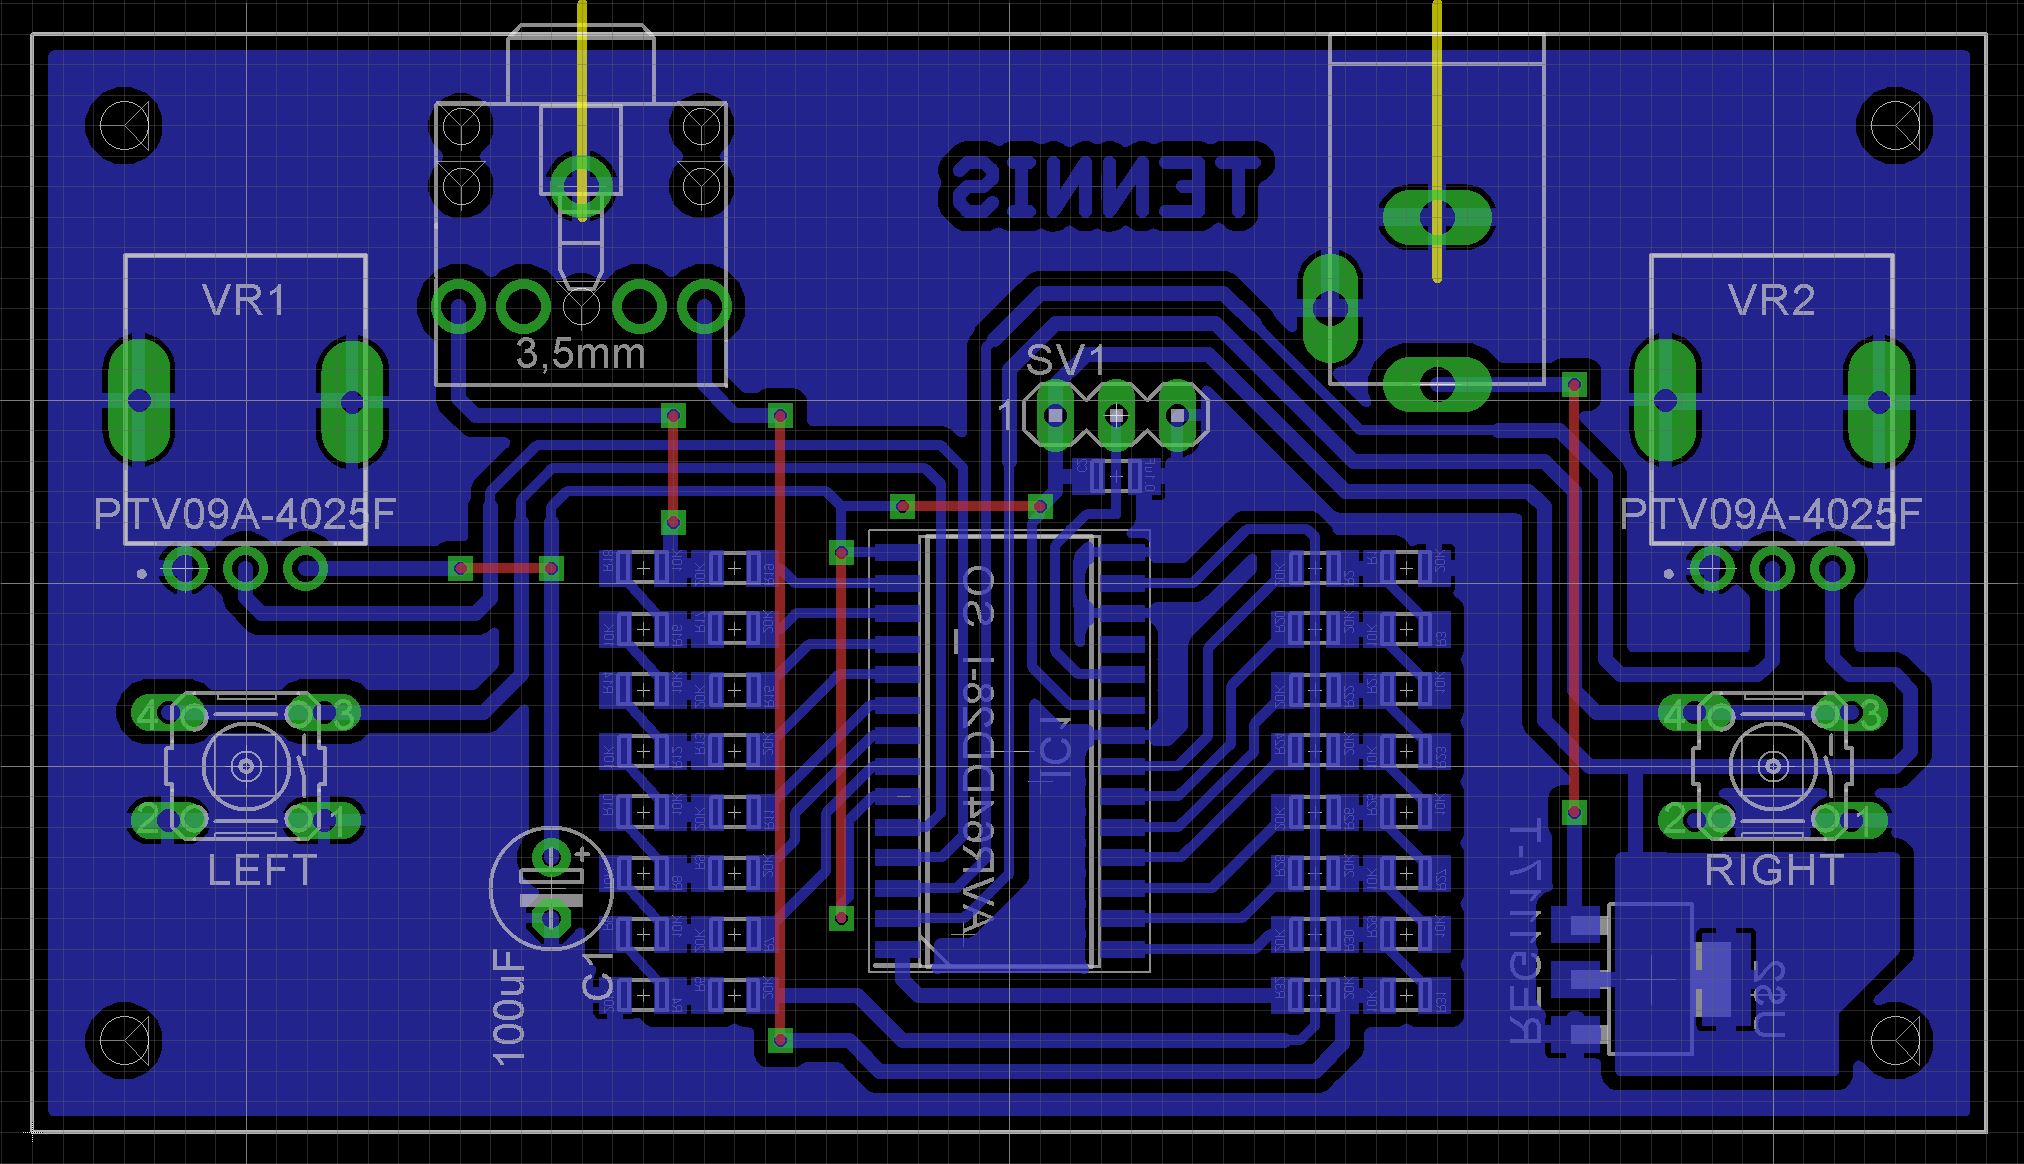
As the AVD64DD28 that I purchased was a Surface Mount Device (SMD), the PCB uses SMD components for the 3.3V regulator, resistors and the decoupling capacitor. The filter capacitor is a small electrolytic capacitor as I didn't have an equivalent SMD tantalum capacitor on hand.
I have included the Eagle files in case you want to get the board commercially made or do as I did and make it yourself. I used the Toner method.
AssemblyStart by adding the SMD components
Add any links if your board is single sided
Add the top side components.
Screw the PCB board onto the lid using 4 x 4mm M2 screws.
Add the button tops and knobs.
Programming the microprocessor is done using Serial UPDI. You probably don't have a Serial UPDI programmer, fortunately it is pretty easy to create one using off-the-self parts. Everything you need on how to build one is described in the following article by Spence Konde:
You need to install the DxCore into the Arduino IDE. This board package can be installed via the board manager. The boards manager URL is:
http://drazzy.com/package_drazzy.com_index.json
- File -> Preferences, enter the above URL in "Additional Boards Manager URLs"
- Tools -> Boards -> Boards Manager...
- Wait while the list loads (takes longer than one would expect, and refreshes several times).
- Select "DxCore" and click "Install".
Next open the sketch
Select Tools -> Board -> DxCore -> AVR DD Series (no bootloader)
Select Tools -> Chip-> AVR64DD28
Also set the following options:
- millis()/micros() timer: TB2 (default for 28/32 pins)
- MultiVoltage I/O (MVIO): Disabled
- Programmer: SerialUPDI - 230400 baud
Compile and upload the sketch.
ConclusionThe original game was based on the best contemporary technology: analog electronic computers built out of op-amps, relays, and the occasional transistor. It took Higinbotham and his technicians several weeks to design and build the game. Of course, some things have changed over the last 50 years.
One of the things that has changed over time is the oscilloscope. The old heavy analog oscilloscopes have been replaced with digital oscilloscopes in many workshops both small and large. I tried this game on my Hantek DS02D10 digital oscilloscope and it looks crap on its TFT LCD screen. It definitely looks better on an analog oscilloscope with its phosphorous display.
All in all, it did expose me to the AVR DD Series so useful in that sense. Thanks to Windell Oskay for publishing his project.


Comments
Please log in or sign up to comment.