Introduction
A simple TV remote is capable of a lot more that channel changing when connected to the SmartThings cloud. With a small part count and an immediate payoff, the project is a good way to explore the platform.
Background on Arduino and the ThingShield
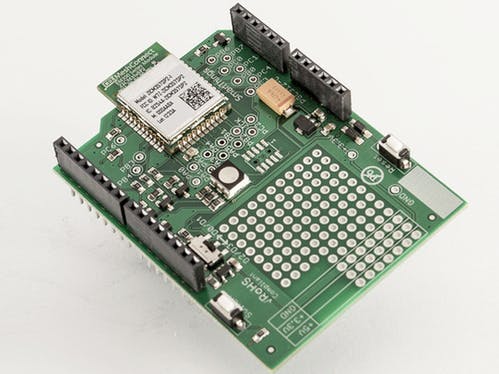
The SmartThings ThingShield makes it easy to build SmartThings prototypes using Arduino. The shield connects directly to the UNO linking to the SmartThings hub via the Zigbee protocol. A switch on the shield allows one to choose between using pins 0,1 or 2,3 to communicate with the Arduino. The ThingShield already reserves the use of pin 6.
For more information on getting started with Arudino: http://arduino.cc/en/Guide/Introduction
Step 1: You will need
- (x1) SmartThings Arduino ThingShield
- (x1) Arduino Uno
- (x1) IR Receiver
- (x1) IR Emitting LED
- (x1) 100 Ohm Resistor (optional)
Step 2: Download the IR Library
The project depends on a marvelous Arduino library developed by Ken Shirriff. https://github.com/shirriff/Arduino-IRremote
Install the library Arduino library in the usual manner.
http://arduino.cc/en/Guide/Libraries
Once installed, we need to modify IRRemoteInt.h to use the timer on pin 9. In this example, we use pin 3 for communication with the ThingShield.
Step 3: Arduino Sketch
Next, upload the sketch to your Arduino board (see code section).
Step 4: The Build
The build is simple and straightforward. First connect the ThingShield on top of the Arduino. Although only the Arduino is shown in the diagram below, pin placements are the same with the shield attached.
For the IR Receiver, connect the corresponding pins to ground and 5V. Then attach the data pin to Arduino pin 11. Connect the IR emitting LED to pin 9 and ground. The 100 ohm resistor is optional in this design as the LED can likely handle the max current from the Arduino as it blinks rapidly to send signals. Left on continuously, the same current would likely burn out the LED.
Step 5: Creating a Custom SmartThings Device Type
In the SmartThings IDE, we next create a new device type for our ThingShield.
Go to the “My Device Types” section, click “New SmartDevice” on the right.
Creating a new SmartDevice requires two steps. First, give the new device type a name at the top “Ir Bridge.” Note we will reference the name of our SmartDevice in our SmartApp code later.
We need to define the Attributes (variables) and Commands (functions) of the device. For this tutorial, we will create the attributes and commands for two programmable buttons and a record button. Add each of the attributes and commands shown. Select “Create” to continue onto coding the device.
Next, copy the device definition into the code window in the IDE (see code section). Click the “Save” button at the top, and then click “Publish” to make the device available to you.
Step 6: Updating the ThingShield to Your New Device Type
Make sure to add your ThingShield to your SmartThings hub if it is not already setup. To pair the device, attach the ThingShield to your Arudino and give it power. Hold the “Switch” button on the shield for 6 seconds. With the SmartThings smartphone app, select the Add button. Press the physical “switch” button one more time and you should see the hub identify the ThingShield.
Back, in the IDE, navigate to your Arduino ThingShield by clicking on “devices” on the home screen. Select your device from the list and click the “Edit” button at the bottom of the page. From the “Type” dropdown menu, choose the new SmartDevice type you created. It’s helpful to give devices meaningful label names when you need to select them later. Hit update to set the device to your new device type.
Note, when publishing updates to your custom device types in the future, you will want to come back to confirm that your physical devices remained associated with the correct device type after a published update.
Step 7: Writing the SmartThings App
We have one more piece of code in the project – the SmartApp itself. Navigate to “My SmartApps” and start a “New SmartApp” by clicking the button on the right. Give it a name, a description and a category (“My apps”). Click “Create” to continue coding the app.
Copy the smartApp code (see code section). Select “Save” and then click “Publish” to make the SmartApp available on your Smartthings iOS or Android (coming soon) app.
Note that we reference the SmartDevice type by name as “IrBridge” without the original space we originally used in the name “Ir Bridge”:
input "irDevice", "device.IrBridge"The line allows us to show only devices of the type “Ir Bridge” as options to select in the SmartApp. The camelCasing used is a very specific: When referencing device types in smart apps, spaces are removed from the name. The first character and characters originally following a space are capitalized. All others are lowercase, regardless of the original capitalization.
Step 8: Enable the SmartApp
Within the SmartThings smartphone app, associate the new SmartApp with our new IR device and select the switches you wish to control. Then click “install.”
To program each of the buttons in the app, go to the tile details by clicking the gear in the corner of the tile. Select the big record button – it will turn red to show you are in record mode. Then click the tile (Play/Pause or B) you wish to control – it will turn yellow. Aim your remote at the ThingShield and press the button you want to learn. The ThingShield will now send that code to the SmartThings cloud and associate it with the button you chose in the SmartApp. The newly programmed button will turn green and the record button will go back to white.
The next time you push that button on your remote control, you will toggle the switch you associated with the button in the SmartApp.


_ztBMuBhMHo.jpg?auto=compress%2Cformat&w=48&h=48&fit=fill&bg=ffffff)


Comments
Please log in or sign up to comment.