I have some chickens, but I want some more! Buying chicks at the store would be way too easy, so I decided to build myself an incubator!
What is an IncubatorAn incubator is a device that hatches eggs. It keeps a space at a certain temperature and humidity for a certain amount of days, till the eggs hatch. Some can also rotate the eggs, to keep the embryo from sticking to the shell. Others you have to manually turn the eggs.
Here is an example of an automatic turning incubator:
What we will build is an incubator that monitors temperature and humidity. It also controls the temperature, and rotation.
How Eggs Need to be IncubatedFrom here on, I will be referring to chicken eggs when I mention eggs.
Eggs need to be incubated for 21 days in total. The right temperature is approximately 95.5˚F, although some people may adjust that slightly higher or lower based off of their hatching ratio. The humidity needs to be from 20% to 60% for the first 18 days, and for the last three, it needs to be from 70% to 80%!
My incubator does not have automatic humidity control. To increase humidity, just place water inside the incubator! I tried placing a little container with a small amount of water inside, and that raised my humidity from 20% to 35%. I also tried a damp rag, and had much better results! The humidity rose from 25% to 55%. This happens because there is more surface area on a rag (almost like a sponge), which means the water evaporates faster.
Besides the temperature and humidity adjusting, the eggs need to be rotated. Eggs must never be placed pointy side up. They also need to be rotated at least 3 to 4 times a day (the more the better). I have my incubator rotating once every 2 minutes right now!
How the Incubator WorksTemperature
If the temperature in the incubator is less than 88˚, all four heaters will be fully turned on, and the heater fan also fully turned on.
If the temperature is greater than 88˚ and less than 95.75˚, all four heaters will be turned on, and the heater fan will fully turn on for 40 seconds, then turn off for 80 seconds. The purpose in this, is to try and get the heaters to be hotter before the fan dissipates the heat around the space. After trial and error, this is the only way my incubator would get hot enough, because with the fan always on, it only got up to ~90˚.
If the temperature is from 95.75˚ to 96˚, the fan will do the same as above, but with only 3 heaters on.
If the temperature is less than 96˚, two heaters will be fully on, and the fan will be also.
If the temperature is above 96.50˚, only one heater will stay on, while the other three and the fan is off.
With my code so far, I have seen my incubator get up to 96.25˚ (tested with a thermostat from DFRobot).
Humidity
The humidity is not controlled by the incubator, but is only monitored. So you will have to manually raise the humidity if it gets too low.
If the humidity falls below or rises above the correct values, the display will turn red instead of green, and it will beep every so often.
Rotation
The eggs are rotated once every two minutes in my incubator. This can be changed at the beginning of my code. The stepper motor gradually increases and decreases its speed to prevent catapulting the eggs out of the rotator.
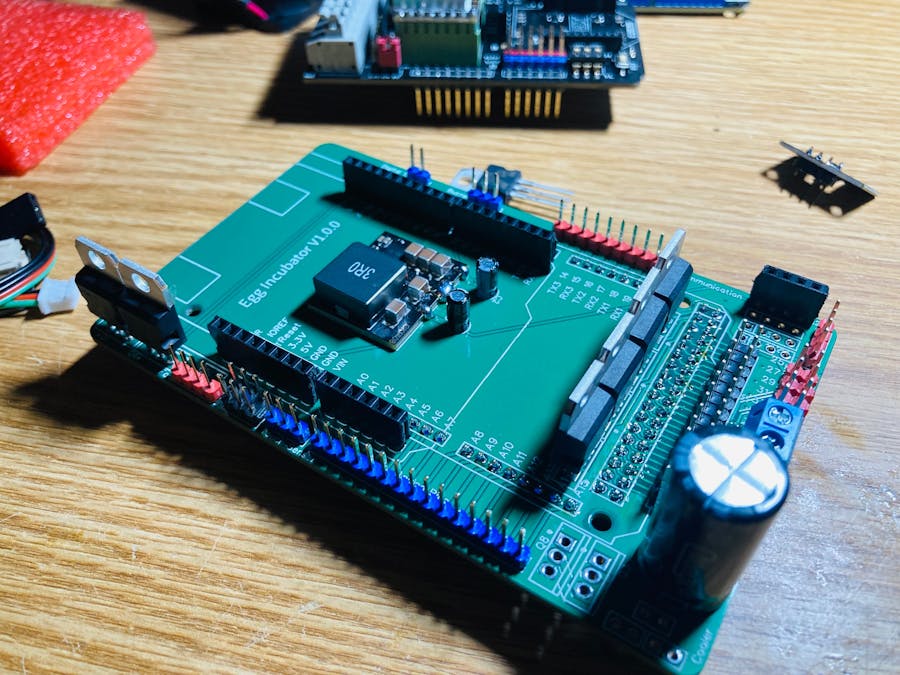
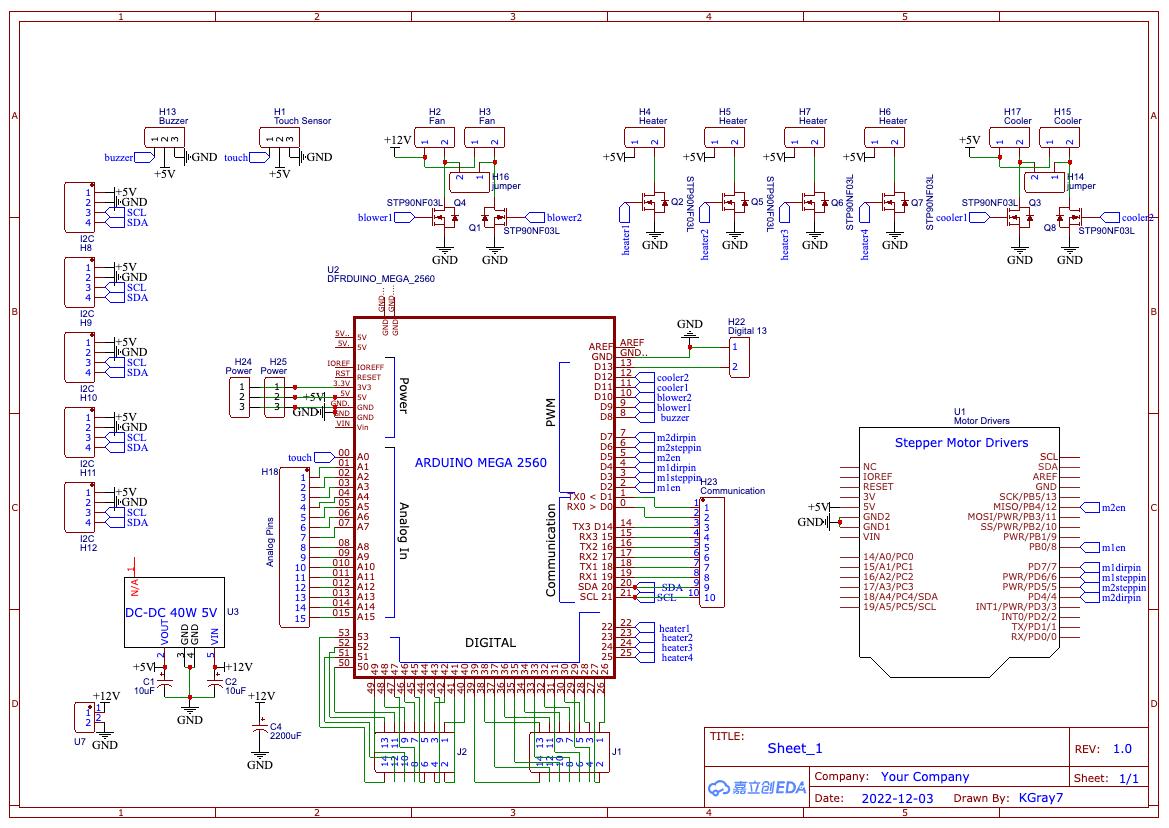
PCBI created a Printed Circuit Board that just makes the wiring simpler. It acts like a Arduino Mega shield!
Here is what it looks like:
The motor driver is stacked on top of the PCB, and the whole stack is stacked on top of the DFRduino Mega (or Arduino Mega)!
I also made sure that all of the Mega pins are available on pin headers, that way you can do many modifications to this project.
____________________________________________________________
If you would like to buy a PCB from me, I have 4 new PCBs leftover from this project!
You can also have me assemble a PCB with my parts for additional costs (assembly does NOT include the 5V regulator).
Feel free to contact me at tickers-beaker-0v@icloud.com.
DFRobotDFRobot was the sponsor for this project! They sponsored most of the electronic parts for it, and I also bought some parts from them myself for this project!
They have many high quality and well documented parts. They have any module or piece you can think of for any type of project. Just check out my profile page for project ideas!
Check them out here.
Or here:
PCBWayPCBWay sponsored the PCB for this project! Their PCBs are very high quality, and I am impressed with the detail in the lettering!
Check them out here.
Or here:
How to Build itWhat you need:
- All of the electronics parts listed at the beginning
- A PCB
- A container for the incubator (I used an old mini standup freezer!)
- Some wire
- A high powered power supply (I used a 12V6A AC to DC converter)
- Some heatsinks (for the heating unit)
- A drill with a boring bit
TheBox
First thing's first; the box! I used a mini freezer that doesn't work anymore. This is a perfect choice as it is already insulated and will therefore stay hot inside easier. I drilled a hole all the way through the back for the power cord. Besides that, I did place paint stirrers across where the shelves used to be (I don't have the shelves) to hold the turners and eggs. I didn't cut any holes for the display or button, as more holes means less heat! Instead, I ran the cables for the display and switch through the seal in the door, which seems to be working fine.
TheDFRobotParts
Scroll through the photos below to see all of the DFRobot parts I used! (The fan is from LCSC).
TheHeater
For the heater, I lined all 4 PTC heaters along a heatsink with some thermal paste. I then put another heatsink along the top, and held everything together with some clamps! This design keeps everything nicely together, and gives off more heat (like a radiator). I also clamped the high powered fan for the heater, to one end, that way it immediately blows the hot air from the heater around the inside of the fridge.
ThePowerSupply
I installed a dc plugin on the fridge for the power supply so it is easier to plugin!
The power supply I used is a AC to DC 12V6A power supply. This means it provides 72W (12V * 6A) which is perfect for what we need.
The heaters alone draw 40W. Roughly summing up, I guessed everything else would draw ~5W, so that makes for a sum of ~45W.
IMPORTANT:
My DC plug shown below, ended up melting to the male DC jack coming from the adapter. That is how much current is being drawn. So make sure to use a higher gauge wire (somewhere around 18awg) to prevent this from happening and becoming a fire hazard.
____________________________________________________________
IMPORTANT
I made a power disconnect alarm for if the incubator is unplugged! It is just a simple device that plugs between the power supply and the incubator.
Parts list:
- 1x PNP transistor (I uses 2n3906)
- 1x 10kΩ resistor
- 1x 2.2kΩ resistor
- 1x 5V buzzer
- 3x AAA batteries
Wiring schematic:
WhatItDoes
This circuit turns on the buzzer when there is no incoming power! Very handy to make sure the incubator isn't accidentally left unplugged for a while.
____________________________________________________________
TheFans
I placed the high powered mini fan on the heater as I already explained, but then I also added a 12V computer fan.
I placed this second fan in the top and facing towards the ceiling a little, so as the hot air rises, it will force it back down and keep the incubator at a steady temperature.
My PCB has two separate fan connections for doing this. If you would like to add more fans for better circulation, you can just wire them to the incoming 12V! The only downfall, is they will be always on (but that may not be such a bad thing).
TheRotationTray
I bought a egg automatic rotation tray off of aliexpress that looks like this:
It is really handy! I did have to modify it though.
It came with a 110VAC motor with 3RPM. I removed it and used a stepper motor instead. Also, the tray did not fit inside my mini fridge with the motor on the end! So... I instead modified it to place the stepper motor to the right, and used a metal bar to do the rotation (as seen below).
Here is a closeup of how I made the stepper motor rotate the eggs:
AssemblingthePCBA
I soldered all of the parts onto the PCB. Here are some photos:
Now for the final touches!
I set everything in the bottom of the incubator for now, but I plan on putting everything into a case.
Also, make sure the heater is not placed on plastic! We want no fire hazard here. I placed mine on a black metal plate that was already in the mini fridge.
Here's what the incubator looks like:
I also plan on adding two more egg rotation trays, for a total capacity of 72 eggs!
Here is what the display looks like:
I also put a DFRobot temperature module inside, so I can check the temperature on the egg tray against a calibrated source:
Here is a short video clip of the LCD!
Wrapping UpThat was all for this tutorial! Please feel free to ask a question, give some advice, or suggest some ideas in the comments below!
Also, check out the PCB section of this tutorial for buying PCBs or PCBAs from me (up to 4)!
Check out more of my awesome projects here:


Comments
Please log in or sign up to comment.