My project brings the advanced capabilities of GPT, an AI language model, into the realm of voice assistance, packaged in a simple and accessible form. Unlike the complex and often expensive smart assistants available today, our device focuses on simplicity and affordability. It listens to user commands via a microphone and delivers GPT's intelligent responses through a speaker. This setup allows anyone, regardless of their access to a computer or smartphone, to harness the power of GPT.
Motivation:The inspiration for this project stemmed from a desire to merge the potent capabilities of GPT AI with the foundational skills learned in an engineering class. As an AI enthusiast, I saw an opportunity to create something unique and practical - a voice assistant that is not just a showcase of technological advancement but also a testament to the accessibility of AI. This project is about breaking barriers and democratizing access to cutting-edge technology.
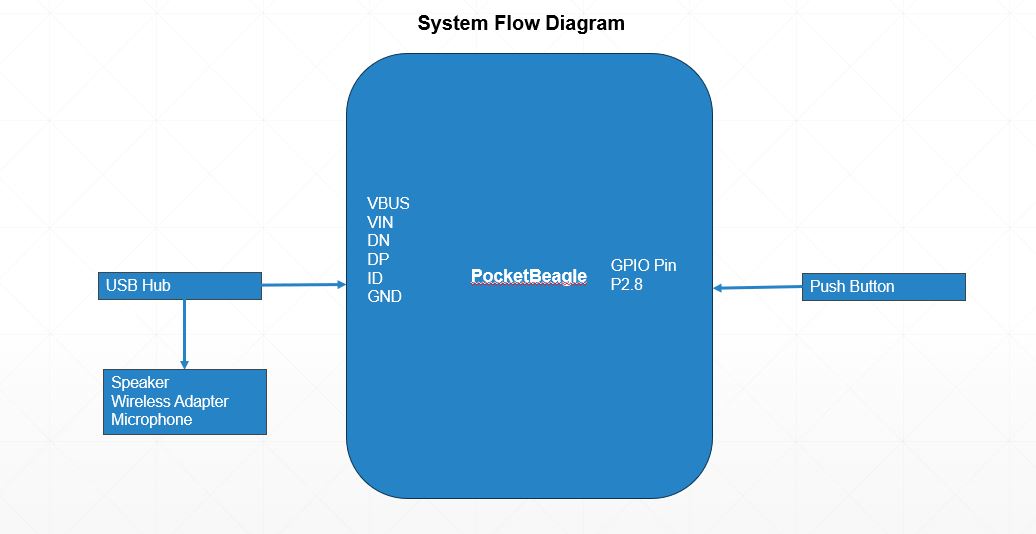
How It Works:At the heart of our setup is the PocketBeagle, a versatile and compact computer, which serves as the brain of our voice assistant. Connected to this are three critical components:
- A microphone to capture voice commands.
- A wireless adapter to connect the device to the internet, enabling it to access GPT.
- A speaker to output the AI's responses.
These components are linked through a USB hub, which then connects to the PocketBeagle via a USB to USB-C adapter. Additionally, we've incorporated a simple button on a breadboard, connected to the PocketBeagle. This button starts the interaction, triggering the device to listen and respond. I have attached the system flow and power block diagrams below to give a better understanding of the flow of the device:
The initial setup of the PocketBeagle is a foundational step in our project. It starts with the careful soldering of headers onto the board, a process essential for creating stable connections with the various components of our voice assistant. After the headers are in place, a crucial step is the soldering of two specific pairs of pins: connecting the ID (Identification) pin to the GD (Ground) pin, and the VB (VBus) pin to the VI (Voltage In) pin. These connections are not just a technical formality but are pivotal for enabling the PocketBeagle's internet connectivity, a feature essential for accessing the GPT model. This internet connection allows our voice assistant to process and respond to user inputs intelligently. While these soldering steps demand precision, they are manageable for anyone with basic soldering experience. Completing this setup transforms the PocketBeagle from a simple circuit board into the heart of a sophisticated, interactive voice assistant.
Next, prepare the USB interface by connecting four or five wires on a breadboard as per the provided layout. Then, attach a four-pin USB port to the breadboard. Place the PocketBeagle onto the breadboard, ensuring the header pin P1_1 aligns with hole A-1 for proper positioning and the wires are attached to the USB output pins (P1_05-13). The other end of the wires should be aligned with the four pins of the USB port. This will allow the Pocketbeagle to connect to all of the components attached to the USB hub (microphone, wireless adapter, and speaker).
To set up the rest of the hardware, the wireless adapter needs to be connected to the Internet by interfacing with another device. Following this, all of the devices merely need to be connected to the ports of the USB hub.
The final step of the hardware setup process is to setup a button to a GPIO output pin. This can be done by wiring one of the leads of the button to any output pin and the 3.3V source and another lead of the button to ground.
Visual Demonstrations:To give a clearer picture of our project, I've included a video demonstration and several images of the device setup. These visuals not only showcase the compact design of the voice assistant but also demonstrate its functionality in real-time.
This project is a step towards making AI accessible and usable for everyone, regardless of their technical background or resources.


Comments
Please log in or sign up to comment.