We decided to build a Makey Santa and a Rudolph-ish reindeer that moves up and down in the Christmas tree. Like its flying! Of course the reindeer should have a flashing red nose as well.
We started with servos i had lying around. To get continues rotation we removed the lock in the gear and to get the gear to rotate freely on the shaft (shaft is the potentiometer) we just drilled the hole in the gear a bit bigger. There is tons of good project pages to look at on how to make a servo continues. Although you can of course use a ordinary DC motor with a gearbox.
The servos arm is connected to a fishing line which you mount in your Christmas tree, the servos rotation makes the deer and Santa go up and down.
We just removed the circuit from the servo and fed the motors from the battery. Via a voltage regulator as explained later. Just works as a DC motor now.
Next i sculpted the reindeer, he is plus size to fit components.
Luckily for me i can use my wife's Cintiq for sculpting which is so much fun! The little reindeer in the bottom i just printed from the internet to get an idea of what this animal looks like. I know the result does not speak for it self but it sure looks cute and fun!
Here i am working at the Santa. Using a picture of Makey as a reference.
Martin made the skids in Fusion and i did the horns in Fusion as well. Just sketched it up and extruded.
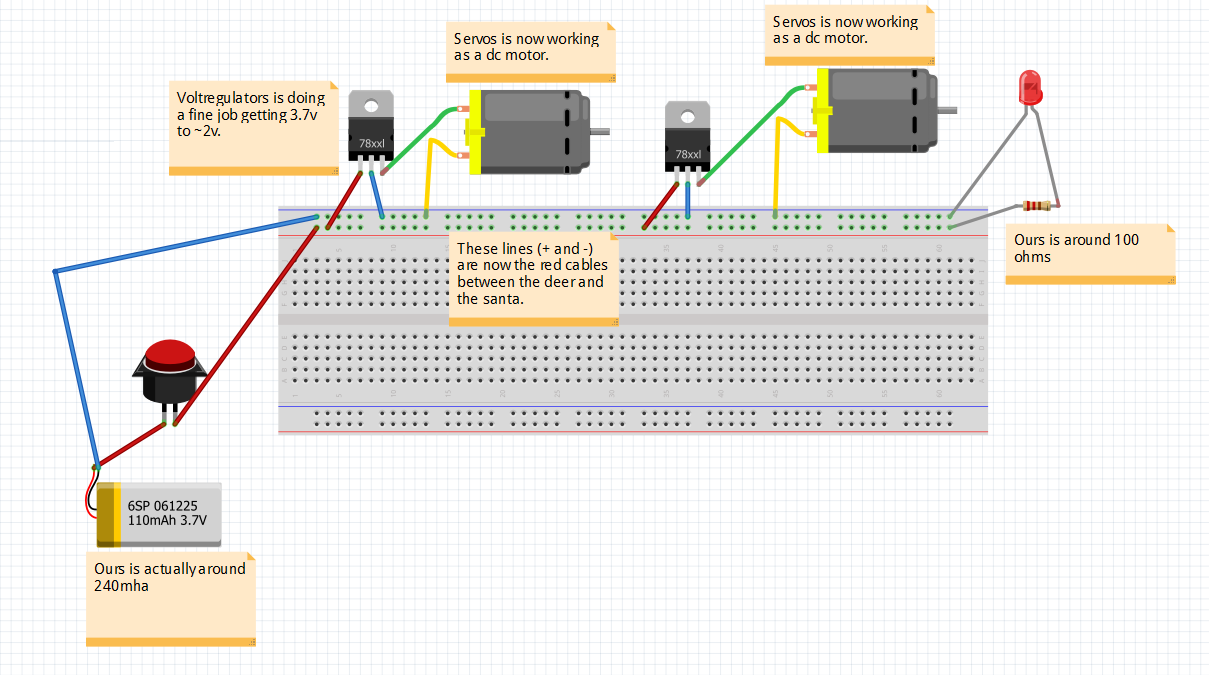
Made a little test circuit to see what i needed to do and to get a feel for the speed of the servos. I thought they were kinda fast so i used a voltage regulator for both servos, although two of them since the battery is in the Santa and i needed to get more juice to the led in the reindeer. The voltage regulators is for 18->5v but is now used for 3.7 to about 2v. Works for me, please let me know if you have a better idea. I had these laying around!
I have added a picture from a scheme sketch i made with fritzing. I have never used this program but i think i got it right, for you all to get an idea of what we did here.
Now, lets get all the parts we included 3D printed! Horns (2), Skids (2), and the rest of the parts (reindeer_left and right, Santa_left and right) one of each. We used 0.2 layers for the reindeer and 0.4 for the Santa. If i would do it again i would have done it with 0.2 for all models. This was a time saving decision. I did use some support to get the hollow parts of the prints to work well.
3D printing and assembly of the reindeer. The resistor(around 100 ohms) for the led is in the shrink tube. The voltage regulator is in the middle of the model. Along with some not so nice soldering. You see from the picture where the red cable goes thru in this model.
Starting to look like something here. Painted with acrylic colors but first a coating of primer. We glued the half's together at certain points since there were no time to implement any other fastening method.
The red cables delivers power to the reindeer´s servo and led, but is also the harness, so that Santa can get where he needs to be.
Assembly file for the Santa. In Fusion 360. Nice.
Here you can see where i placed all stuff in Santa in reality. Didn't want any more weight in the front. The nylon tube (used in extruders) makes the fishing line slide up and down nicely. Its a short one in the reindeer as well. I made holes for the red cables here, near the arms of Makey. So that it looks like he is holding it.
Its a small nail in the servo´s arm (glued in place) that is connected to the fishing line. Which then hangs from a limb in the Christmas tree. You can see it in the picture above. Same one in the reindeer.
Paint job. But first primer for this as well. To get the paint to stick. The skids is painted and glued on later.
And there it is! We really think this turned out great and had alot of fun with it. Of course we have already thought of improvements . Maybe next year? :-)
Now it will be placed in Martin´s Christmas tree for a while, and then it´s my turn!
Hope you guys like it and merry Christmas!


_t9PF3orMPd.png?auto=compress%2Cformat&w=40&h=40&fit=fillmax&bg=fff&dpr=2)


Comments
Please log in or sign up to comment.