


Hardware components | ||||||
 |
| × | 1 | |||
Software apps and online services | ||||||
| ||||||
The Spresense prime number calculator implements a prime number calculation algorithm that can run on several of Spresense CPU cores simultaneously.
The Spresense CXD5602GG chip has six ARM Cortex M4 cores. In this project you will be able to easily decide how many CPU cores that will be used when doing the prime number calculation. The time the calculation takes is measured and then compared with the time it takes to do the same calculation but using only one core. It is a sort of benchmark application where the user can play with various settings and observe the result.
The Spresense main board is enough to do this project but it doesn't make any difference if you have it attached to the Spresense extension board.
Prerequisite
- Ubuntu PC (Needed by the Spresense Full SDK).
Description
By default the Spresense prime number calculator will run on a predefined set of parameters.
The parameters are:
- Number of CPUs to use. [1-5] default: 5.
- Number range to search for prime numbers. [1-"thousands"] default: 15000.
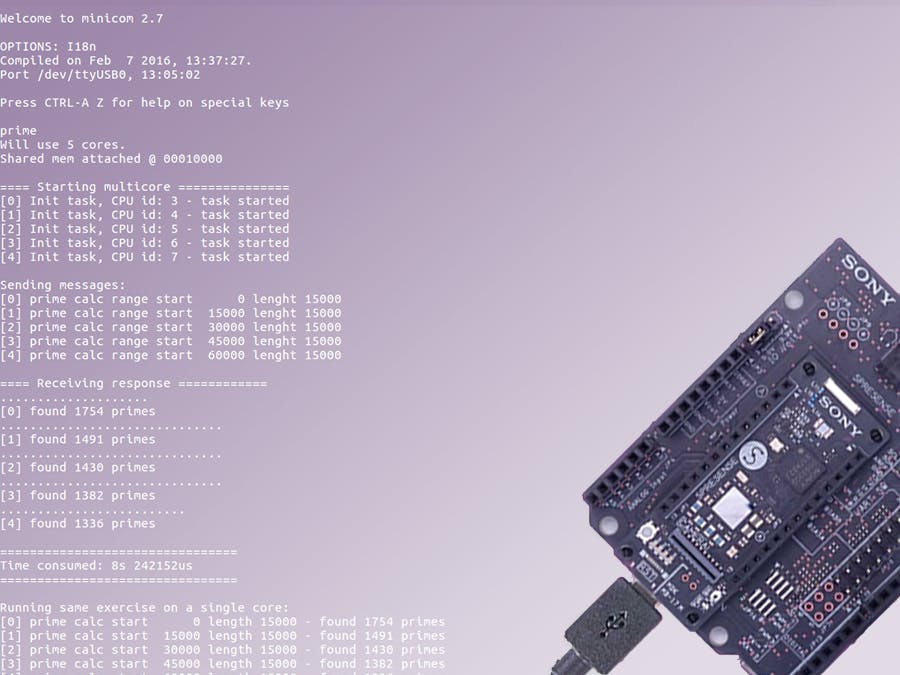
The application will start and initiate an instance of the prime number calculator algorithm on as many cores as has been specified on the command line. If no number of cores has been specified, then the default value will be used.
Each instance will then receive a message with a start value and the length of the range to run through the prime calculator. The length of the range is the same as the number range. This means that the total range that will be calculated will be the number range x number of CPUs.
What does the result mean?
The result is basically just a figure that tells how long time it took to finish the task. As reference, here is the code ported for Arduino UNO.
Spoiler alert! An initial test on an Arduino UNO with a range between 0-2000 numbers takes 10916 ms to find 303 prime values. The same range on Spresense running on five cores takes 9 ms, and 27 ms to run on one Spresense core.
uint32_t find_primes(uint32_t start_val, uint32_t limit) {
 uint32_t primes = 0;
 for (; start_val <= limit; start_val++) {
   int x = 2;
   while (x <= start_val) {
     if (start_val % x == 0)
       break;
     x++;
   }
   if (x == start_val)
     primes++;
 }
 return primes;
}
#define RANGE 5000
void setup() {
 uint32_t primes = 0;
 uint32_t range = RANGE;
 unsigned long start_time, end_time, difference_time;
 // put your setup code here, to run once:
 Serial.begin(115200);
 Serial.print("Starting Prime calculation on Arduino Uno.\nRange from 0 - ");
 Serial.println(range, DEC);
 start_time = millis();
 primes = find_primes(0, RANGE);
 end_time = millis();
 difference_time = end_time - start_time;
 Serial.print("Found: ");
 Serial.print(primes);
 Serial.print(" primes in: ");
 Serial.print(difference_time);
 Serial.println(" ms.");
}
void loop() {
 // put your main code here, to run repeatedly:
}
Above: Code for Arduino UNO.
Step by step instructions:
1. Follow the pre-requisite steps to prepare your Ubuntu computer with the needed tools to run Spresense Full SDK.
2. Clone the forked repository where the prime calculator has been implemented:
$ git clone --recursive git@github.com:TE-KarlKomierowski/spresense.git
3. Configure and build the Spresense Full SDK:
$ cd spresense/sdk
$ tools/config.py --kernel release
$ tools/config.py examples/prime
$ make buildkernel
$ make
4. When the build is finished, a file named nuttx.spk will be created in the SDK folder.
5. This file must be flashed to the Spresense board. You can increase the flashing speed by editing the baud rate with the "-b" switch. Default is 115200. If you try the fastest speed and see that it doesn't go well, try to lower the speed.
$ tools/flash.sh nuttx.spk
or
#Maximum flashing speed is 1152000, default is 115200.
$ tools/flash.sh -b 1152000 nuttx.spk
6. Once the the flashing finished, you start your favourite serial terminal with the following settings, just double check that the device is correct.
+-----------------------------------------------------------------------+
| A -    Serial Device      : /dev/ttyUSB0                              |
| B - Lockfile Location     : /var/lock                                 |
| C -   Callin Program      :                                           |
| D -  Callout Program      :                                           |
| E -    Bps/Par/Bits       : 115200 8N1                                |
| F - Hardware Flow Control : No                                        |
| G - Software Flow Control : No                                        |
|                                                                       |
|    Change which setting?                                              |
+-----------------------------------------------------------------------+
7. Your terminal should look like this:
NuttShell (NSH) NuttX-7.22
nsh>
8. This is the NuttShell. From here you can start the prime calculator by simply typing "prime". The prime calculator will then start with the default values.
Synopsis:
prime [N_CPUS] [RANGE]
The following example will start the application using 4 CPU cores and where each core calculates a range with 1000 values each.
NuttShell (NSH) NuttX-7.22
nsh> prime 4 1000
9. Hit enter and see what results you get when running various range lengths on different amount of cores.
Enjoy! :)


Comments
Please log in or sign up to comment.