


Hardware components | ||||||
 |
| × | 1 | |||
 |
| × | 1 | |||
 |
| × | 1 | |||
 |
| × | 1 | |||
 |
| × | 1 | |||
 |
| × | 1 | |||
Software apps and online services | ||||||
 |
| |||||
| ||||||
The Particle Photon is a great little board. It is very easy to program, as it sits on your wireless network and communicates with the cloud-based particle.io infrastructure. There you can program, control, and collect data for your Photon.
One of the great features of the Photon is the ability to cross-connect your application to other cloud-based services through WebHooks.
Webhooks are a simple and flexible way for your devices to make requests to almost anything on the Internet. Webhooks listen for events from your devices. When you send a matching event, the hook will send a request to your web application with all the details!
This project uses a Photon to collect a set of sensor data that is in turn sent to a data collection and display service called ThingSpeak. Every 60 seconds, light, temperature and humidity data are sent to Thingspeak. At thingspeak, you can view your data over time.
This Project shows you how to set up a Thingspeak channel, Create an particle.io Webhook for it, and program the Photon to send data.
Great, huh? Let's Get Started!
Step 1: Create ThingSpeak ChannelLog into your Thingspeak account and create a new channel through the Channels Page. Name your Field1 - 4 elements as follows, so they match up with your code later on -
Save, and go to the API Keys tab. Record the Write key with a cut and paste to notepad or something. You will need to add this to your Photon code later.
Step 2 - Create your WebhookOk, log into particle.io Dashboard. You should already see your Photon, there, right? (If you don't have your Photon online yet, follow the Particle Getting Started Guide.) Click on the Integrations icon on the left to take you to the Integrations Page. Click New Integration, select Webhook and then Custom JSON, in the upper right corner. Replace the code with Hans and Robert's great JSON file:
{
    "event": "thingSpeakWrite_",
    "url": "https://api.thingspeak.com/update",
    "requestType": "POST",
    "form": {
        "api_key": "{{k}}",
        "field1": "{{1}}",
        "field2": "{{2}}",
        "field3": "{{3}}",
        "field4": "{{4}}",
        "field5": "{{5}}",
        "field6": "{{6}}",
        "field7": "{{7}}",
        "field8": "{{8}}",
        "lat": "{{a}}",
        "long": "{{o}}",
        "elevation": "{{e}}",
        "status": "{{s}}"
    },
    "mydevices": true,
    "noDefaults": true
}
Note that there is NOTHING you need to edit. Click Create Webhook, and you're done!
Ok, now let's get to that Photon.
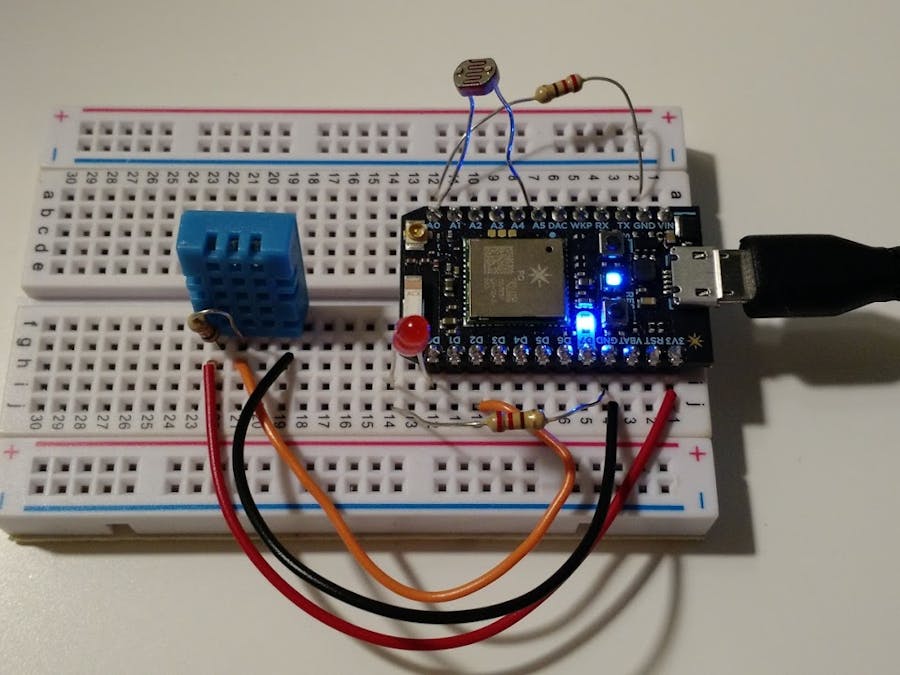
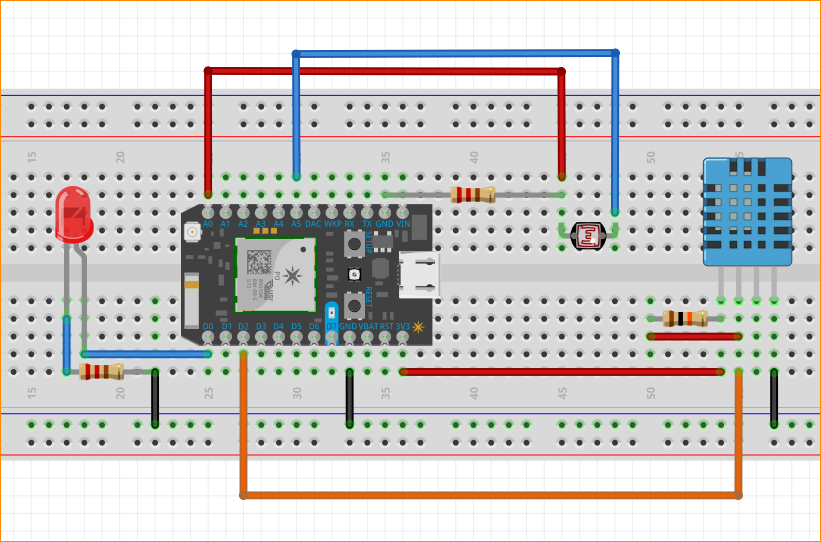
Step 3: Wire Up PhotonWe are going connect a photocell and DHT11 sensor to the Photon.
- 220 ohm Resistor from A0 to GND
- Photocell from A0 to A5
- DHT11 Pin 1 to 3V3
- DHT11 Pin 2 to D2
- DHT11 Pin 3 Not Connected
- DHT11 Pin 4 to GND
- 10K ohm resistor from DHT11 Pin1 to DHT11 Pin2
Load the following code on to your Photon through the build.particle.io IDE:
// -----------------------------------------
// solarmonitor
// Monitor light, temperature and Humidy at solar panel
// Particle Photon + Particle.io Webhook + ThingSpeak Integration
// April, 2016 - Pete Hoffswell - pete@hoffswell.com
// -----------------------------------------
#define DHTPIN 2
#define DHTTYPE DHT11 // DHT11 Module
#define publish_cycle 60000 // Only publish every 60 seconds
const String key = "<Your Key Here>"; // Change this to your Thingspeak api write key
int led = D7; // Sensor Read Light
int photoCell = A0;
int power = A5; // Photocell power.  An analog pin to gives a more steady voltage.
int light; // Light
double tempF; // Temperature F
double tempC; // Temperature C
double humidity; // Humidity
unsigned int lastPublish = 0;
DHT dht(DHTPIN, DHTTYPE);
void setup() {
    // Set Pin Modes
    pinMode(led,OUTPUT);
    pinMode(photoCell,INPUT);
    pinMode(power,OUTPUT);
    digitalWrite(power,HIGH); // Turn on power source for photoCell
    digitalWrite(led,LOW);
    // Connect variables to particle cloud
    // This allows you to save data to particle.io, and run commands against it such as "particle variable Photon get light"
    Particle.variable("light", &light, INT);
    Particle.variable("tempF", &tempF, DOUBLE);
    Particle.variable("tempC", &tempC, DOUBLE);
    Particle.variable("humidity", &humidity, DOUBLE);
    dht.begin();
    Serial.begin(9600);
    delay(10000);
} //setup
void loop() {
  unsigned long now = millis();
  digitalWrite(led,HIGH); // Signal read sequence led
  // read sensors
  light = analogRead(photoCell);
  delay(100);  // is this needed?
  humidity = dht.getHumidity();
  tempC = dht.getTempCelcius();
  tempF = dht.getTempFarenheit();
  // DHT Read ok?
  if (isnan(humidity) || isnan(tempF) || isnan(tempC)) {
    Serial.println("");
    Serial.println("Failed to read from DHT sensor!");
    Serial.println("humidity=" + String(humidity) + " tempF=" + String(tempF) + " tempC=" + String(tempC));
    Serial.println("");
    return; // exit loop and try again
  }
  // Display to serial
  Serial.println();
  Serial.print("humidity=" + String(humidity) + " tempF=" + String(tempF) + " tempC=" + String(tempC) + " light=" + String(light));
  delay(200);
  // Publish to thinkspeak
  if ((now - lastPublish) > publish_cycle) {
    Particle.publish("thingSpeakWrite_All", "{ \"1\": \"" + String(humidity) + "\"," +
       "\"2\": \"" + String(tempC) + "\"," +
       "\"3\": \"" + String(tempF) + "\"," +
       "\"4\": \"" + String(light) + "\"," +
       "\"k\": \"" + key + "\" }", 60, PRIVATE);
    lastPublish = now;
    Serial.println(" - Published!");
  } else {
      Serial.println();
  }
  digitalWrite(led,LOW);
  delay(2000); // Wait 2 seconds before next loop
} // loop
We need to add the DHT library by:
- Click Libraries ribbon icon on left
- Search Community Libraries for "DHT"
- Select ADAFRUIT_DHT
- Click Include In App
- Click the name of your app and Add to App
Remember that Key you collected from Thingspeak WAY back in the first step? Install that into the key variable, replacing the <Your Key Here> text.
Now verify and Flash!
Step 5: TestThe code, as you can see, uses the serial monitor as well as the particle publish function. If you open a powershell, you should be able to see your Photon reading and publishing.
You should now be able to visit Thingspeak and see your data.
Here's my Photon Data!
How did it go for you? Did I miss anything?


Comments
Please log in or sign up to comment.