Have you ever wanted to have your own personal assistant that can control and automate your IoT devices and projects? You've come to the right place. In this project, I'll show you how to get the Google Assistant running on the Onion Omega 2+!
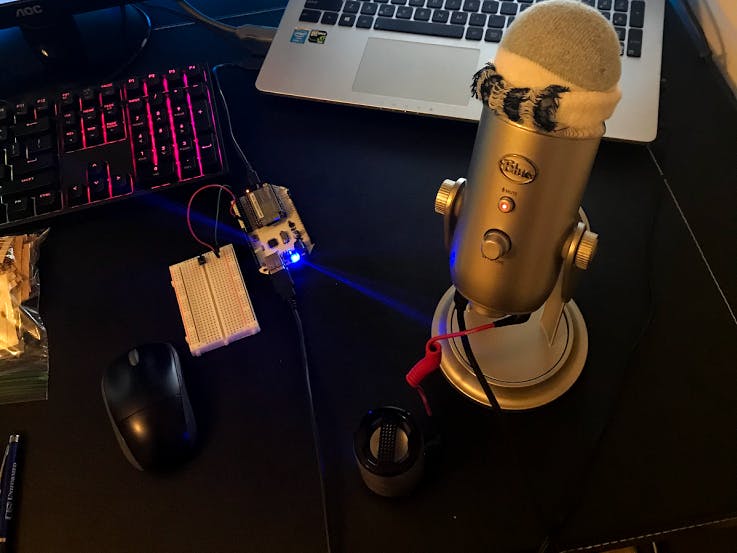
ComponentsI'm using the Onion omega 2+ in this project, connected to an Arduino dock. This is really useful, as it provides one USB Port!
For the Microphone, I'm using the Blue Yeti microphone. It's not the cheapest solution, but it has an audio output, and a built in sound card, and it does the job.
For the speaker, I used a battery powered speaker I had lying around. It had a 3.5mm input jack, so it should work with my setup.
If you do not have a Blue Yeti, you can simply use a cheap 3.5mm mic and speaker connected to a USB sound card like this one.
Setting Up the Onion OmegaFollow the instructions provided in Onion's Documentation:
https://docs.onion.io/omega2-docs/first-time-setup.html
TL;DR: Just connect the Onion Omega 2+ to a 5v microUSB Power Supply, and connect to the Omega-XXXX internet access point. From there, you can either ssh into onion@omega-XXXX, or set it up from the wizard by going to omega-XXXX.local following the wizard. The default credentials are:
Username: 'root'
Password: 'onioneer'
without the quotes.
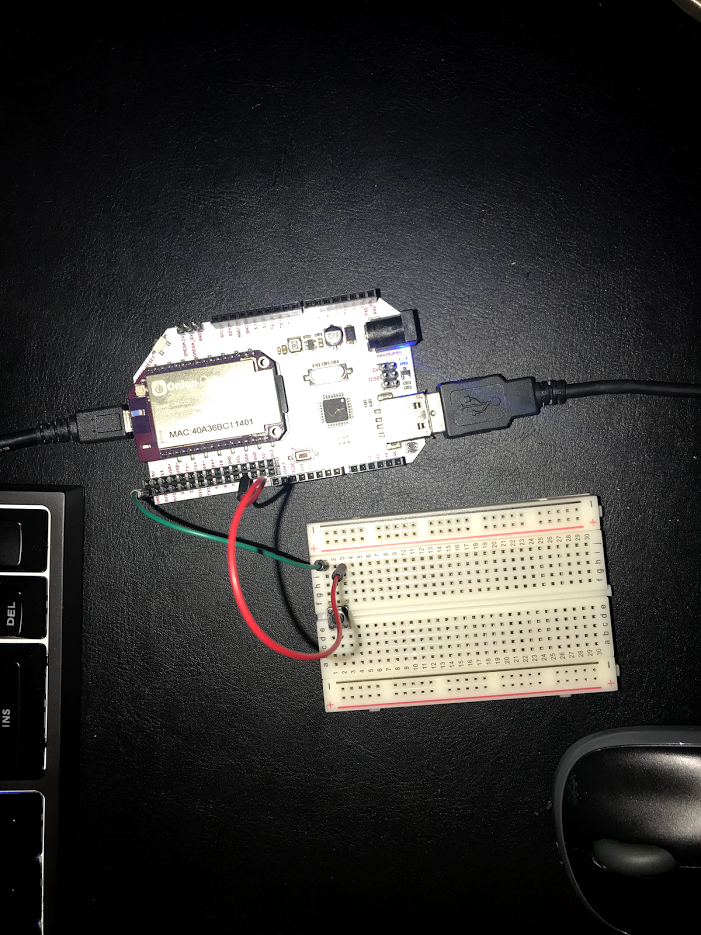
Wiring the Onion OmegaIf your setup uses a Blue Yeti Microphone or a similar device, follow the wiring diagram below. Otherwise, see the second photo for reference.
USB Sound Card Setup:
Run these commands to set up a MicroSD Card
opkg update
opkg install kmod-usb-storage-extras e2fsprogs kmod-fs-ext4
umount /dev/mmcblk0p1
mkfs.ext4 /dev/mmcblk0p1
mkdir /mnt/mmcblk0p1
mount /dev/mmcblk0p1 /mnt/mmcblk0p1
mount /dev/mmcblk0p1 /mnt/ ; tar -C /overlay -cvf - . | tar -C /mnt/ -xf - ; umount /mnt/
opkg install block-mount
block detect > /etc/config/fstab
vi /etc/config/fstab
Then change
option target '/mnt/mmcblk0p1'
to
option target '/overlay'
and change
option enabled '0'
to
option enabled '1'
Reboot, and you should be good to go!
Setting Up AudioGoogle Assistant uses Alsa, which can be installed on the Omega 2+ . Run these commands to install the necessary packages for Audio:
opkg update
opkg install pulseaudio-daemon pulseaudio-tools alsa-lib alsa-utils
mkdir /run
udevd --daemon
chmod 0777 /dev/snd/*
mkdir -p /var/lib/pulse
pulseaudio --system --disallow-exit --no-cpu-limit &
To test your sound setup run:
speaker-test -t wav
In order to install some packages, we need to first modify our /etc/opkg/distfeeds.conf file. Run
vi /etc/opkg/distfeeds.conf
and uncomment all the commented out repos. Then run:
opkg update
Installing Google-Assistant-SDK is not as straightforward on the Omega2+, we have to manually install some packages, modules, and dependencies before moving on to installing Google Assistant
opkg update
opkg install git git-http
opkg install python3-dev python-pip python-sounddevice
pip install urllib3[secure] pyopenssl sounddevice==-0.3.7 click==6.7 tenacity==4.1.0
pip install  google-auth-oauthlib[tool]==1.0.1 argparse==1.4.0
pip install --upgrade google-assistant-sdk
This will take a while. If you encounter any issues such as MemoryErrors or No storage left on device. then expand /tmp or add more swap space.
To add swap, see:
https://docs.onion.io/omega2-docs/extending-omega-memory.html
To expand /tmp, all you need to do is run this command:
mount -o remount,size=150M /tmp #you can change size to whatever you want
Follow Google's guide to set up your credentials here:
https://developers.google.com/assistant/sdk/develop/python/config-dev-project-and-account
Save the credentials in your home directory as assistant.json
I found that the AIYprojects-Raspbian code from the raspbian kit seemed to work very well on the Omega. All you need to do is:
git clone https://github.com/google/aiyprojects-raspbian.git voice-recognizer-raspi
and then replace the code in scripts/install-deps.sh with
#!/bin/bash
set -o errexit
scripts_dir="$(dirname "${BASH_SOURCE[0]}")"
# make sure we're running as the owner of the checkout directory
RUN_AS="$(ls -ld "$scripts_dir" | awk 'NR==1 {print $3}')"
if [ "$USER" != "$RUN_AS" ]
then
   echo "This script must run as $RUN_AS, trying to change user..."
   exec sudo -u $RUN_AS $0
fi
opkg install alsa-utils python-pip pyOnionGpio rsync ntpdate
pip3 install --upgrade pip virtualenv pysocks ttspico
cd "${scripts_dir}/.."
virtualenv --system-site-packages -p python3 env
env/bin/pip install -r requirements.txt
# The google-assistant-library is only available on ARMv7.
if [[ "$(uname -m)" == "armv7l" ]] ; then
 env/bin/pip install google-assistant-library==0.0.3
fi
for config in status-led.ini voice-recognizer.ini; do
 if [[ ! -f "${HOME}/.config/${config}" ]] ; then
   echo "Installing ${config}"
   cp "config/${config}.default" "${HOME}/.config/${config}"
 fi
done
Modifying that shell script is necessary, as it uses some commands that aren't used in LEDE/OpenWRT.
Make install-deps.sh executable:
chmod +x install-deps.sh
Run the scripts:
 cd ~/voice-recognizer-raspi
./scripts/install-deps.sh
./scripts/install-services.sh
google-oauthlib-tool --client-secrets path/to/assistant.json --scope https://www.googleapis.com/auth/assistant-sdk-prototype --save --headless
To run the Google Assistant, all you need to do is:
 cd ~/voice-recognizer-raspi
source env/bin/activate
python3 src/main.py -T clap
The demo video below shows me pressing a button, but by setting the trigger to clap, you have a much simpler interface.
Apologies for the weird audio and the bad video quality. I'll upload a proper demo of the Assistant working soon.
Hope y'all enjoyed it!
OtherI'm sorry for the bad documentation, I'm writing this just minutes before the deadline. I will upload better documentation along with a bash script that can install everything automatically.
IssuesThe main issue here is that this setup is very unreliable, and the lack of a voice trigger defeats the purpose of voice control. The main reason behind this is that there is little to no support for some of the dependencies with OpenWRT.
Future Plans:I plan on improving the documentation, 3d printing an enclosure, and adding hotword detection using KiTT.ai's Snowboy.


_3u05Tpwasz.png?auto=compress%2Cformat&w=40&h=40&fit=fillmax&bg=fff&dpr=2)


Comments
Please log in or sign up to comment.