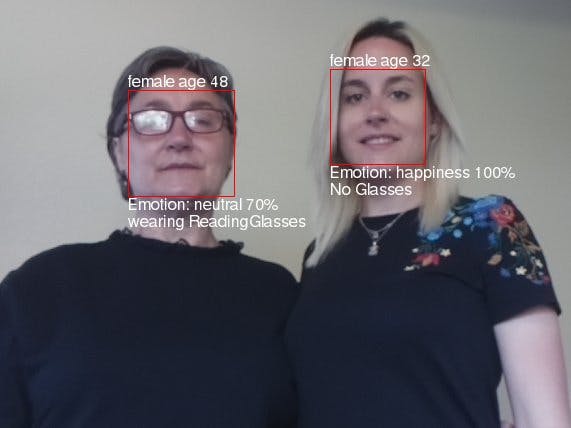
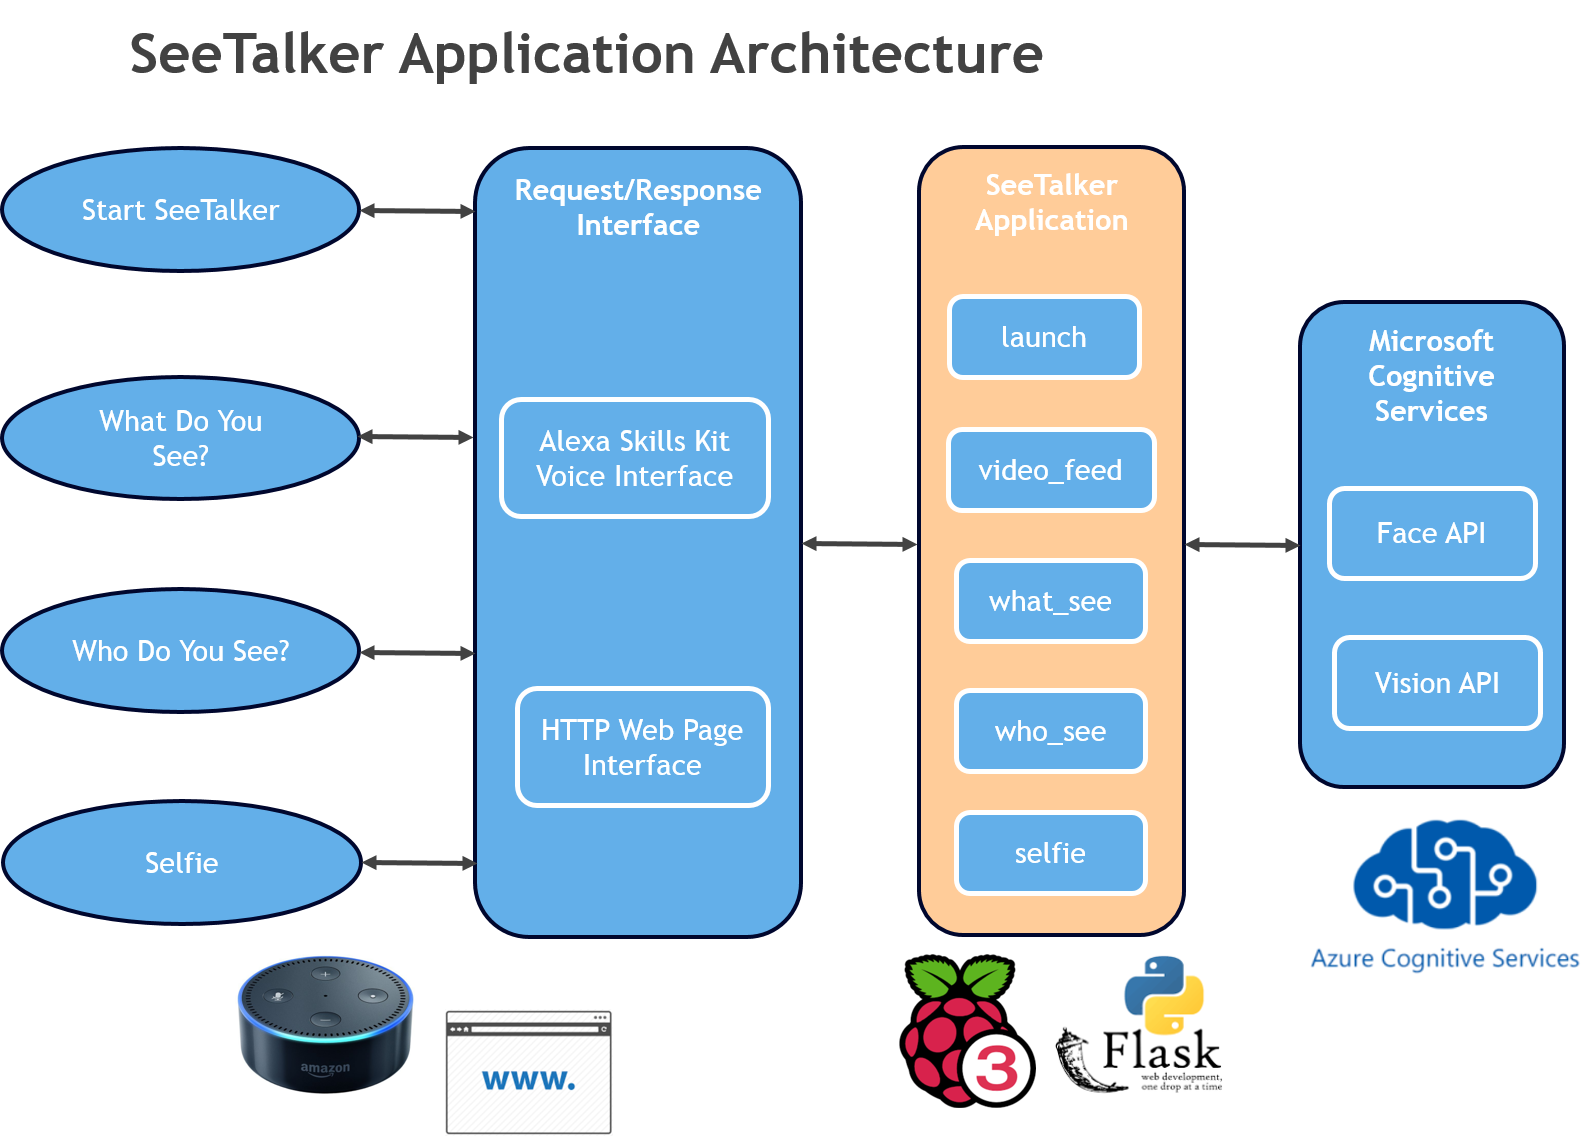
Ask SeeTalker to tell you what it sees! The SeeTalker Alexa skill will snap a photo of what it sees and then call a Microsoft Cognitive Services API to interpret the image. Alexa gives a voice to the image recognition, telling you what it sees. SeeTalker can also take a group selfie using an Alexa command.
Project cost about $200, mostly for an Alexa Dot and to make a standalone, touchscreen Pi computer. Software and services are open source or within free tiers.
Learning opportunities from SeeTalker:
- Leverage AI services at no cost (so far)
- Use Alexa as a voice interface
- Create an Alexa skill
- Use image recognition from Microsoft Cognitive Services
- Make a Raspberry Pi a web and Alexa server using Flask-Ask
- Send Email
- Use callbacks for asynchronous event handling
I created this project to learn. I have a personal strech goal to create a micro sized, smart drone and wanted to focus on the "smart" part in this project. I came into the project with a dormant programming background (C++ on Windows), but little to no experience with web development, Python, the Raspberry Pi and Linux. Persistence helped. SeeTalker was developed with a lot of Googling for code examples, hacking the code and learning along the way. There never is a single source for everything one wants to do, so I want to share credit with the many people who have posted code that I used in this project (see Credits).
My inexperience with Python and Linux will show in my work, but I hope this documentation and source code gives you something useful for your project. I tried to capture the key steps to run the application but I apologize in advance for any details missing as I didn't think to make the code public when I started, so didn't log everything on the journey.
Step 1 - Raspberry Pi SetupFirst step is to set up the Raspberry Pi. I used a Pi 3b. I plan to port the app to a Pi Zero but have not tested on that hardware yet. The app is pretty CPU intensive with the video feed embedded, so only consider a Pi Zero if you need the smaller footprint. I used Raspbian Stretch and recommend using it since it's the latest Raspbian release.
The project github repository has the requirements.txt file for library dependencies. You will also need a Pi Camera. The underlying video code from Miguel Grinberg is implemented generically to support multiple cameras, but I only tested with the Pi Camera.
I housed my Raspberry Pi in a SmartiPi case and added a Logitech USB keyboard/mouse pad and 7" LCD screen to give me a standalone computer. You can also SSH into the Pi from another computer to work in headless mode. Below are front and back views of my setup.
The SeeTalker application code can be downloaded from the SeeTalker github site. The requirements.txt file is also on the github site for library dependencies. I did not record how I retrieved every library, but references are available from the web.
See Git Basics: Getting a Git Repository for help getting the code.
You will need to add Alexa, Azure Cognitive API and email parameters:
st_main.py:
The main application code is st_main.py. It has the Alexa and web request handlers. The parameters below must be updated for sending Selfie Emails. The parameters are in the SelfieAlert_EmailHandler() function.
fromAddr = 'change this to your sender email address'
toAddr = 'change this to your destination address'
email_pwd = 'change this or reference from a function'
ms_cognitive_imagerec.py:
This is the image recognition code which uses Azure Cognitive Services. Change the subscription keys and API endpoints for Azure (Microsoft) Cognitive Services. I left the "westus" endpoints, so change that per guidance from Azure Cognitive Services:
face_api_sub_key = 'your subscription key'
face_api_endpoint = 'https://westus.api.cognitive.microsoft.com/face/v1.0/detect'
vision_api_sub_key = 'your subscription key'
vision_api_endpoint = 'westus.api.cognitive.microsoft.com'
Sample JSON Response From FACE API
eml_Email.py
This code is used to send email from the Selfie function. This was a late feature added initially for debugging. It is not secure since the email password is hardcoded in st_main.py. Consider whether you need this code and consider a more secure way to store login credentials.
# set for gmail
smtp_server = "smtp.gmail.com"
image_draw.py
This code has functions used to draw rectangles and text on images. It is based on the PIL library. No settings to set.
Step 3 - Configure the Alexa SkillCreating an Alexa skill requires set up on the Alexa Developer Console and code to interact with Alexa. The code can be done using Amazon's Lamba service, where your code resides on Amazon's AWS clould, or you can do what we do in this project, host code on your own computer.
a. Create and Amazon Developer Account (if new to AWS)
https://developer.amazon.com/why-amazon
b. Configure Your Skill
First get an overview of Steps to build a Customer Alexa Skill
Key steps for this project:
1. Define the invocation name for your skill. This is basically the app name that you tell Alexa to start. In our case, it's "see talker". The invocation name cannot have capital letters. Please use another invocation name for your app.
2. Create your intents. Intents are the actions you want the skill (See Talker) to perform. Each intent requires that you define utterances to invoke the intent. The 3 customer intents and details for each intent are shown below. Notice how Alexa gives you 3 required intents as well (StopIntent, HelpIntent, CancelIntent) for which you do not need to code, but can override.
3. Configure Your Endpoint
This is the URL on your host Pi computer (or other computer) that will be called by Alexa. I used ngrok on the Pi to enable a temporary HTTS tunnel to the computer. The command to run ngrok is shown later under Run SeeTalker. When you start ngrok, you will be given the tunnel URL https address. Use the URL as the endpoint.
This project uses the Flask-Ask framework to run the core application and respond to Alexa and web browser requests. See John Wheeler's github site for the flask-ask code.
Run: pip install flask-ask
Step 5 - Create Azure Cognitive Services API Keysa. Create an Azure developer account
azure.microsoft.com/Account/Developer
b. Create API keys for the Face API ("who do you see") and Vision API ("what do you see")
Key creation how-to:
https://azure.microsoft.com/en-us/try/cognitive-services/?api=face-api
The SeeTalker Dashboard and settings are shown below. You can use either key1 or key 2 in your application. In addition to the two APIs, SeeTalker uses the "video_talker" blob to store the file used for the Selfie camera sound. Had to use a trusted storage location for the sound file.
If you don't have an Alexa, the Alexa Dot works and is relatively inexpensive. SeeTalker will work with all Alexa's, however, so if you have an Alexa, bring it close enough to your SeeTalker camera to do the image recognition and Alexa conversation in one location for testing. You could put the Alexa and Pi/Camera in separate locations. Refer to your Alexa documentation for set up or visit Amazon's Alexa website for your Alexa. Here is the link for the Dot.
Step 7 - Run SeeTalker7a. Run ngrok HTTPS tunnel
To enable Alexa and web browsers outside your local network to reach SeeTalker, you have to create open an HTTPS tunnel to your Raspberry Pi. I used ngrok for this purpose.
7a1. Get ngrok
Download from the ngrok website: https://ngrok.com/
7a2. Run ngrok
I used port 5000, but you can change. Alexa must use HTTPS. Copy the https address to use later. You will need to add the address as the endpoint in the Alexa Developer Console for your SeeTalker type app (please use another skill name).
./ngrok https 5000b. Run SeeTalker
Create a SeeTalker directory and run this at the command line:
python3 st_main.pyStep 8 - Use SeeTalker
To Alexa:
- Hey, Alexa!
- Start See Talker
SeeTalker Through Alexa
- SeeTalker active, how can I help you?
Ask SeeTalker Through Alexa One of These:
- Who do you see?
- What do you see?
- Selfie!
Ask SeeTalker Through Web Interface
- Live video feed: [ngrok address or local IP]/video_feed (works better on local wifi network)
- Who Do You See: [ngrok address or local IP]/who_see
- What Do You See: [ngrok address or local IP]/what_see


Comments
Please log in or sign up to comment.