


Hardware components | ||||||
 |
| × | 1 | |||
Software apps and online services | ||||||
| ||||||
Hand tools and fabrication machines | ||||||
| ||||||
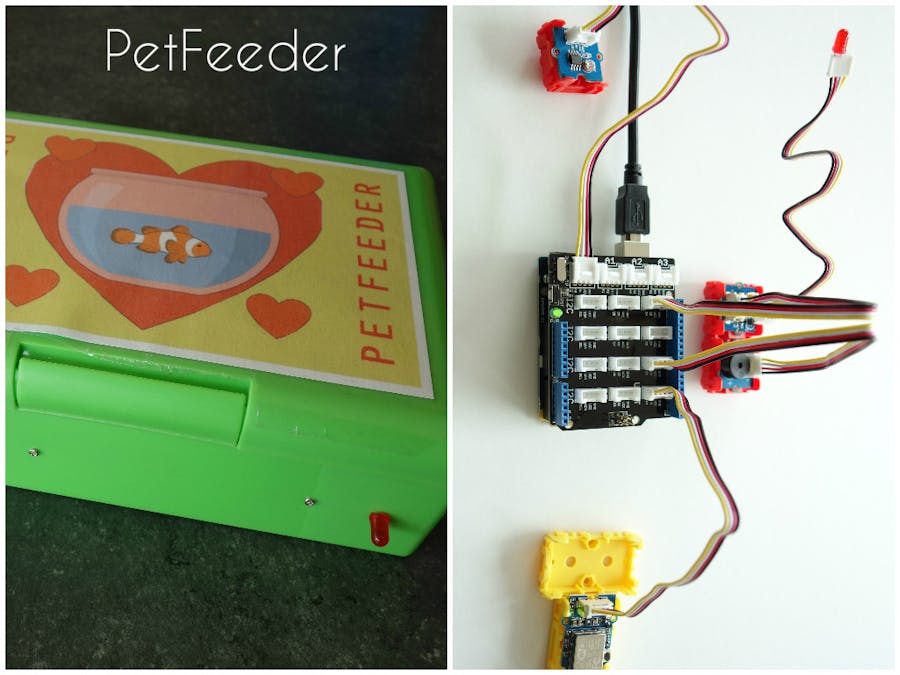
Wist je dat er in 2010, 10.000 meldingen waren van uitgehongerde en verwaarloosde huisdieren en dat dit cijfer elk jaar is blijven stijgen. Hier hebben wij een oplossing voor gevonden namelijk.. de petfeeder.
De Petfeeder is een sensor die je in je doos of kast met dierenvoer plaatst. Als die kast of doos 36 uur lang niet open is geweest en dus geen licht kreeg, gaat er een buzzer af, het led lampje gaat branden en je krijgt eveneens een bericht op je smartphone, dat je huisdier dringend eten nodig heeft . Dit is een handig instrument want nu vergeet je je huisdier niet meer te voederen.
De petfeeder is ook een goed controlemiddel of je doggysitter of goudvisoppas wel voldoende aandacht besteedt aan je lieve huisdier, terwijl jij op vakantie bent.
Want zoals je weet every pet needs a leader so use our PetFeeder.
petfeeder.ino
Arduino/*
Author: students JOMA secundair Merksem and K. Kuypers
Contact: kathleen.kuypers@gmail.com or kkuypers@jomasecundair.be
Arduino UART Demo Sketch. This Sketch is made for an Genuino 101 IoT board with a Grove
UART WiFi module based on the popular ESP8266 IoT SoC to communicate to the AllThingsTalk
IoT developer cloud.
The Grove UART WiFi module has firmware installed which includes the ATT_IOT library. It
communicates through Serial1 of the Genuino 101 board.
Version 1.0 dd 16/03/2016
### Instructions
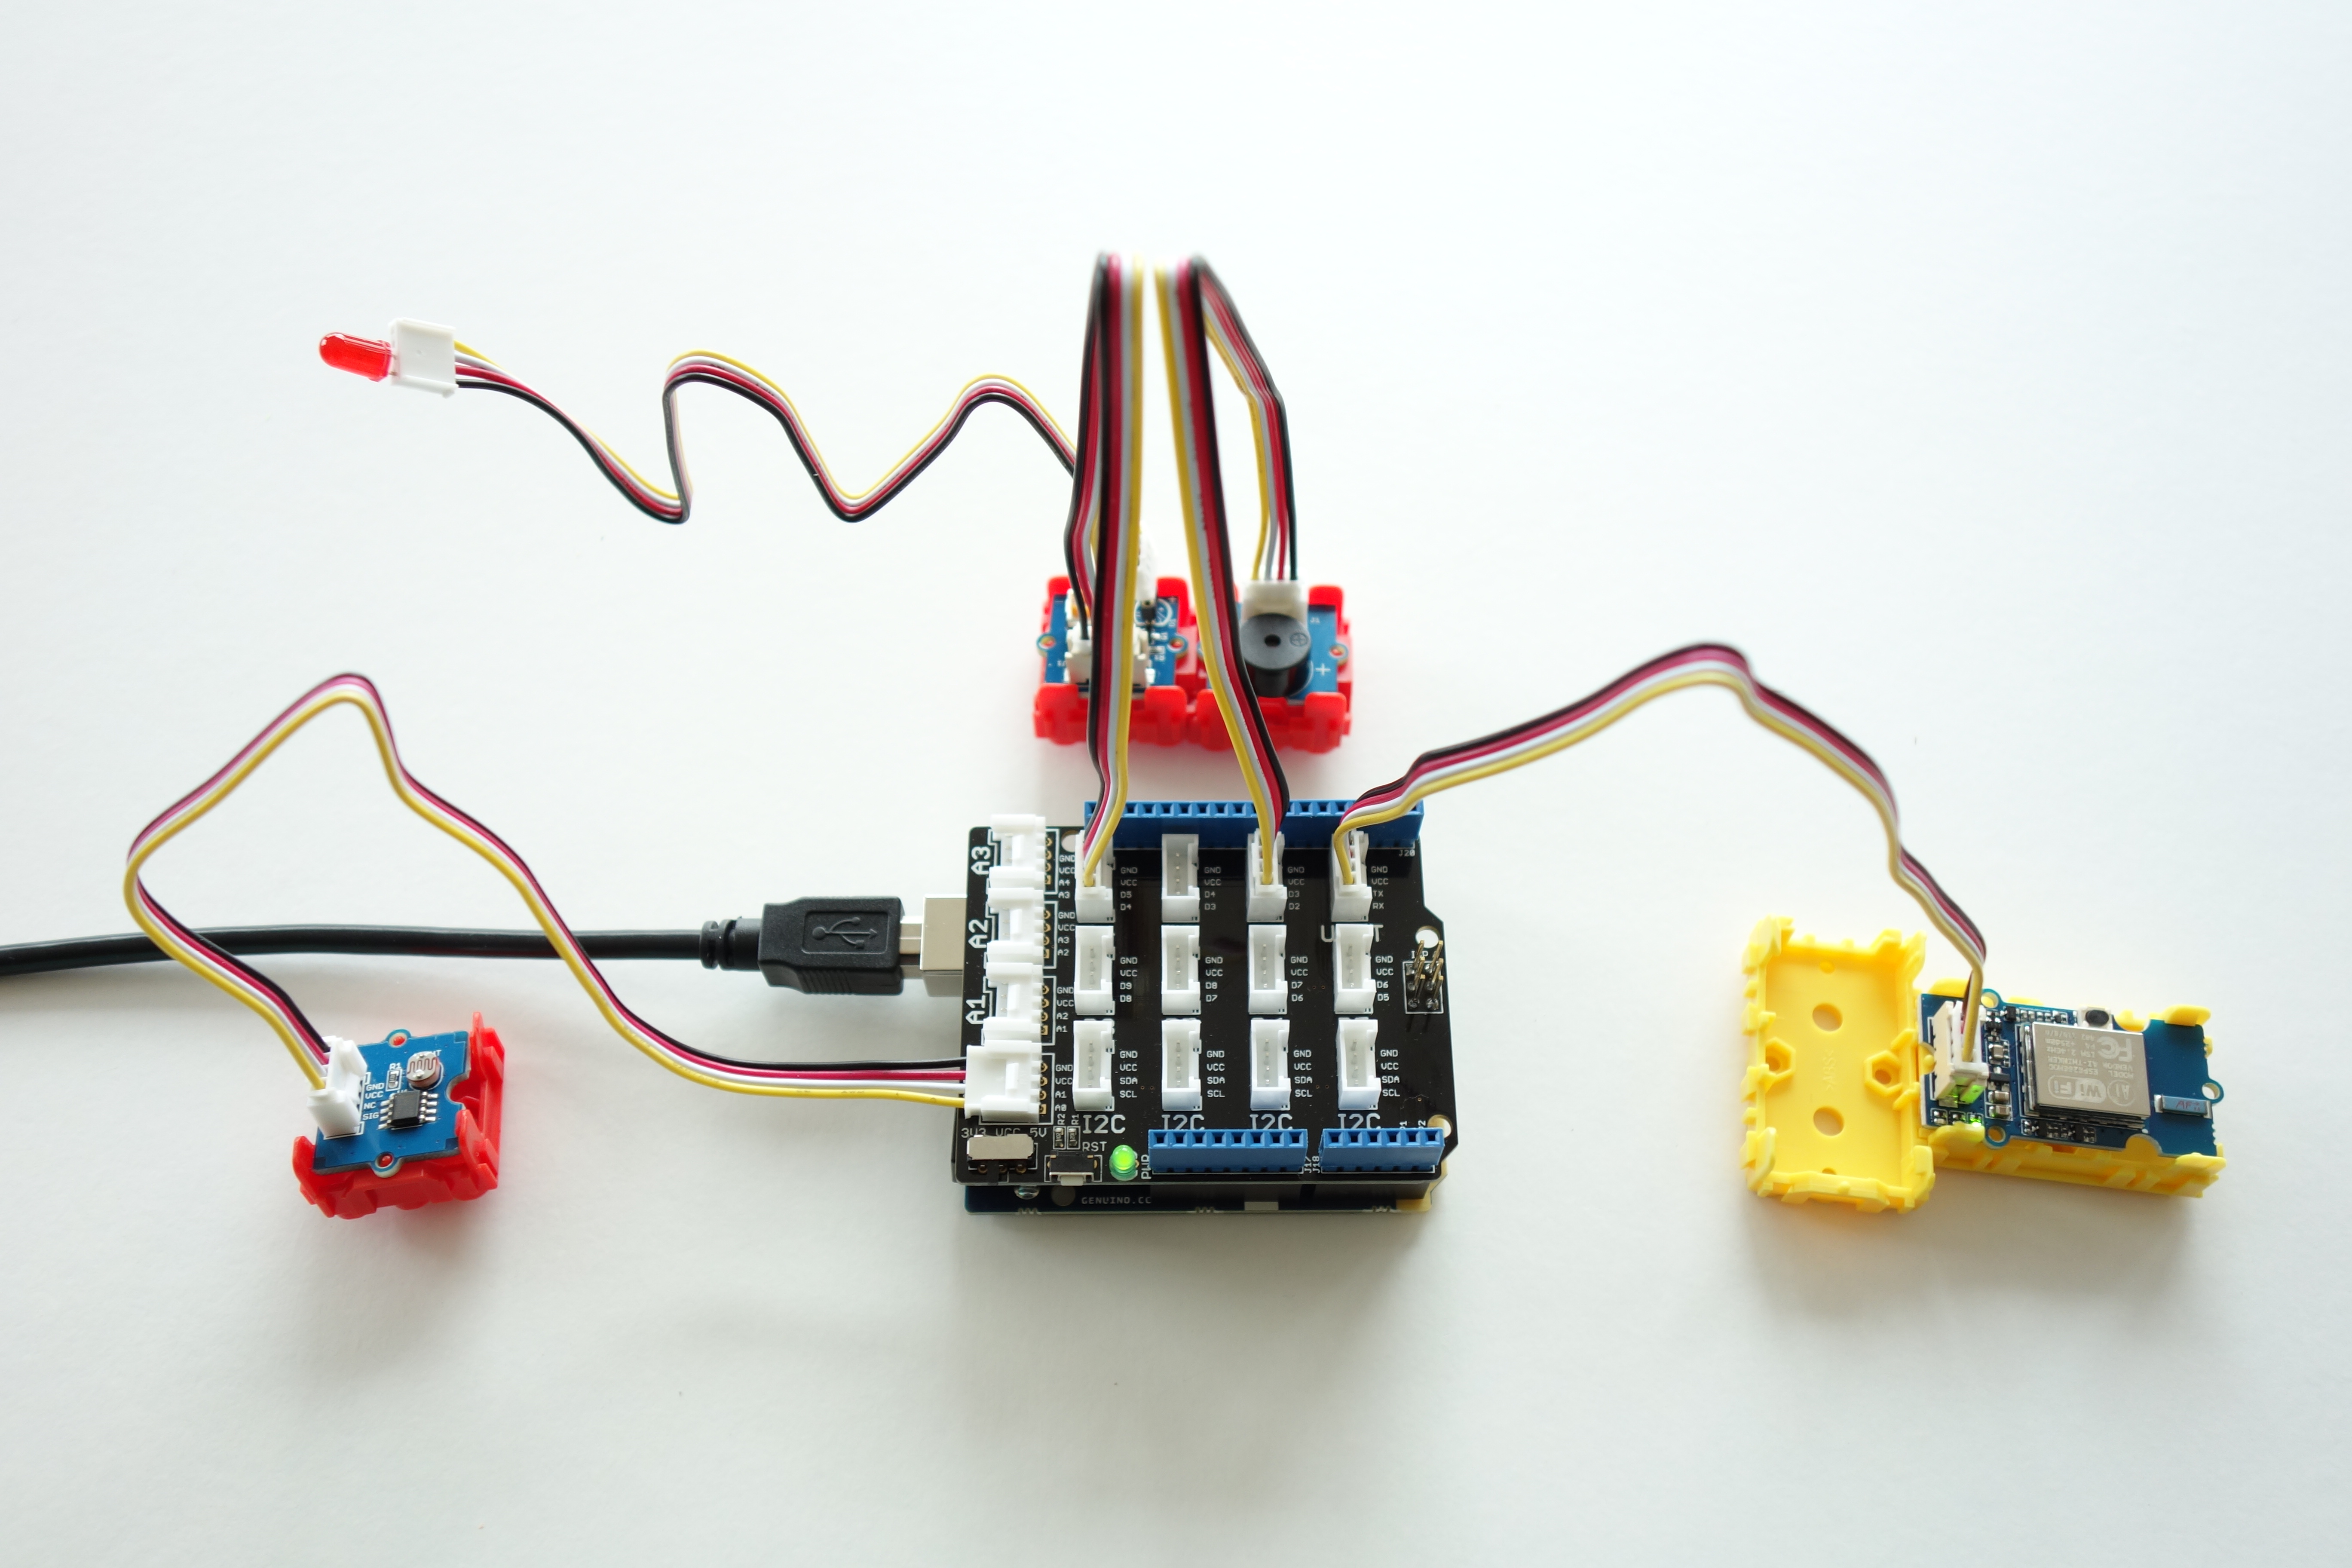
1. Setup the Arduino hardware
- Use an Arduino Genuino 101 IoT board
- Connect the Arduino Grove shield
- Connect USB cable to your computer
- Connect a Grove Light sensor to pin A0 of the Arduino shield
- Connect a Grove Buzzer actuator to pin D2 of the Arduino shield
- Connect a Grove Led actuator sensor to pin D4 of the Arduino shield
- Grove UART wifi to pin UART (D0,D1)
2. Add 'ATT_IOT_UART' library to your Arduino Environment
More info can be found at http://arduino.cc/en/Guide/Libraries
3. Fill in the missing strings (deviceId, clientId and clientKey) in the keys.h file
4. Optionally, change sensor names, labels as appropiate
5. Upload the sketch
Note: for use of extra actuators, extend the callback function at the end of the sketch
*/
#include "ATT_IOT_UART.h" // AllThingsTalk Arduino UART IoT library
#include <SPI.h> // Required to have support for signed/unsigned long type
#include "keys.h" // Keep all your personal account information in a seperate file
// Fixed constants for minimum and maximum light sensor value
#define sensorMin 0
#define sensorMax 1023
ATTDevice Device(&Serial1);
char httpServer[] = "api.smartliving.io"; // HTTP API Server host
char mqttServer[] = "broker.smartliving.io"; // MQTT Server Address
//****************************************************************
//** PIN numbers
//****************************************************************
#define lightId 0 // Analog sensor is connected to pin A0 on grove shield
#define ledId 4 // Digital actuator led is connected to pin D4 on grove shield
#define buzzerId 2 // Digital actuator buzzer is connected to pin D2 on grove shield
// Required for the device
void callback(int pin, String& value);
//****************************************************************
//** setup
//****************************************************************
void setup()
{
Serial.begin(57600); // Init serial link for debugging
while(!Serial && millis() < 1000); // Make sure you see all output on the monitor. After 1 sec, it will skip this step, so that the board can also work without being connected to a pc
Serial.println("Starting sketch");
Serial1.begin(115200); // Init serial link for WiFi module
while(!Serial1);
while(!Device.StartWifi(true))
Serial.println("Retrying...");
while(!Device.Init(DEVICEID, CLIENTID, CLIENTKEY)) // If we can't succeed to initialize and set the device credentials, there is no point to continue
Serial.println("Retrying...");
while(!Device.Connect(httpServer)) // Connect the device with the AllThingsTalk IOT developer cloud. No point to continue if we can't succeed at this
Serial.println("Retrying");
//*** Add assets to the smartliving IOT cloud
Device.AddAsset(lightId, "STATUS", "Status", false, "string"); // Create the sensor asset for your device
Device.AddAsset(ledId, "FEED ME PLEASE!", "LED", true, "boolean"); // Create the actuator asset for your device
//***
delay(1000); // Give the WiFi some time to finish everything
while(!Device.Subscribe(mqttServer, callback)) // Make sure that we can receive message from the AllThingsTalk IOT developer cloud (MQTT). This stops the http connection
Serial.println("Retrying");
pinMode(lightId, INPUT); // Initialize the digital pin as an input.
Device.Send("OK", ledId);
Serial.println("Light sensor is ready for use!");
pinMode(buzzerId, OUTPUT); // Initialize the digital pin as an input.
Serial.println("Buzzer is ready for use!");
pinMode(ledId, OUTPUT); // Initialize the digital pin as an input.
Device.Send("false", ledId);
Serial.println("LED is ready for use!");
}
//****************************************************************
//** variables
//****************************************************************
int maxHours = 36; // the max time between 2 feedings in hours
//int maxSeconds = maxHours * 3600; // the max time between 2 feedings in seconds
int maxSeconds = 3; // for testing issues so that we don't have to wait maxHours
int sec = 0; // seconds since last feeding
int Prev_range = 5; // assume we start with a lighty situation
void loop()
{
sec++; // start timer
int range = map(analogRead(lightId), sensorMin, sensorMax, 0, 5); // meassure lightness and convert to a number between 0 and 5
if (range != Prev_range) // Verify if value has changed
{
if (range!=0 && range !=1) // it's not dark so it's "open" and we are feeding
{
Device.Send("feeding...", lightId);
sec = 0; // pet has been fed so restart timer
}
if (sec >= maxSeconds) // it's dark and last feeding was to long ago
{
Device.Send("PLEASE FEED YOUR PET!", lightId);
while (range==0 || range==1) // as long as it's dark (closed): buzz and blink led
{
digitalWrite(ledId, HIGH);
Device.Send("true", ledId);
digitalWrite(buzzerId, HIGH);
Device.Send("true", buzzerId);
digitalWrite(ledId, LOW);
Device.Send("false", ledId);
digitalWrite(buzzerId, LOW);
Device.Send("false", buzzerId);
delay(1000); //wacht 1 sec
range = map(analogRead(lightId), sensorMin, sensorMax, 0, 5);
}
Device.Send("OK feeding...", lightId);
sec = 0; // pet has been fed so restart timer
}
Prev_range = range;
}
Device.Process();
delay(1000); // meassure every second
}
// Callback function: handles messages that were sent from the iot platform to this device.
void callback(int pin, String& value)
{
Serial.print("Incoming data for: "); // Display the value that arrived from the AllThingsTalk IOT developer cloud.
Serial.print(pin);
Serial.print(", value: ");
Serial.println(value);
}
keys.h
ArduinoFill in the missing strings (deviceId, clientId and clientKey) in the keys.h file you get for the device
#ifndef SETTINGS
#define SETTINGS

#define DEVICEID "xxx"           // Your device id comes here
#define CLIENTID "xxx"           // Your client id comes here;
#define CLIENTKEY "xxx"          // Your client key comes here;

#endif


Comments
Please log in or sign up to comment.