Introduction
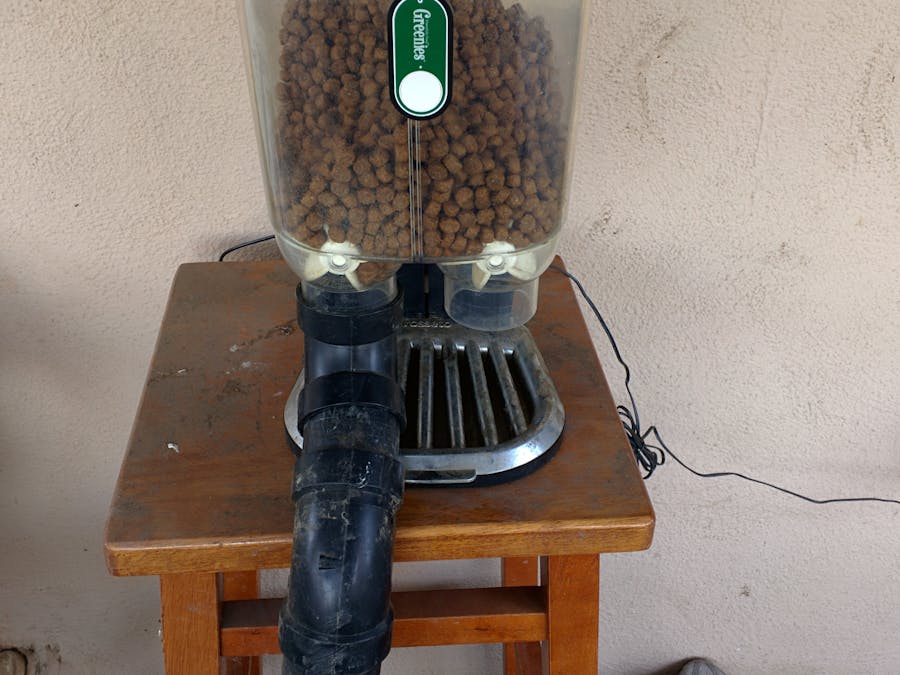
This is an automated dog feeder that uses a NodeMCU(Based on ESP8266) Lua DevKit to drive a Parallax Continuous Rotation Servo. The NodeMCU Devkit drives the servo and has a mini web server that's always running on it. Any GET request to the chip with proper parameters can activate the servo. This opens up the ability to turn on the dog feeder with a hacked amazon dash button, openhab, Tasker(android), or pebble watch.
I originally followed the setup by Dave Bryan at: http://drstrangelove.net/2013/12/raspberry-pi-power-cat-feeder-updates/
I made some changes for my own setup:
-I switched it to the NodeMCU devkit because it was a lot cheaper ($4 on aliexpress.com)
-I felt the raspberry pi was a bit overpowered and I would rather use it for other stuff (see below)
-I used the raspberry pi to host an openhab server for home automation instead as well as hosting the nodejs script that listens for ARP requests from the dash button.
Parts
-NodeMCU Lua Devkit - $4-$6 on aliexpress. Link: http://www.aliexpress.com/item/4M-4FLASH-NodeMcu-Lua-WIFI-Networking-development-board-Based-ESP8266/32448662166.html?ws_ab_test=searchweb201556_9_21_79_78_77_92_91_22_80,searchweb201644_5,searchweb201560_9
-Cereal Dispenser (After building this I realized that there were other alternatives such as wall-mounted cereal dispensers for cheaper prices). Link: http://www.amazon.com/Rosseto-EZ-SERV100-5-Gallon-Cereal-Dispenser/dp/B001LK792A
-Raspberry Pi (optional) - to host the nodejs script. You can also use any computer that's always on.
-Amazon Dash button (optional)
-Pebble Watch (optional)
-Tasker for Android (optional)
About the NodeMCU DevKit
The Development Kit is based on the ESP8266 but it doesn't require an FTDI adapter (straight to USB) and has 10 GPIO pins. If you're unfamiliar with the ESP8266, think of it as a wifi adapter that can host applications. ESP8266's have become popular in recent years because of their small size, cheap price ($3-$6 from AliExpress) and low power consumption. The NodeMCU DevKit uses the esp8266 and adds a usb port for power and extra pins (among other additions). A few applications for the NodeMCU DevKit:
-Controlling a Relay (turn on/off a light, open a garage door)
-Creating low-cost sensor modules. (temperature, humidity, movement, vibrations, etc.)
-Creating a dog feeder....
Setup
All code is on my github page at: https://github.com/iclosem/Dogfeeder
1) Connect your nodemcu devkit by usb to your computer.
2) Install the drivers and flash the firmware. Instructions are here:
http://www.electrodragon.com/w/ESP8266_NodeMCU_Dev_Board
Nodemcu flasher:https://github.com/nodemcu/nodemcu-flasher
3) Install Esplorer: http://esp8266.ru/esplorer/
4) When you open Esplorer click on the Open button on the right as well as DTR and RTS. Baudrate should be 9600. Make sure you're on the right com port. (COM5 for me). You should see something that says:
"Port Open 9600 Communication with MCU...
Got Answer!
AutoDetect firmware..."
You may get some error messages and gibberish but the main thing is a connection has been established. (If you get some problems connecting, press the reset button on your NODEMCU)
5) To test it you can paste in (on the left window):
wifi.setmode(wifi.STATION)
wifi.sta.config("[Insert SSID here]", "[Inser Wifi Pass here]")
Then click Send to Esp on the bottom, erase everything and paste in:
print(wifi.sta.getip())
Your assigned ip address should show up. If "nil" shows up, try running "print(wifi.sta.getip())" again (sometimes there's a lag time) and if it still gives you "nil" then there may be something wrong with your network credentials.
6) Create a New file in Esplorer and paste in the contents of "init.lua" (in the NodeMCU directory) and click save to esp. This will setup a webserver on your nodemcu and you'll be able to see it at: http://your.nodemcu.ip.address
7) To get the servo hooked up paste in the contents of "servo.lua" (in the NodeMCU directory) into a new file and save it as "servo.lua"
8) On the Parallax Rotation Servo connect the black wire to Ground, Red wire to Vin, and the White Wire to Pin 4.
Wiring with a breadboard:
Wiring directly w/out a breadboard:
9) Navigate to the website http://yournodemcuipaddress and click either "ON" button and the servo should spin.
Amazon Dash Setup (A little glitchy does not always work 100%):
1) follow the instructions at: https://github.com/hortinstein/node-dash-button to install the node-dash-button module
Follow the example to get the mac address of your dash button.
2) Create a new .js file - sudo nano feeddash.js
3) Paste in the contents of the feeddash.js file (In the Raspberry Pi directory- don't forget to put in your mac address)
4) You can have it run in the background using this command: nohup sudo node feeddash.js &
Pebble Watch setup:
1) Setup an account at cloudpebble.net
2) Create a new project, name it whatever you want, and select pebble.js for the project type
3) paste in the contents of app.js into the app.js file. (Don't forget to set your url/ip on line 108)
4) Click the run button on the top right. (make sure it runs on phone and enable developer connection on your phone's pebble app)
Tasker setup:
1) Create a new task
2) Create a new Action and select Net -> HTTP Get
3) Under server put in http://YourNodeMcuIp/?pin=ON1
4) Assign any Profile to work with this. I use the autovoice pro plugin so I can say "ok google feed the dog" and it feeds the dog.
In the future I plan on adding an integration with Amazon Echo.
I can also control it with OpenHab:
If you have questions about the openhab binding, I pretty much setup a rule that listened to the DogFeeder item and used the exec command to run a .sh file. The .sh file sends curl request to the dog feeder.
If you have any questions at all about the openhab binding or the project in general, post a comment below.
Thanks!


Comments
Please log in or sign up to comment.