


Hardware components | ||||||
 |
| × | 1 | |||
| × | 1 | ||||
Software apps and online services | ||||||
| ||||||
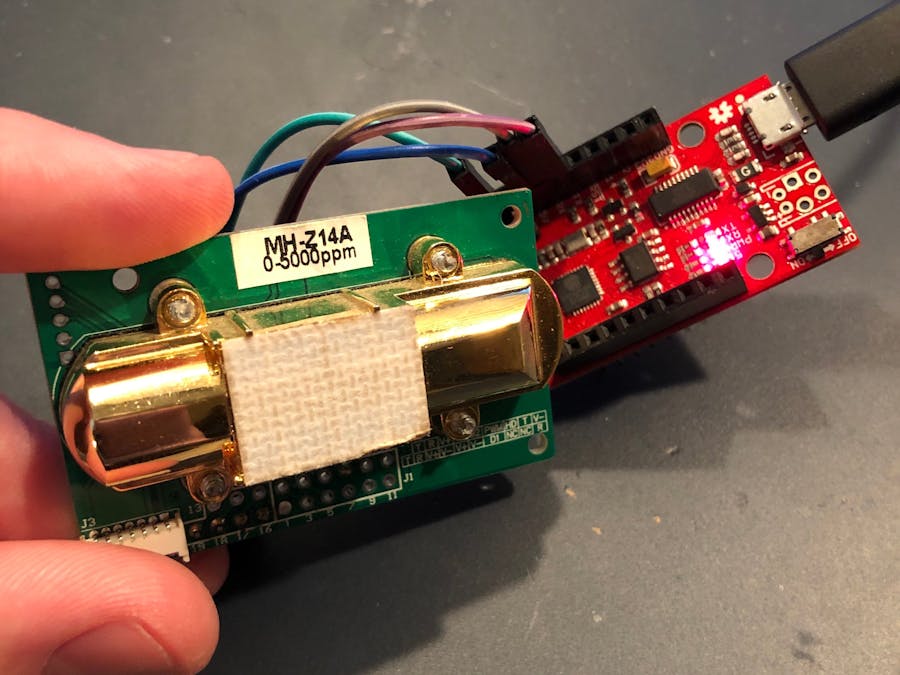
I'm going to show you how to hookup and use the MH-Z14A carbon dioxide gas sensor. I received this sensor by accident when I bought a different one so I figured I would see how well it works. The MH-Z14A according to the datasheet:
MH-Z14A NDIR Infrared gas module is a common type, small size sensor, using non-dispersive infrared (NDIR) principle to detect the existence of CO2 in the air, with good selectivity, non-oxygen dependent and long life. Built-in temperature compensation; and it has digital output, analog voltage output, and PWM output.
Here are the specs:
- Input Power: 4.5V - 5.5V DC @ 150ma
- Logic: 3.3v (5v compatible w/ analog out)
- Preheat Time: 3 min
- 0-5000ppm +/-50ppm
- Outputs: UART(which we will use here), PWM, and Analog 0.4-2v or 0-2.5v DC
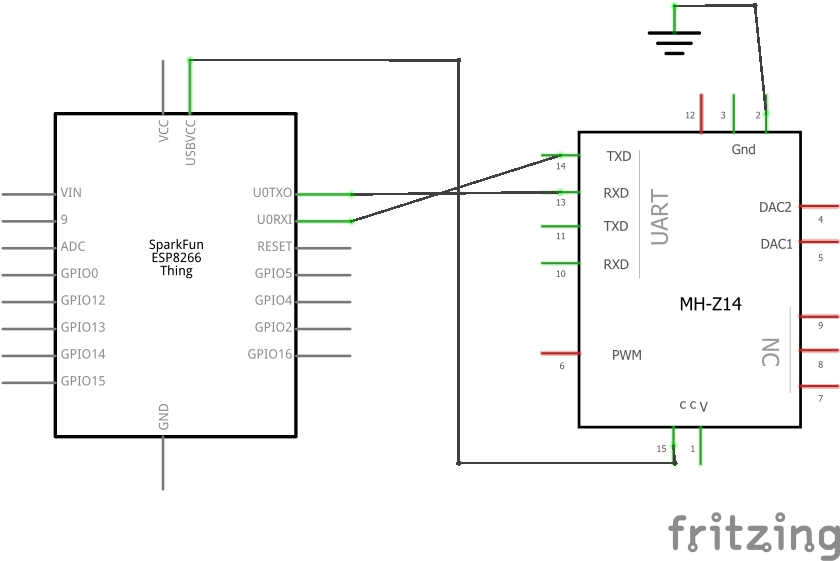
Here is a diagram of the pinouts/pads on the sensor. It is also labeled with abbreviations on the front of the sensor.
For this project I decided to go with using UART for the sensor interface with arduino rather than PWM or analog out. I feel why not stay digital for the best accuracy right? You can use those others but I won't be covering that here. So with UART there are 2 commands we are going to use. One to get the CO2 concentration and the other to manually calibrate the sensor. Each command & response contains 9 bytes. Below is a list of the commands and syntax:
So basically to initiate a read, we will send 0xFF, 0x01, 0x86, 0x00, 0x00, 0x00, 0x00, 0x00, 0x79 to the sensor. You want to setup your baud rate in your program to 9600 so it can talk correctly. For the physical hookups we will use four wires: power, ground, RX, & TX and those are pads 19, 18, 17, & 16 but many are redundant. Connect as follows to your board:
- 5v DC -----> Pad 17
- Ground ---> Pad 16
- TX ----------> Pad 18
- RX ----------> Pad 19
I selected for my board a Sparkfun ESP8266 Thing Dev but you can use any ESP8266 with this sketch or you can use any other board (if its 3.3v logic) by taking out some code. I went with a ESP8266 because it has built in wifi for Blynk and can do OTA updates.
I setup the program so that it polls the sensor every 15 seconds and then uploads the data for the Blynk app. The whole code is listed below. A couple important things to note about the sketch. Look at the notes in the sketch to see the various parts and how to easily modify the code to suit your needs such as taking out the OTA update functionality. The reason I use Blynk is because the ESP8266 only has one hardware serial port. Soooooo... you can't read the values off the USB hookup because the sensor is using the hardware serial. You would need to use software serial if you wanted it to read to a computer via serial. I just avoid that whole thing and write my values to Blynk.
With regard to calibrating, the sensor self calibrates but you can initiate a manual calibration by sending the calibration command. The sensor must be outside in (400ppm) CO2 for at least 30 min to be safe. I find it isn't needed for most use.
Hopefully this helped someone out! Leave a comment if you have issues or questions. Thanks


_3u05Tpwasz.png?auto=compress%2Cformat&w=40&h=40&fit=fillmax&bg=fff&dpr=2)
Comments
Please log in or sign up to comment.