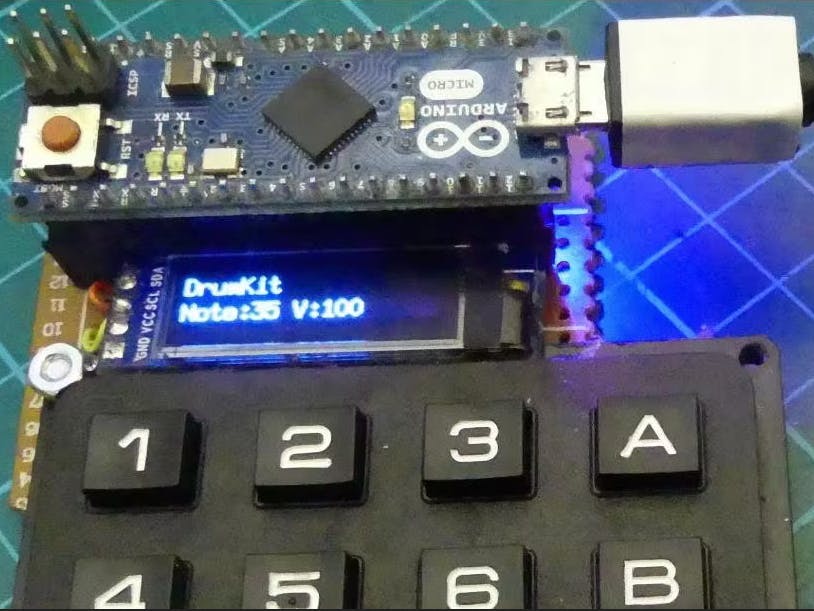
In order to learn how to make MIDI instrument (musical instruments that can be used in music software), I tried to plug buttons on an Arduino Micro.
I figure out, I could simply plug a keypad instead to have 16 buttons! Keypads don't works well when you want to use multiples buttons at the same time, but it still a lot of fun.
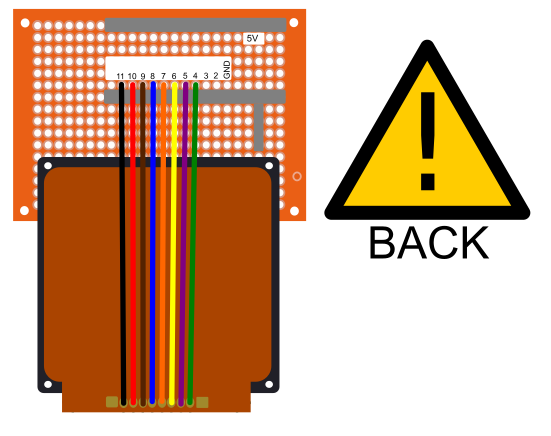
WiringWiring the keypad and the display is pretty simple as it used pins from 2 to 11
Solder headers
First you need to cut two 17 pins female headers (for the arduino) and one 4 pins female headers (for the OLED display).
Here is how to do this: https://www.youtube.com/watch?v=qDG3VFSMSPQ
Solder the headers on a strip board, you can use the arduino micro to check the alignment. (5 spaces between the two headers)
I, personally, didn’t use a header for the OLED display, since I removed the pins on it.
Placing components
You can either hot glue the keypad or screw it by drilling holes on the strip board.
It’s better to fix the keypad before soldering the cable, as it will be easier to check the length of the cables.
Soldering the keypad
So let’s get to the point, here is how to solder the keypad.
Beware, you can easily make a mistake, when you check where the pins are plugged on your arduino, as it is reversed.
You should start with pins 11 and then solder the next one.
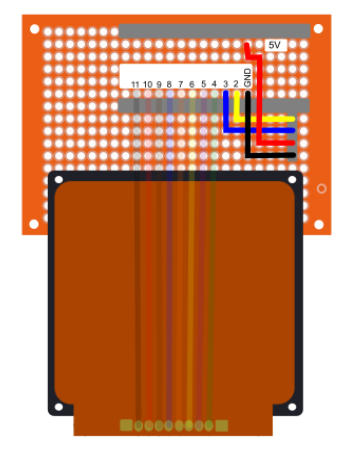
Solder the OLED Display
Here is how to solder the OLED display.
The display use the I2C protocol so it needs to be plugged on pins 2 (SDA) and 3 (SCL) (this is always the case on board with an ATmega32U4)
The ground and the 5v are in the same column
And voilà! our prototype is finished! Last thing, you need to plug the arduino micro this way (the USB port needs to be on the right)
The drawing used here are from usini cards: https://github.com/usini/usini-cards
Images are public domains, so feel free to use it!
CodeNow that our keypad is ready, we need to upload our sketch to the arduino micro.
The code is available here: https://github.com/maditnerd/keypad_midi
Libraries
The code used 3 libraries
If you forgot how to manage libraries, here is a guide:
https://www.arduino.cc/en/Guide/Libraries
- MidiUSB by Gary Grewal (manage USB MIDI)
- U8g2 by olikraus (for the OLED display)
- Keypad by NullKraft (for the keypad)
MidiUSB and U8g2 can be installed using the library manager in the arduino software.
For the keypad, it’s a little bit tricky, this is a modified version of the keypad library by Mark Stanley and Alexander Brevig.
This one can manage multiple-key input.
Multiple keys pressed works more or less, since my goal was to make a monophonic instrument (aka that play one note at a time) it works fine, but if you want to play chords there will be a small delay between each note.
To install the keypad libraries, you need to
- Go to this github repository: https://github.com/Nullkraft/Keypad
- Click on the green button: Clone/Download
- Extract Keypad-master.zip in your library folder inside your sketchbook, you should have a folder Keypad-Master in arduino/libraries.
Settings your preset
I tried to comment on the code as much as I could, so I won’t go into too much detail, feel free to ask me for more information on the comments.
Most parameters are at the beginning of the code, this is where we will set up the notes and velocity (velocity is the volume of the notes).
Memory issues
I had some issues with memory, primary due to the screen.
U8g2 library used a lot of dynamic memory (used by global variables).
I could have used u8x8 or the adafruit library for SSD1306 but the font was either too small or too big.
I had to limit the preset to 8, but you could probably increase the preset numbers with some optimisation.
You could for example, remove the possibilities to customize velocity on each notes for ex.
Preset name
Preset names are stored in this array:
String preset_name [PRESET] = {"Du Riechst So Gut", "FF - Replica", "DrumKit", "A", "4", "5", "6", "B"};
Notes
Notes are stored in a two-dimensional array, each note are in the order of the buttons (first one is 1, second one is 2, etc.).
int notes [PRESET] [NB_BUTTONS] = {
{38, 38, 39, 39, 43, 46, 38, 38, 48, 46, 45, 45, 57, 60, 60, 57}, //Preset 1
{37, 40, 42, 39, 40, 38, 41, 40, 48, 46, 45, 45, 57, 60, 60, 57}, // Preset 2
{35, 35, 38, 42, 44, 45, 46, 47, 48, 49, 50, 51, 52, 53, 55, 57}, // Preset 3
{0, 0, 0, 0, 0, 0, 0, 0, 0, 0, 0, 0, 0, 0, 0, 0},  //Preset A
{0, 0, 0, 0, 0, 0, 0, 0, 0, 0, 0, 0, 0, 0, 0, 0},  //Preset 4
{0, 0, 0, 0, 0, 0, 0, 0, 0, 0, 0, 0, 0, 0, 0, 0},  //Preset 5
{0, 0, 0, 0, 0, 0, 0, 0, 0, 0, 0, 0, 0, 0, 0, 0},  //Preset 6
{0, 0, 0, 0, 0, 0, 0, 0, 0, 0, 0, 0, 0, 0, 0, 0}  //Preset B
};
Notes are stored as midi notes (it goes from 0 to 127), here is a spreadsheet to convert it from musical notes.
Velocity
Same thing for velocity
int velocity [PRESET] [NB_BUTTONS] = {
{70, 70, 70, 70, 100, 100, 100, 100, 100, 100, 100, 100, 100, 100, 100, 100}, //Preset 1
{70, 70, 70, 70, 70, 70, 70, 70, 70, 70, 70, 70, 70, 70, 70, 70}, //Preset 2
{100, 100, 100, 100, 100, 100, 100, 100, 100, 100, 100, 100, 100, 100, 100, 100}, //Preset 3
{0, 0, 0, 0, 0, 0, 0, 0, 0, 0, 0, 0, 0, 0, 0, 0}, //Preset A
{0, 0, 0, 0, 0, 0, 0, 0, 0, 0, 0, 0, 0, 0, 0, 0}, //Preset 4
{0, 0, 0, 0, 0, 0, 0, 0, 0, 0, 0, 0, 0, 0, 0, 0}, //Preset 5
{0, 0, 0, 0, 0, 0, 0, 0, 0, 0, 0, 0, 0, 0, 0, 0}, //Preset 6
{0, 0, 0, 0, 0, 0, 0, 0, 0, 0, 0, 0, 0, 0, 0, 0}, //Preset B
};
Velocity changer
I create a way to change velocity when the D key is pressed.
You can choose to use it or not on any preset by changing the boolean value inside the velocity_changer array.
const int velocity_button = 15; //The D key is used to change velocity if velocity changer is true
const int VELOCITY_CHANGE = 100; //Velocity when D is pressed (should probably be changeable)
bool velocity_changer [PRESET] = {false, true, false, false, false, false, false, false};
Rename your MIDI devices
By default, your MIDI keypad will be named Arduino Micro.
If you want to change the name, follow this tutorial:
http://liveelectronics.musinou.net/MIDIdeviceName.php
In a nutshell, you need to create a new board in boards.txt and rename it.
Using the MIDI KeypadIf you don’t have any music software, you should try LMMS which is free and open source.
Each key plays a note define in the arduino code except *
* Open preset selection mode, press from 1 to B to choose a preset and press * again to exit the selection mode.
My Guitar RigFinally, here is a quick explanation of how I manage to use my keypad as an electric guitar.
In order to host my VST plugins (plugins to generate/modify sounds), I used Reason. https://www.propellerheads.com/fr/reason
However you can use any music software that is compatible with VST.
Here is the list of plugins, I used
- Native Instrument Kontakt : https://www.native-instruments.com/fr/products/komplete/samplers/kontakt-6/This software hosts the guitar plugin
- Prominy V-Metal http://prominy.com/V_METAL.htmGuitar plugin
- Guitar Rig 5 https://www.native-instruments.com/fr/products/komplete/guitar/guitar-rig-5-pro/Guitar effect plugin
I combined two guitars in order to have a heavier sound.
One play note by note (no legato) and the second one plays chords (power chords)
For the effects I used the Shredder Solo effects (which I have a bit modified)
I’m thinking of making a light version of it, that could work on LMMS https://lmms.io/ or samplerbox http://www.samplerbox.org/ by using samples, if you are interested, tell me about it in the comment or on my Twitter account (https://twitter.com/m4dnerd).
It will probably be a lot less cool. :-(


_PnKPri8a6q.jpg?auto=compress%2Cformat&w=48&h=48&fit=fill&bg=ffffff)


Comments
Please log in or sign up to comment.