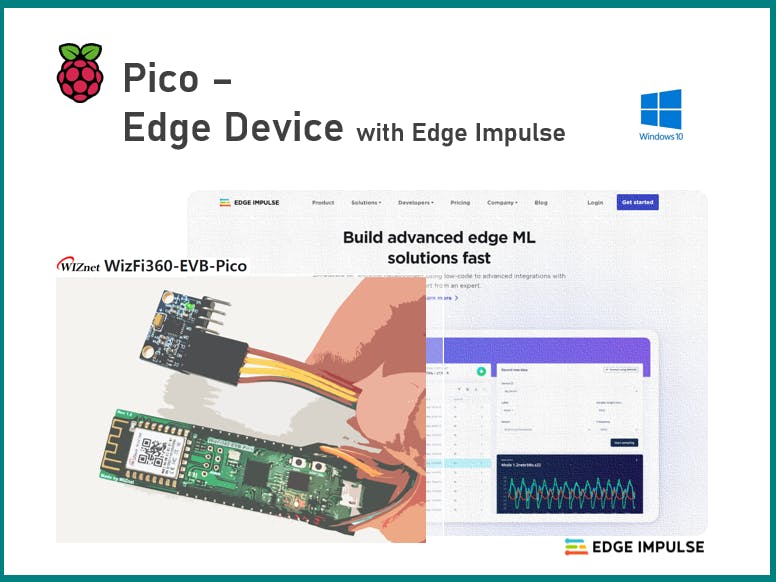
Machine learning is a high-spec data operation that was possible on a high-spec computer or cloud system. However, there are many business models that make this possible even at the embedded level recently, such as TinyML. And I think this market will bring many possibilities in the future.
I recently discovered a software ML platform service called Edge Impulse. it is being serviced to provide ML solutions for several platform boards including Arduino and Pico, and testing is also available for free.
My goal is to create a project that can be used helpful by dividing a few posts. And this time, I posted about an easy way to start.
1. Hardware setupThe platform board is WizFi360-EVB-Pico designed by WIZnet which is IoT platform board including RP2040 and WizFi360 (is a Wi-Fi module). And for data collection, a 6-axis acceleration-gyro sensor called MPU6050 is selected.
WizFi360-EVB-PicoWizFi360-EVB-Pico board is an IoT solution board that connects WizFi360 Wi-Fi module to RP2040. Pico can easily use WizFi360 by setting AT command through UART interface.The more details, you can get through this official link & github repository:https://docs.wiznet.io/Product/Open-Source-Hardware/wizfi360-evb-picohttps://github.com/Wiznet/WizFi360-EVB-Pico-C
MPU6050MPU6050, a 6-axis acceleration-gyro sensor, has 3.3V ~ 5.0V operating voltage range and provides I2C communication. This sensor module is widely used in various platforms such as Pico and Arduino, and datasheets and many related materials can be easily found.
https://www.dfrobot.com/product-880.html
Pico configurationPlease refer how to configurate Pico development stuffs on Window10 from the below post.
https://www.hackster.io/lawrence-wiznet-io/how-to-setup-raspberry-pi-pico-c-c-sdk-in-window10-f2b816
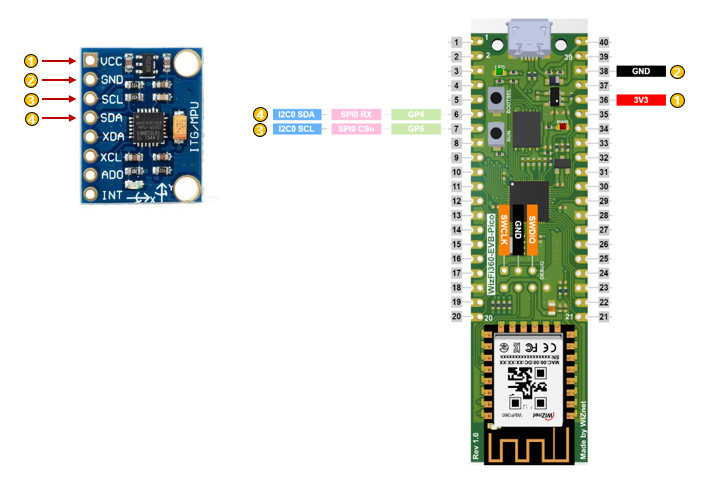
WiringCheck the below Hardware wiring between MPU6050 and WizFi360-EVB-Pico.
SDA on MPU6050 board -> GPIO PICO_DEFAULT_I2C_SDA_PIN (pin 6)
SCL on MPU6050 board -> GPIO PICO_DEFAULT_I2C_SCL_PIN (pin 7)
VCC on MPU6050 board -> 3.3v (pin 36)
GND on MPU6050 board -> GND (pin 38)Edge ImpulseEdge Impulse is a platform service creating ML model for embedded system. As it seems so suitable and an excellent solution for many platform boards. Basically it collects data from device and provides ML model solutions from it, And it can be used in various fields. Above all, the services that embedded developers are looking for seemed well built, and the UI was very useful. I haven't figured out much at the moment, but I'll introduce detailed functions through future projects.
Setup EdgeImpulseon Window10
1. Intall Python 3 on PC
2. Install Node.js v14 or higher on PC
3. Open command prompt to install the CLI tools via:
npm install -g edge-impulse-cli --forceRef. https://docs.edgeimpulse.com/docs/edge-impulse-cli/cli-installation
Edge impulse CLI list:
edge-impulse-daemon : configures devices over serial, and acts as a proxy for devices that do not have an IP connection.

edge-impulse-uploader : allows uploading and signing local files.

edge-impulse-data-forwarder : a very easy way to collect data from any device over a serial connection, and forward the data to Edge Impulse.

edge-impulse-run-impulse : show the impulse running on your device.

edge-impulse-blocks : create organizational transformation, custom dsp, custom deployment and custom transfer learning blocks.

himax-flash-tool : to flash the Himax WE-I Plus.Pico-examples supports MPU6050 example for Pico board. Before compile MPU6050 example, CMakeLists.txt must be changed with output port. To run Edge Impulse CLI, Pico should be connected to PC with USB port.
Build & Run Pico example Open MPU6050 example on Pico example folder.C:\RP2040\pico-examples\i2c\mpu6050_i2c
https://github.com/raspberrypi/pico-examples
Add USB output and disable UART output on CMakerList.txt
# Enable usb output, disable uart output
pico_enable_stdio_usb(mpu6050_i2c 1)
pico_enable_stdio_uart(mpu6050_i2c 0)
Open Developer Command Prompt and build.
cmake -G "NMake Makefiles" ..nmakeDownload mpu6050_i2c.uf2 to WizFi350-EVB-Pico on C:\RP2040\pico-examples\build\i2c\mpu6050_i2c
You can press RUN button holding BOOTSEL without plug & unplug to download.uf2Run Edge Impulse CLIOpen Command Prompt as Run as administrator and type CLI edge-impulse-run-impules --raw
edge-impulse-run-impulse --raw
// select USB port
If you have multiple USB port, need to select Pico board USB port
Next, we need to setup Edge Impulse project to upload data from WizFi360-EVB-Pico. After sending data, Edge Impulse analytics and displays data pattern and the analytic results.
Create ProjectAfter creating your account, click Create new project in your profile menu on the top of site. Then fulfill project name(pico-mpu6050) and selecting Developer. Click Create new project button.
When you meet the below pop-up, just close it. You will send data from Device via CLI.
Reprogram MPU6050 exampleYou can send data from WizFi360-EVB-Pico via Edge Impulse CLI. Because WizFi360-EVB-Pico output is set as USB.
Open Command Prompt as Run as administrator and type CLI edge-impulse-data-forwarder
edge-impulse-data-forwarder
// select USB port
But you will meet the below error. because the data format required from Edge Impulse is not matched with original Pico-example.
Open mpu6050_i2c.c and commenting the original data format and program the new data format.
while (1) {
    mpu6050_read_raw(acceleration, gyro, &temp);
#if 0
    // These are the raw numbers from the chip, so will need tweaking to be really useful.
    // See the datasheet for more information
    printf("Acc. X = %d, Y = %d, Z = %d\n", acceleration[0], acceleration[1], acceleration[2]);
    printf("Gyro. X = %d, Y = %d, Z = %d\n", gyro[0], gyro[1], gyro[2]);
    // Temperature is simple so use the datasheet calculation to get deg C.
    // Note this is chip temperature.
    printf("Temp. = %f\n", (temp / 340.0) + 36.53);
#else
    // Change the raw data format without data tag
    printf("%d, %d, %d\n", acceleration[0], acceleration[1], acceleration[2]);
#endif
    sleep_ms(100);
}
After changing code, you can check the data format with CLI edge-impulse-run-impulse --raw
edge-impulse-run-impulse --raw
// select USB port
Edge Impulse CLI to set device After chance the code, re-type CLI edge-impulse-data-forwarder
edge-impulse-data-forwarder
// select USB port
> Select a Project name pico-mpu6050 and enter your account info(ID/PW).
Edge Impulse data forwarder v1.15.1
Endpoints:
Websocket: wss://remote-mgmt.edgeimpulse.com
API:  https://studio.edgeimpulse.com/v1
Ingestion: https://ingestion.edgeimpulse.com
[SER] Connecting to /dev/tty.usbmodem101
[SER] Serial is connected (E6:60:38:B7:13:27:B5:32)
[WS ] Connecting to wss://remote-mgmt.edgeimpulse.com
[WS ] Connected to wss://remote-mgmt.edgeimpulse.com
[SER] Detecting data frequency...
[SER] Detected data frequency: 105Hz
[SER] Sampling frequency seems to have changed (was 9Hz, but is now 105Hz), re-configuring device.
> 3 sensor axes detected. What do you want to call them? Separate the names with ", ": (Type data name)
accX, accY, accZ> What name do you want to give this device? (Type your device name)
WizFi360-EVB-PicoEdge Impulse CLI to send 3axesData Go to Device menu shows the device registered by user CLI.
Go to Data acquisition menu and check Record new data.
Device : select registered device
Label : Data name
Sample length(ms) : Data receive time (Edge Impulse will receive data during this time set)
Sensor : select registered sensor
Frequency : Data sending frequency
Click Start sampling.Then CLI will automatically send device sensor data to Edge-Impulse
So far, I checked how to upload sensor data to Edge-Impulse. Edge-Impulse' UI and user functions are very well developed and easy to handle them. Also there is no problem for Pico board.
Next time, I will learn how to analytic the data and make ML model for specific solution. Thank you.


Comments
Please log in or sign up to comment.