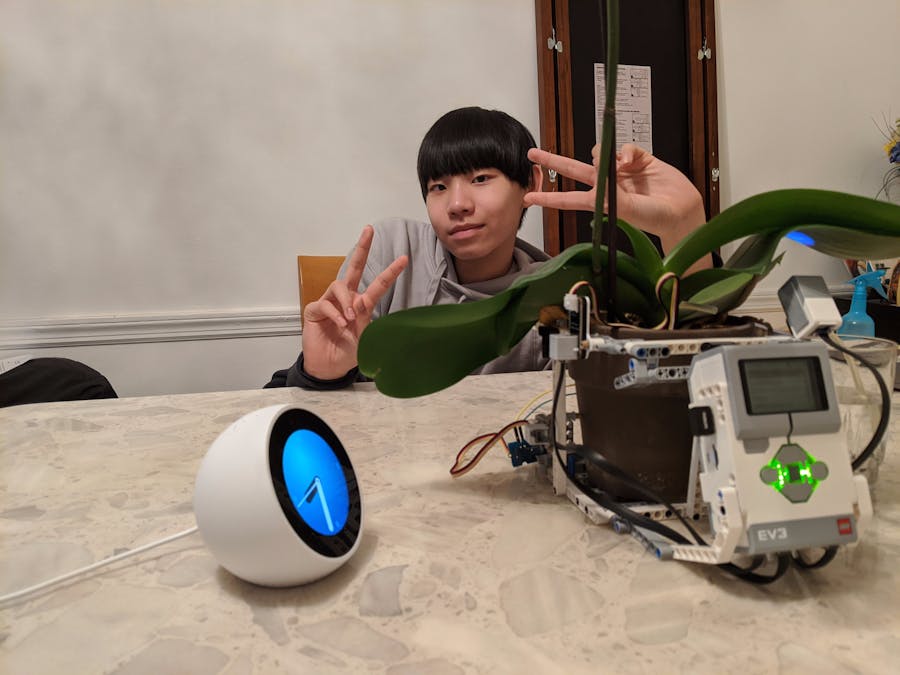
I always have hard time keeping plants alive, maybe because it's due to too much homework, video games, or it can be just lack of awareness. I want to build a smart plant where I can communicate, this time via Alexa. I am receiving a lot of help and mentoring from Peter Ma to build this project, and I am learning how to code along the way.
LEGO Equipments neededWe would need both Lego MindStorms ev3 education set and ev3 expansion to get this completed. Mainly because we'd need lots of 4xTECHNIC 15M BEAM from the expansion sets to cover the size of the plant enclosure itself. And of course, we'd also need a plant.
We first need to build the Lego enclosure for the plant, in this project we are building something simple that can hold the plant itself. We are using 4xTECHNIC 15M BEAM to create large one
Once base is done we can measure whether it is big enough to hold the plant itself shown as following.
We can then use 4xTECHNIC 15M BEAM to enclose the enclosure itself.
And finally we will seal off the top with 4x TECHNIC 15M BEAM, 4x T-BEAM 3X3 W/HOLE and 4x ANGULAR BEAM 90DEGR. W.4 SNAPS that comes from the 45560 set.
At this stage we should totally enclosed the plant and install our brick.
lastly, we will install additional color sensor into port 4, this is to check the leaf color and plant health.
Disclaimer: Peter has helped me with this part
As time of this writing we do not yet have driver support for MindSensor, and also there are absolutely no resources at all on python interaction with MindSensor on ev3dev platform. Since this is an important part of our project, I will be guiding you through step by step on how to integrate MindSensor in both getting the data as well as setting the motor/pump.
We first need to install smbus2 in our shell, the original smbus does not have i2c message option.
easy_install3 smbus2ev3dev does not have Grove Driver yet, so Sensor class does not support Grove adapter yet, we will have to connect directly to I2C to receive the data, and to do that we will have to through I2C.
We will do following to get the port
robot@ev3dev:~$ ls /dev/i2c-in*
/dev/i2c-in1  /dev/i2c-in2  /dev/i2c-in3  /dev/i2c-in4

robot@ev3dev:~$ udevadm info -q path -n /dev/i2c-in1
/devices/platform/i2c-legoev3.3/i2c-3/i2c-dev/i2c-3
The first port is i2c-3, which is 0x21 in hex code, we will do
robot@ev3dev:~$ sudo i2cdump 3 0x21You'd see
This allow us to interact with mindstorms, now that we have the i2c connection ready. Since we are using MindSensor Grove Adapter to get more informations on the plant themselves, we will have to interact in python code. Below are the code needed for interaction. We first import smbus2 for SMBus and i2c_msg, from the instruction above we know that the. The address for sensor i2c is 0x21 and bus is 3 for this sensor
We then need to set flag on 0x42 as 0x01, this is to let the MindSensor Adapter know that we are trying to read the analog sensor input from the Grove Sensor itself, we can do this by writing moisbus.write_byte_data(I2C_ADDRESS, 0x42, 0x01). After that we can read the data from 0x44 and 0x45, combine them and we would get the result from the sensor.
from smbus2 import SMBus, i2c_msg
import time
from ev3dev2.port import LegoPort
I2C_ADDRESS = 0x21 # the default I2C address of the sensor
moisbus = SMBus(3)
moisbus.write_byte_data(I2C_ADDRESS, 0x42, 0x01)
while(True):
part1 = moisbus.read_byte_data(I2C_ADDRESS, 0x44)
part2 = moisbus.read_byte_data(I2C_ADDRESS, 0x45)
result = (part1 << 2) + part2
print(result)
time.sleep(.5)
Analog sensors, in this case runs from 0 to 1024, from the spec on http://wiki.seeedstudio.com/Grove-Moisture_Sensor/ we can see that anything below 300 is considered dry.
When installed into the base plant and port 1 from the brick, it can look something like this.
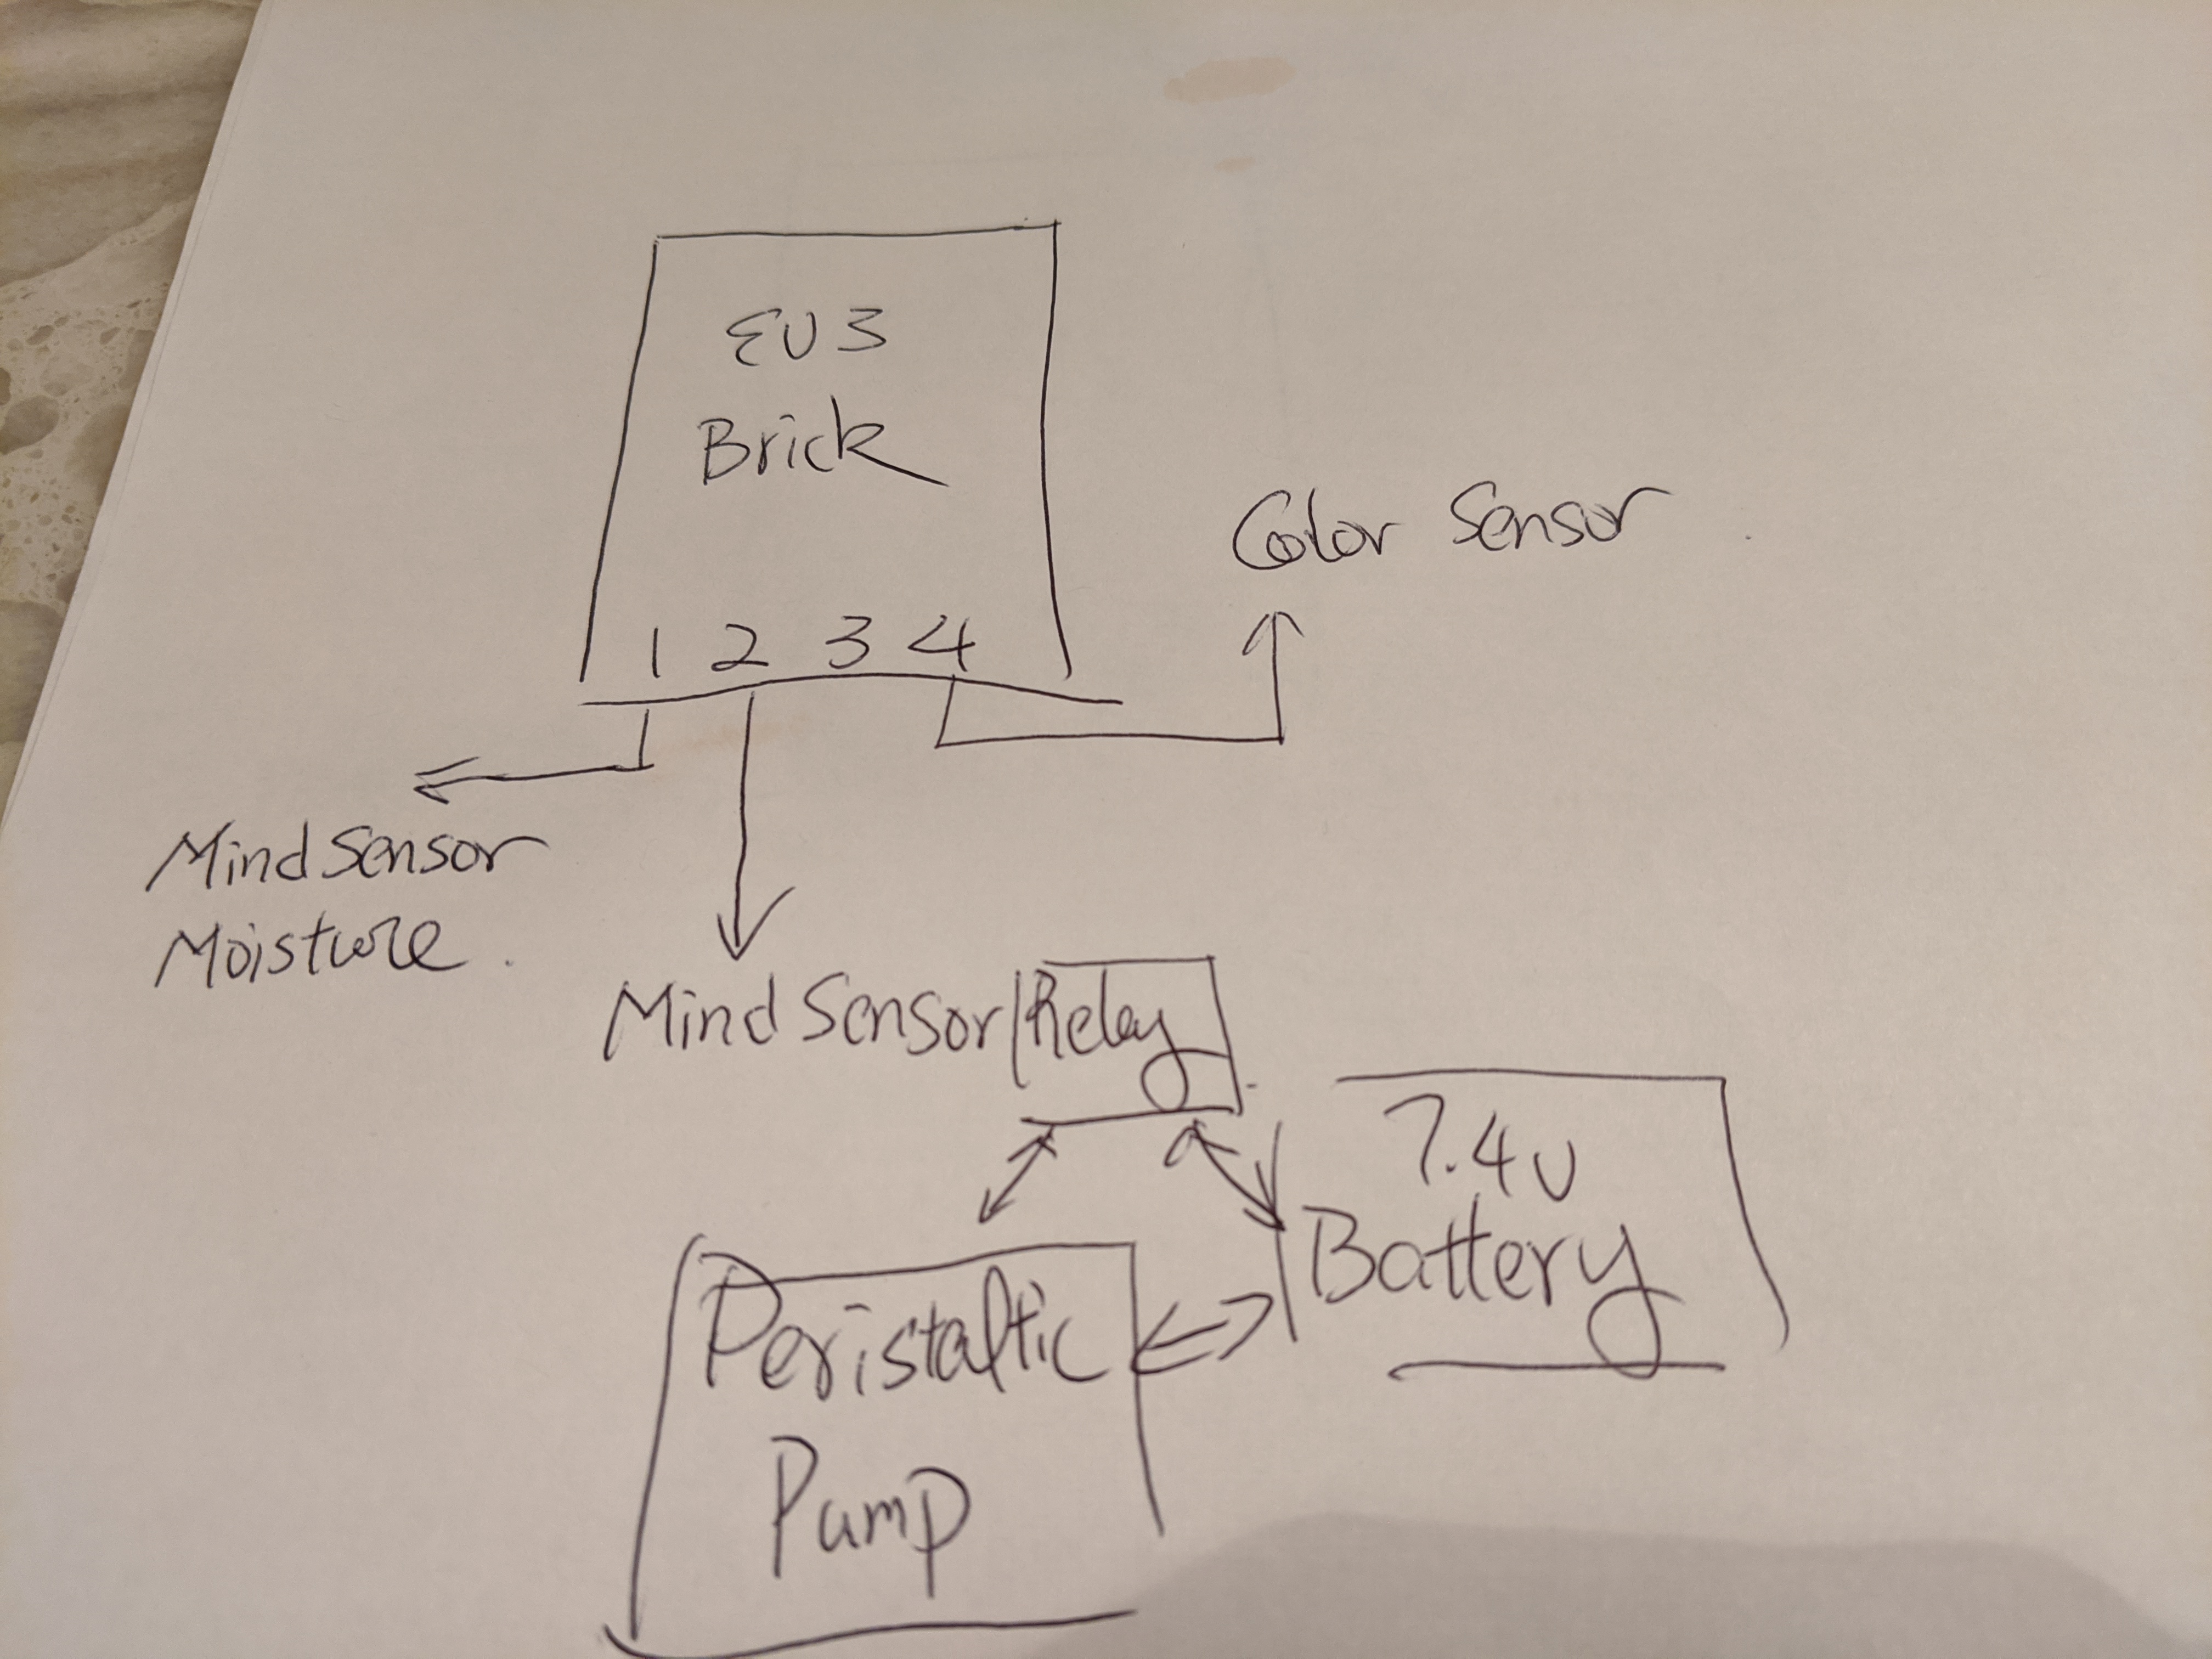
Second part is Relay and Peristaltic Liquid Pump, to do that we would need a a second MindSensor and plug it into port 2.
robot@ev3dev:~$ udevadm info -q path -n /dev/i2c-in2
/devices/platform/i2c-legoev3.4/i2c-4/i2c-dev/i2c-4
This time we can see that it's i2c-4, now that bus is 4
robot@ev3dev:~$ sudo i2cdump 4 0x21In the previous example we are trying to do analog read, in this case we will be doing digital write. Before we write python code we can simply connect the sensors and try them on command line. Turning this on and off will be specifically involves around writing 0 and 1 to address 0x42 using i2c-4, which is bus number 4, in another word, in command line we can turn off the relay by doing. Digital_0 is 0x02, and Digital_1 is 0x03
robot@ev3dev:~$ sudo i2cset -y 4 0x21 0x42 0x02and turn on the relay by
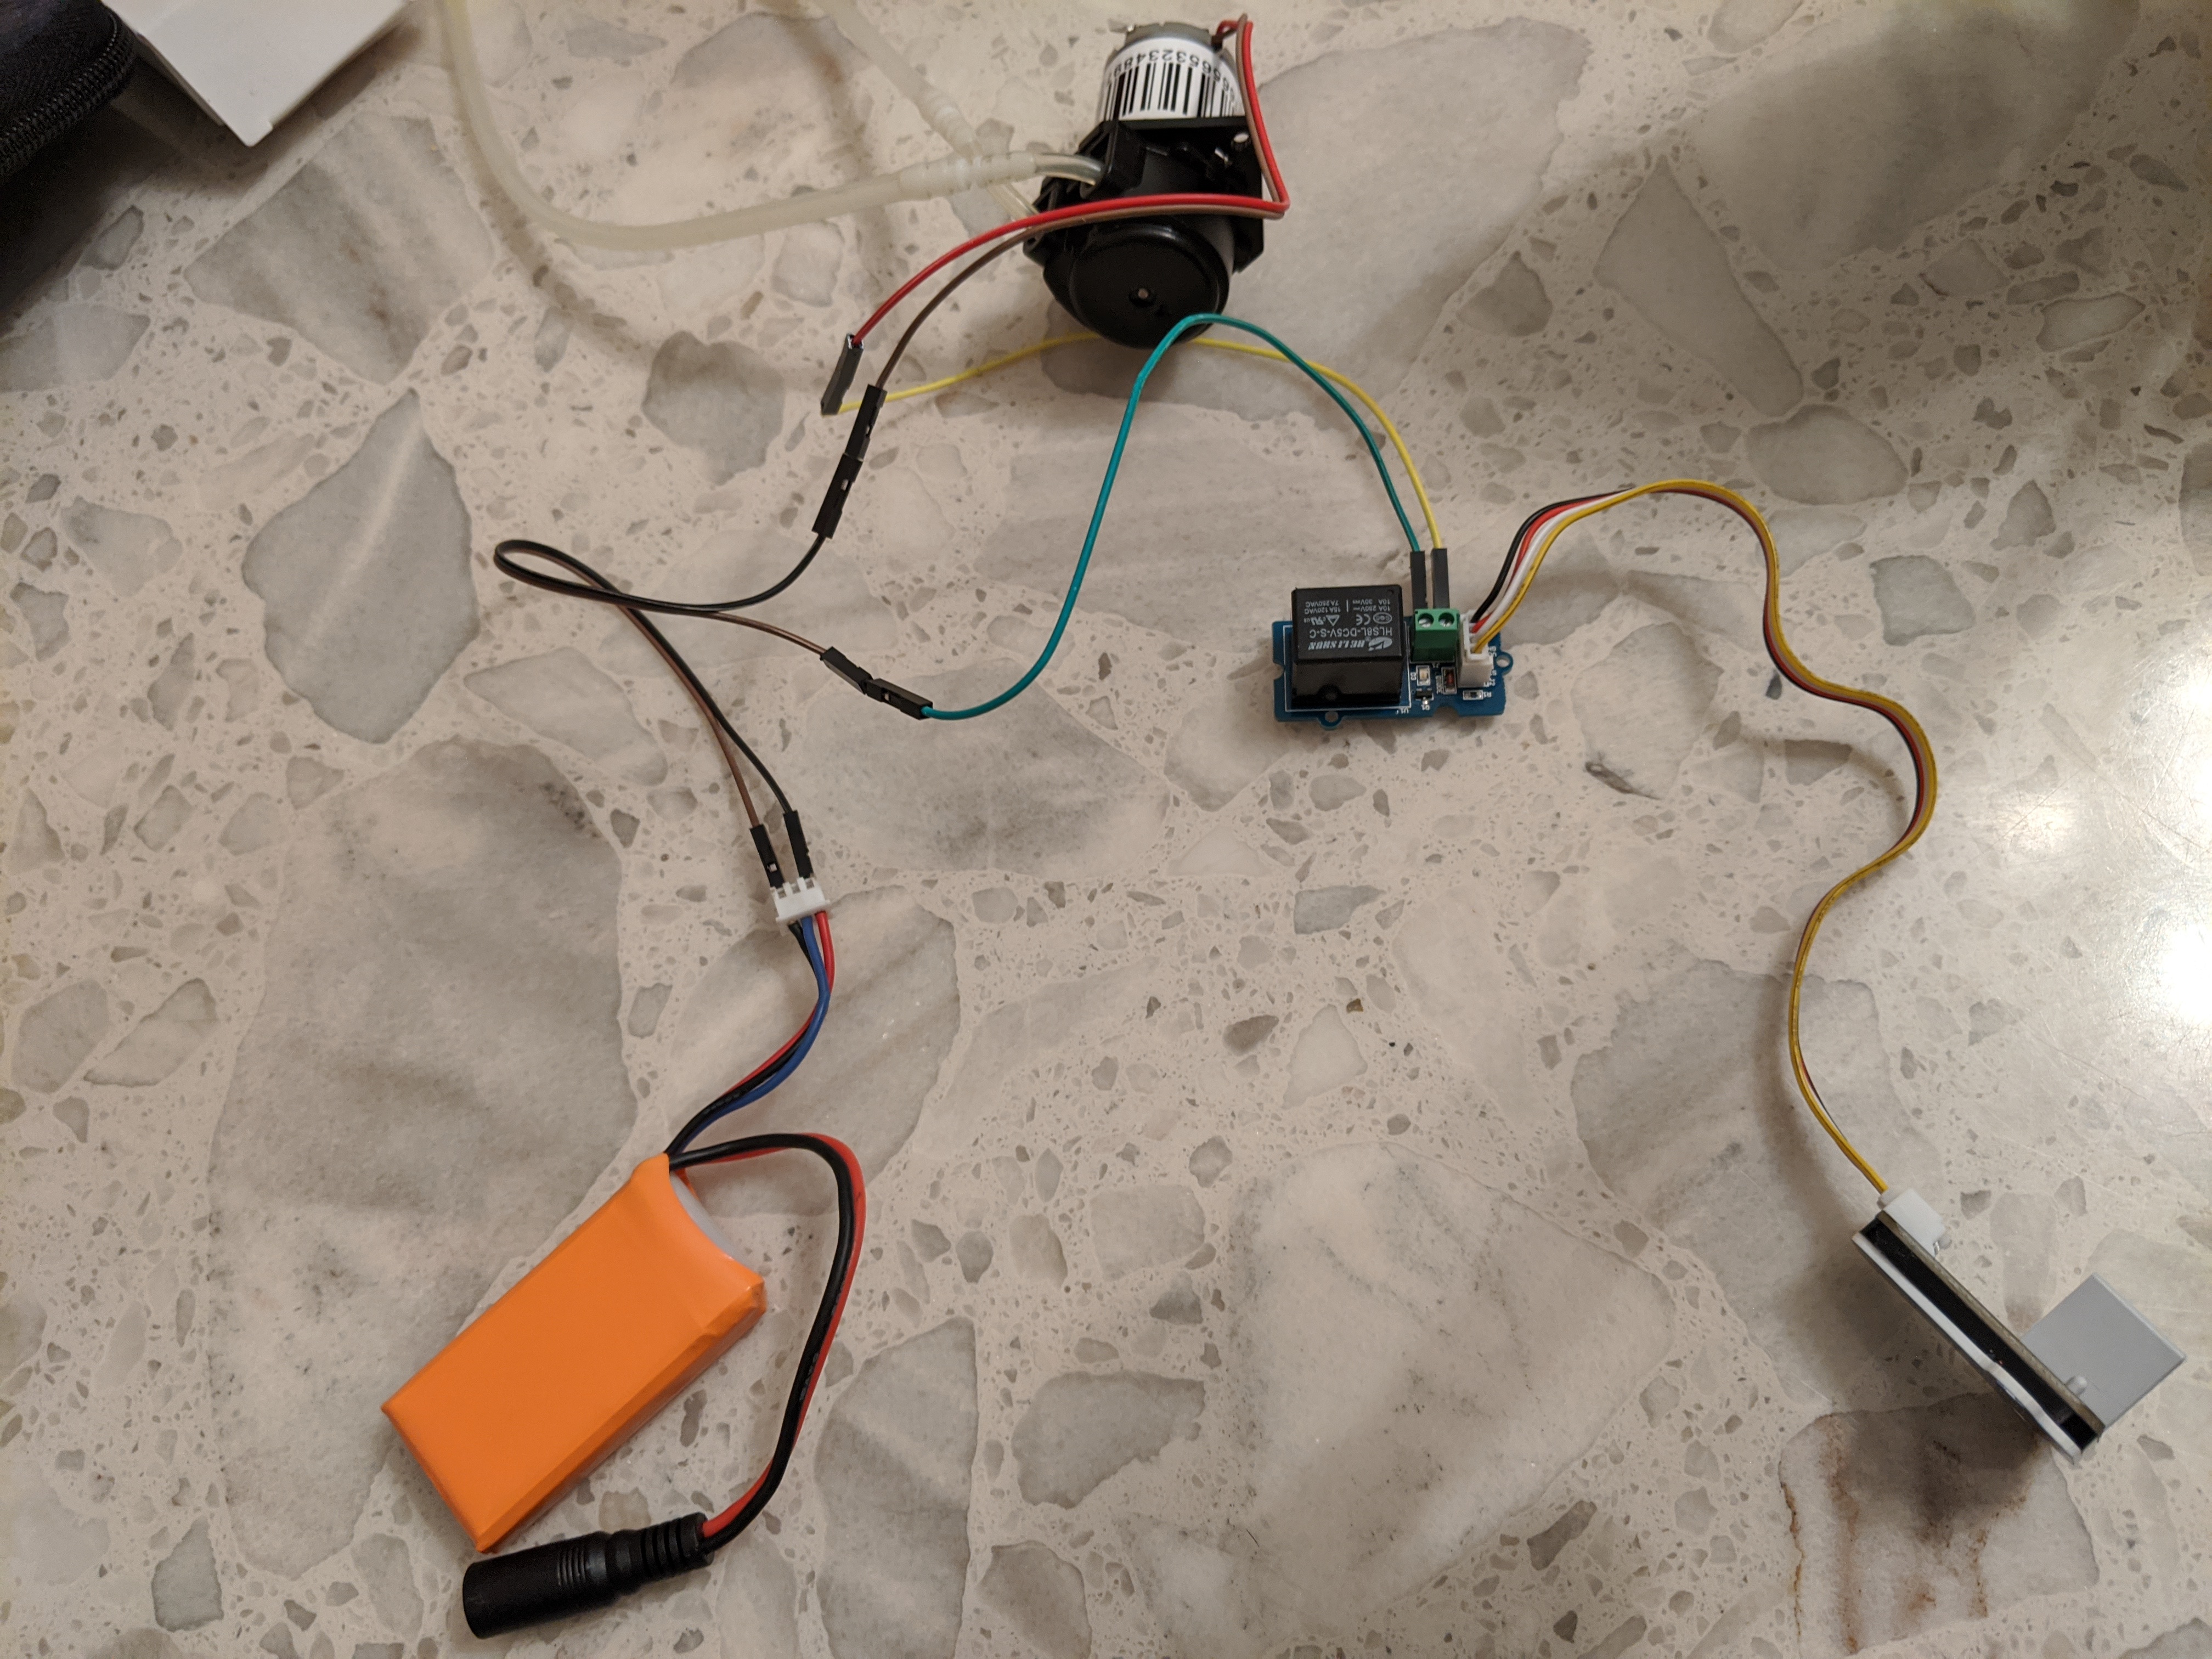
robot@ev3dev:~$ sudo i2cset -y 4 0x21 0x42 0x03The peristaltic pump itself would need more power to run, we can do this via 3 way wiring with battery like the image below
When we connect MindSensor Adapter we can connect the entire wire frame
And then we can install this to the side of the plant as seen from following.
From another angle we can place the relay and battery inside the frame itself
AlexaGadget has setup a setup and 4 missions to go through the challenge, to complete this project we'd recommend you to go through all of them, as we will be building our project from modifications of mission-04. You can find the full challenge located at https://www.hackster.io/alexagadgets/. Throughout the Missions you'd be able to setup Alexa Gadget, Alexa app and lambda, we will take it from there.
Since users should be already finished mission 4, we can expect the Alexa app is already setup. This project is meant to do 4 things, checking the plant situation through moisture sensor, pumping to water the plant, and check the color of the leaf for disease, and finally, auto watering the plant. In turn, we've created PlantIntent, WaterIntent, HealthIntent and AutoIntent
Also, we need to change the "invocationName" to "plant bot", so we can ask Alexa to open "plant bot"
{
"interactionModel": {
"languageModel": {
"invocationName": "plant bot",
"intents": [
{
"name": "AMAZON.CancelIntent",
"samples": []
},
{
"name": "AMAZON.HelpIntent",
"samples": []
},
{
"name": "AMAZON.StopIntent",
"samples": []
},
{
"name": "AMAZON.NavigateHomeIntent",
"samples": []
},
{
"name": "PlantIntent",
"slots": [],
"samples": [
"How is the plant doing",
"What's the status for the plant"
]
},
{
"name": "WaterIntent",
"slots": [],
"samples": [
"Water the plant",
"Pump some water",
"Water it"
]
},
{
"name": "HealthIntent",
"slots": [],
"samples": [
"What's the color of the leaf",
"How is plant health",
"How is the health of the plant"
]
},
{
"name": "AutoIntent",
"slots": [
{
"name": "OnOff",
"type": "OnOffType"
}
],
"samples": [
"Turn {OnOff} auto watering",
"Turn {OnOff} auto",
"Turn {OnOff} auto mode"
]
}
],
"types": [
{
"name": "OnOffType",
"values": [
{
"name": {
"value": "on"
}
},
{
"name": {
"value": "off"
}
}
]
}
]
}
}
}
And in index.js, we will introduce 3 more IntentHandlers, which modifies from the mission-04,
// The SkillBuilder acts as the entry point for your skill, routing all request and response
// payloads to the handlers above. Make sure any new handlers or interceptors you've
// defined are included below. The order matters - they're processed top to bottom.
exports.handler = Alexa.SkillBuilders.custom()
.addRequestHandlers(
LaunchRequestHandler,
PlantIntentHandler,
WaterIntentHandler,
HealthIntentHandler,
AutoIntentHandler,
EventsReceivedRequestHandler,
ExpiredRequestHandler,
Common.HelpIntentHandler,
Common.CancelAndStopIntentHandler,
Common.SessionEndedRequestHandler,
Common.IntentReflectorHandler, // make sure IntentReflectorHandler is last so it doesn't override your custom intent handlers
)
.addRequestInterceptors(Common.RequestInterceptor)
.addErrorHandlers(
Common.ErrorHandler,
)
.lambda();
Next, we will do the easiest which is WaterIntent, this will send water command into the alexagadget.
// Construct and send a custom directive to the connected gadget with data from
// the WaterIntent.
const WaterIntentHandler = {
canHandle(handlerInput) {
return Alexa.getRequestType(handlerInput.requestEnvelope) === 'IntentRequest'
&& Alexa.getIntentName(handlerInput.requestEnvelope) === 'WaterIntent';
},
handle: function (handlerInput) {
const attributesManager = handlerInput.attributesManager;
let endpointId = attributesManager.getSessionAttributes().endpointId || [];
let speed = attributesManager.getSessionAttributes().speed || "50";
// Construct the directive with the payload containing the move parameters
let directive = Util.build(endpointId, NAMESPACE, NAME_CONTROL,
{
type: 'water',
command: 'water',
speed: speed
});
let speechOutput = 'Watering the plant until soil is moist';
return handlerInput.responseBuilder
.speak(speechOutput + BG_MUSIC)
.addDirective(directive)
.getResponse();
}
};
For HealthIntent and PlantIntent, we will send the command and handle them through EventsReceivedRequestHandler. HealthIntent will send type and command health into Alexa,
// Construct and send a custom directive to the connected gadget with data from
// the HealthIntentHandler.
const HealthIntentHandler = {
canHandle(handlerInput) {
return Alexa.getRequestType(handlerInput.requestEnvelope) === 'IntentRequest'
&& Alexa.getIntentName(handlerInput.requestEnvelope) === 'HealthIntent';
},
handle: function (handlerInput) {
const attributesManager = handlerInput.attributesManager;
let endpointId = attributesManager.getSessionAttributes().endpointId || [];
let speed = attributesManager.getSessionAttributes().speed || "50";
// Construct the directive with the payload containing the move parameters
let directive = Util.build(endpointId, NAMESPACE, NAME_CONTROL,
{
type: 'health',
command: 'health',
speed: speed
});
let speechOutput = 'Checking health of the plant, please wait';
return handlerInput.responseBuilder
.speak(speechOutput + BG_MUSIC)
.addDirective(directive)
.getResponse();
}
};
Similarly for PlantIntent, we will rely on EventsReceivedRequestHandler to get back the answer.
// Construct and send a custom directive to the connected gadget with data from
// the ComeIntent.
const PlantIntentHandler = {
canHandle(handlerInput) {
return Alexa.getRequestType(handlerInput.requestEnvelope) === 'IntentRequest'
&& Alexa.getIntentName(handlerInput.requestEnvelope) === 'PlantIntent';
},
handle: function (handlerInput) {
const attributesManager = handlerInput.attributesManager;
let endpointId = attributesManager.getSessionAttributes().endpointId || [];
let speed = attributesManager.getSessionAttributes().speed || "50";
// Construct the directive with the payload containing the move parameters
let directive = Util.build(endpointId, NAMESPACE, NAME_CONTROL,
{
type: 'plant',
command: 'plant',
speed: speed
});
let speechOutput = 'Checking moisture level for the plant';
return handlerInput.responseBuilder
.speak(speechOutput + BG_MUSIC)
.addDirective(directive)
.getResponse();
}
};
Lastly, we will set AutoIntentHandler to automatically turn on water when it's dry and automatically turn off water when the soil is moist.
// Construct and send a custom directive to the connected gadget with data from
// the AutoIntentHandler.
const AutoIntentHandler = {
canHandle(handlerInput) {
return Alexa.getRequestType(handlerInput.requestEnvelope) === 'IntentRequest'
&& Alexa.getIntentName(handlerInput.requestEnvelope) === 'AutoIntent';
},
handle: function (handlerInput) {
let onoff = Alexa.getSlotValue(handlerInput.requestEnvelope, 'OnOff');
if (!onoff) {
return handlerInput.responseBuilder
.speak("Can you repeat that?")
.withShouldEndSession(false)
.getResponse();
}
const attributesManager = handlerInput.attributesManager;
let endpointId = attributesManager.getSessionAttributes().endpointId || [];
let speed = attributesManager.getSessionAttributes().speed || "50";
// Construct the directive with the payload containing the move parameters
let directive = Util.build(endpointId, NAMESPACE, NAME_CONTROL,
{
type: 'auto',
command: onoff,
speed: speed
});
let speechOutput = 'Turning auto watering ' + onoff;
return handlerInput.responseBuilder
.speak(speechOutput + BG_MUSIC)
.addDirective(directive)
.getResponse();
}
};
When we send Alexa to Mindstorms to get the information, we want return value to be handled in EventsReceivedRequestHandler, in this case we will get back the speech needed.
const EventsReceivedRequestHandler = {
// Checks for a valid token and endpoint.
canHandle(handlerInput) {
let { request } = handlerInput.requestEnvelope;
console.log('Request type: ' + Alexa.getRequestType(handlerInput.requestEnvelope));
if (request.type !== 'CustomInterfaceController.EventsReceived') return false;
const attributesManager = handlerInput.attributesManager;
let sessionAttributes = attributesManager.getSessionAttributes();
let customEvent = request.events[0];
// Validate event token
if (sessionAttributes.token !== request.token) {
console.log("Event token doesn't match. Ignoring this event");
return false;
}
// Validate endpoint
let requestEndpoint = customEvent.endpoint.endpointId;
if (requestEndpoint !== sessionAttributes.endpointId) {
console.log("Event endpoint id doesn't match. Ignoring this event");
return false;
}
return true;
},
handle(handlerInput) {
console.log("== Received Custom Event ==");
let customEvent = handlerInput.requestEnvelope.request.events[0];
let payload = customEvent.payload;
let name = customEvent.header.name;
let speechOutput;
if (name === 'Plant') {
speechOutput = payload.speech;
}
return handlerInput.responseBuilder
.speak(speechOutput + BG_MUSIC, "REPLACE_ALL")
.getResponse();
}
};
Full code can be seen in attachment here.
Step 6: Building plant bot on ev3devSince we are modifying the project from mission-4, but we are not using Motors, so we will have a lot of changes on the code.
The ini file would be the same, we are focused on Custom.Mindstorms.Gadget
[GadgetCapabilities]
Custom.Mindstorms.Gadget = 1.0
Let's go through this part, we are only taking ColorSensor, LED, Sound and smbus2 to control the pump and i2c
import os
import sys
import time
import logging
import json
import random
import threading
from enum import Enum
from smbus2 import SMBus, i2c_msg
from agt import AlexaGadget
from ev3dev2.led import Leds
from ev3dev2.sound import Sound
from ev3dev2.sensor.lego import ColorSensor
In init, we will initialize both i2c sensors as well as windstorm ev3 sensors, in this case we will be using ColorSensor. SMBus3 and SMBus4 from previous steps will be handling moisture and pump relay. We are starting auto water thread to check moisture level as well as auto water level.
def __init__(self):
"""
Performs Alexa Gadget initialization routines and ev3dev resource allocation.
"""
super().__init__()
# the default I2C address of the sensor
self.I2C_ADDRESS = 0x21
# setup the buses
self.moisbus = SMBus(3)
self.relaybus = SMBus(4)
#setup the moisbus and relaybus
self.moisbus.write_byte_data(self.I2C_ADDRESS, 0x42, 0x01)
self.relaybus.write_byte_data(self.I2C_ADDRESS, 0x42, 0x02)
#setup the lastmois so we can track it well
self.lastmois = 0
# Robot state
self.auto_mode = False
self.sound = Sound()
self.leds = Leds()
self.color = ColorSensor()
# Start threads
threading.Thread(target=self._autowater_thread, daemon=True).start()
In autowater_thread, we will constantly update the latest moisture level, also to check the flag for auto_mode, if auto_mode is on we will pump water whenever the soil gets dry. We also turn LED Green when it's moist, and LED Red when it's too dry as an indicator.
def _autowater_thread(self):
"""
Performs random movement when patrol mode is activated.
"""
while True:
part1 = self.moisbus.read_byte_data(self.I2C_ADDRESS, 0x44)
part2 = self.moisbus.read_byte_data(self.I2C_ADDRESS, 0x45)
result = (part1 << 2) + part2
print(result)
if result <= 300 and self.lastmois > 300:
#turns on when it gets too dry
gadget.leds.set_color("LEFT", "RED")
gadget.leds.set_color("RIGHT", "RED")
self._send_event(EventName.PLANT, {'speech': "Soil moisture has just turned very dry, please water the plant"})
elif result >= 300 and self.lastmois < 300:
#turns off when it's wet already
gadget.leds.set_color("LEFT", "GREEN")
gadget.leds.set_color("RIGHT", "GREEN")
self._send_event(EventName.PLANT, {'speech': "Soil Moisture just turned wet, we are stopping watering the plant"})
if self.auto_mode:
if result <= 300 and self.lastmois > 300:
#turns on when it gets too dry
self.relaybus.write_byte_data(self.I2C_ADDRESS, 0x42, 0x03)
elif result >= 300 and self.astmois < 300:
#turns off when it's wet already
self.relaybus.write_byte_data(self.I2C_ADDRESS, 0x42, 0x02)
time.sleep(1)
self.lastmois = result
time.sleep(1)
In our on_custom_mindstorms_gadget_control, we will be able to handle the 4 Intent separately from Alexa, plant, water, health and auto.
def on_custom_mindstorms_gadget_control(self, directive):
"""
Handles the Custom.Mindstorms.Gadget control directive.
:param directive: the custom directive with the matching namespace and name
"""
try:
payload = json.loads(directive.payload.decode("utf-8"))
print("Control payload: {}".format(payload), file=sys.stderr)
control_type = payload["type"]
if control_type == "plant":
self._plant_handler()
elif control_type == "water":
self._water_handler()
elif control_type == "health":
self._health_handler()
elif control_type == "auto":
_self._auto_handler(payload["command"])
except KeyError:
print("Missing expected parameters: {}".format(directive), file=sys.stderr)
In _plant_handler, we can check the last moisture and send back to Alexa the soil moisture level
def _plant_handler(self):
#turning plants
if lastmois < 300:
self._send_event(EventName.PLANT, {'speech': "Soil moisture has is very dry, please water the plant"})
else:
self._send_event(EventName.PLANT, {'speech': "Soil moisture is doing very good, and the plant is very happy"})
In _water_handler, we will pump water until moisture level is above 300.
def _water_handler(self):
while True:
part1 = self.moisbus.read_byte_data(self.I2C_ADDRESS, 0x44)
part2 = self.moisbus.read_byte_data(self.I2C_ADDRESS, 0x45)
result = (part1 << 2) + part2
if result < 300:
#turn on the pump
self.relaybus.write_byte_data(self.I2C_ADDRESS, 0x42, 0x03)
else:
break
#turn off the pump
self.relaybus.write_byte_data(self.I2C_ADDRESS, 0x42, 0x02)
in _health_handler, we check the color yellow or green to determine plant's health
def _health_handler(self):
if self.color.color == ColorSensor.COLOR_GREEN:
self._send_event(EventName.PLANT, {'speech': "The plant is green and health"})
elif self.color.color == ColorSensor.COLOR_YELLOW:
self._send_event(EventName.PLANT, {'speech': "The plant leaves appears yellow, it may have diseases"})
in _auto_handler, we simply set the flag for self.auto_mode
def _auto_handler(self, onoff):
if onoff == "on":
self.auto_mode = True
else:
self.auto_mode = False
With this, we are ready to test our application.
Step 7: DemoTo test out the application we can do following.
"Alexa, Open plant bot"
To check plant's moisture level, we can ask
"Alexa, How is the plant doing", or "Alexa, What's the status for the plant"
To water the plant, we can simply say
"Alexa, Water the plant" or "Alexa, Pump some water"
To check the health of the plant we say
"Alexa, What's the color of the leaf" or "How is the health of the plant"
To turn auto watering on based on moisture we use
"Alexa, Turn on auto watering" or "Alexa, Turn off auto mode"
Now we have everything running, let's see the demo


_dyynx0bnuf_8u4Xi07d4z.png?auto=compress%2Cformat&w=48&h=48&fit=fill&bg=ffffff)


Comments
Please log in or sign up to comment.