


Hardware components | ||||||
_ztBMuBhMHo.jpg?auto=compress%2Cformat&w=48&h=48&fit=fill&bg=ffffff) |
| × | 1 | |||
 |
| × | 1 | |||
 |
| × | 1 | |||
 |
| × | 1 | |||
 |
| × | 1 | |||
| × | 1 | ||||
Software apps and online services | ||||||
 |
| |||||
Hand tools and fabrication machines | ||||||
 |
| |||||
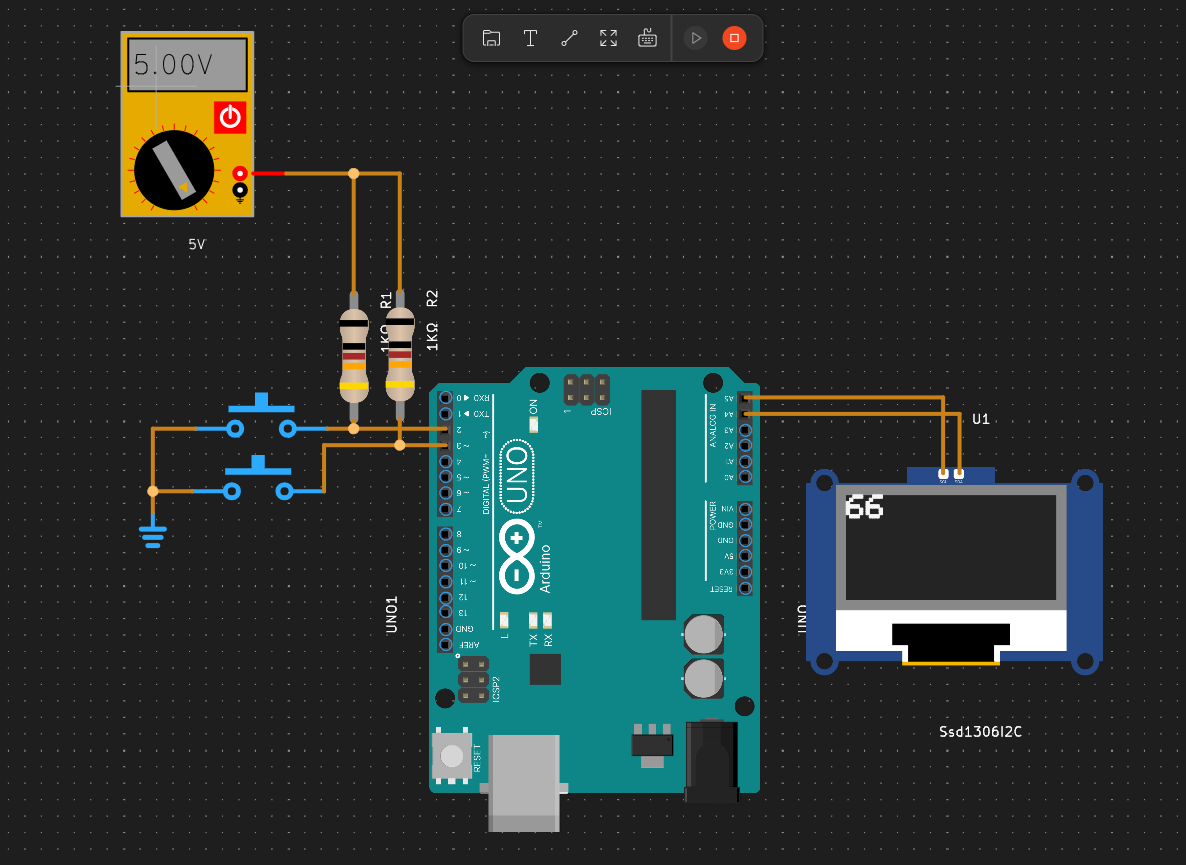
This project utilizes an OLED display alongside two input switches to allow a user to increment two digits displayed on the screen (tens and units). The code consists of setup and loop functions that manage the display and the switch inputs.
Components Required- Arduino Board (e.g., Arduino Uno, Nano)
- OLED Display (based on SSD1306)
- 2 Push Button Switches
- Resistors (if necessary for switches)
- Jumper Wires
- Breadboard (optional)
cpp
#include <Wire.h>
#include <Adafruit_GFX.h>
#include <Adafruit_SSD1306.h>

#define SCREEN_WIDTH 128 // Width of the OLED display in pixels
#define SCREEN_HEIGHT 64  // Height of the OLED display in pixels
#define OLED_RESET -1     // Reset pin (or use -1 for sharing Arduino reset pin)
cpp


#include <Wire.h>
#include <Adafruit_GFX.h>
#include <Adafruit_SSD1306.h>

#define SCREEN_WIDTH 128 // Width of the OLED display in pixels
#define SCREEN_HEIGHT 64  // Height of the OLED display in pixels
#define OLED_RESET -1     // Reset pin (or use -1 for sharing Arduino reset pin)
- The code starts by including necessary libraries to control the OLED display.
- Constants are defined for the display's width, height, and reset pin.
cpp


Adafruit_SSD1306 display(SCREEN_WIDTH, SCREEN_HEIGHT, &Wire, OLED_RESET);
cpp
Adafruit_SSD1306 display(SCREEN_WIDTH, SCREEN_HEIGHT, &Wire, OLED_RESET);
- An instance of
Adafruit_SSD1306is created to manage the OLED display.
cpp
const int switch1Pin = 2; // Pin for switch 1
const int switch2Pin = 3; // Pin for switch 2

int tens = 0; // Initialized tens place to 0
int units = 0; // Initialized units place to 0
cpp


const int switch1Pin = 2; // Pin for switch 1
const int switch2Pin = 3; // Pin for switch 2

int tens = 0; // Initialized tens place to 0
int units = 0; // Initialized units place to 0
- Two pins are declared for the switches, and variables for tens and units are initialized.
cpp
void setup() {
    pinMode(switch1Pin, INPUT_PULLUP);
    pinMode(switch2Pin, INPUT_PULLUP);

    if(!display.begin(SSD1306_SWITCHCAPVCC, 0x3C)) {
        Serial.println(F("SSD1306 allocation failed"));
        for(;;); // Loop forever if allocation fails
    }

    display.clearDisplay();
    updateDisplay();
}
cpp


void setup() {
    pinMode(switch1Pin, INPUT_PULLUP);
    pinMode(switch2Pin, INPUT_PULLUP);

    if(!display.begin(SSD1306_SWITCHCAPVCC, 0x3C)) {
        Serial.println(F("SSD1306 allocation failed"));
        for(;;); // Loop forever if allocation fails
    }

    display.clearDisplay();
    updateDisplay();
}
In the setup function:
- The pins for the switches are set to input mode with internal pull-up resistors.
- The OLED display is initialized. If it fails, the program will loop indefinitely.
- The display is cleared and updated to show initial values.
- In the
setupfunction:The pins for the switches are set to input mode with internal pull-up resistors.The OLED display is initialized. If it fails, the program will loop indefinitely.The display is cleared and updated to show initial values.
cpp
void loop() {
    // Check first switch
    if (digitalRead(switch1Pin) == LOW) {
        delay(50); // Debouncing delay
        if (digitalRead(switch1Pin) == LOW) {
            tens = (tens + 1) % 10; // Increment tens
            updateDisplay();
            while (digitalRead(switch1Pin) == LOW); // Wait for release
        }
    }

    // Check second switch
    if (digitalRead(switch2Pin) == LOW) {
        delay(50); // Debouncing delay
        if (digitalRead(switch2Pin) == LOW) {
            units = (units + 1) % 10; // Increment units
            updateDisplay();
            while (digitalRead(switch2Pin) == LOW); // Wait for release
        }
    }
}
cpp


void loop() {
    // Check first switch
    if (digitalRead(switch1Pin) == LOW) {
        delay(50); // Debouncing delay
        if (digitalRead(switch1Pin) == LOW) {
            tens = (tens + 1) % 10; // Increment tens
            updateDisplay();
            while (digitalRead(switch1Pin) == LOW); // Wait for release
        }
    }

    // Check second switch
    if (digitalRead(switch2Pin) == LOW) {
        delay(50); // Debouncing delay
        if (digitalRead(switch2Pin) == LOW) {
            units = (units + 1) % 10; // Increment units
            updateDisplay();
            while (digitalRead(switch2Pin) == LOW); // Wait for release
        }
    }
}
- The
loopfunction continuously checks if either switch is pressed, with debounce logic to prevent multiple counts from a single press.
For each switch:
- If pressed, the corresponding digit (tens or units) is incremented and wrapped around using modulo 10.
- The display is updated to reflect the new values.
- For each switch:If pressed, the corresponding digit (tens or units) is incremented and wrapped around using modulo 10.The display is updated to reflect the new values.
cpp
void updateDisplay() {
    display.clearDisplay();
    display.setTextSize(2); // Set text size to 2
    display.setTextColor(SSD1306_WHITE); // Set text color to white
    display.setCursor(0, 0); // Set cursor position
    display.print(tens); // Print tens value
    display.print(units); // Print units value
    display.display(); // Render the display
}
cpp


void updateDisplay() {
    display.clearDisplay();
    display.setTextSize(2); // Set text size to 2
    display.setTextColor(SSD1306_WHITE); // Set text color to white
    display.setCursor(0, 0); // Set cursor position
    display.print(tens); // Print tens value
    display.print(units); // Print units value
    display.display(); // Render the display
}
- The
updateDisplayfunction clears the display, sets the text size and color, positions the cursor, and prints the current tens and units values on the screen.


Comments
Please log in or sign up to comment.