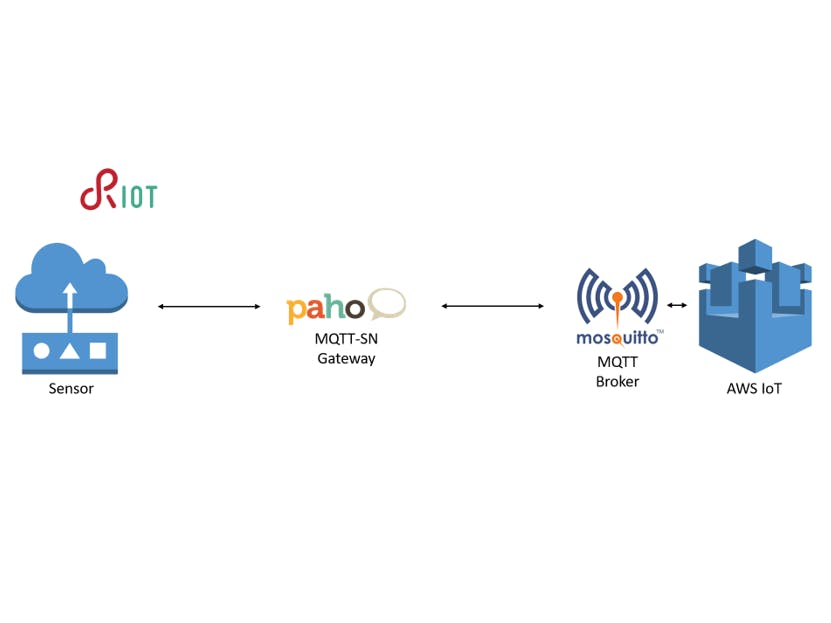
Please note that this tutorial assumes you're working on a Linux PC.
PrerequisitesThis project builds upon the cloud infrastructure that is developed in this project.
1- You must have followed these steps:
- AWS IoT configuration.
- Connection with DynamoDB.
- Developing the Node.js backend app.
- Developing the Angular frontend app.
2- You must have Git installed. If Git is not installed, you can download it here.
Build the MQTT-SN Transparent Gateway1- Open the Terminal and run the following commands to set up the gateway:
> git clone -b experiment https://github.com/eclipse/paho.mqtt-sn.embedded-c
> cd paho.mqtt-sn.embedded-c/MQTTSNGateway
> make SENSORNET=udp6
> make install
> make clean
2- Open the gateway.conf file and edit the contents in this way:
#**************************************************************************
# Copyright (c) 2016-2019, Tomoaki Yamaguchi
#
# All rights reserved. This program and the accompanying materials
# are made available under the terms of the Eclipse Public License v1.0
# and Eclipse Distribution License v1.0 which accompany this distribution.
#
# The Eclipse Public License is available at
#    http://www.eclipse.org/legal/epl-v10.html
# and the Eclipse Distribution License is available at
#   http://www.eclipse.org/org/documents/edl-v10.php.
#***************************************************************************
#
# config file of MQTT-SN Gateway
#

#BrokerName=mqtt.eclipse.org
#BrokerPortNo=1883
#BrokerSecurePortNo=8883

BrokerName=localhost
BrokerPortNo=1884
#BrokerSecurePortNo=8883

#
# When AggregatingGateway=YES or ClientAuthentication=YES,
# All clients must be specified by the ClientList File
#

ClientAuthentication=NO
AggregatingGateway=NO
QoS-1=NO
Forwarder=NO

#ClientsList=/path/to/your_clients.conf

PredefinedTopic=NO
#PredefinedTopicList=/path/to/your_predefinedTopic.conf

#RootCAfile=/etc/ssl/certs/ca-certificates.crt
#RootCApath=/etc/ssl/certs/
#CertsFile=/path/to/certKey.pem
#PrivateKey=/path/to/privateKey.pem

GatewayID=1
GatewayName=PahoGateway-01
KeepAlive=900
#LoginID=your_ID
#Password=your_Password


# UDP
GatewayPortNo=10000
MulticastIP=225.1.1.1
MulticastPortNo=1883

# UDP6
#GatewayUDP6Bind=FFFF:FFFE::1
GatewayUDP6Bind=fec0:affe::1/64
#GatewayUDP6Port=10000
GatewayUDP6Port=1885
GatewayUDP6Broadcast=FF02::1
GatewayUDP6If=wpan0

# XBee
Baudrate=38400
SerialDevice=/dev/ttyUSB0
ApiMode=2

# LOG
ShearedMemory=NO;
Basically, you have to configure the MQTT part (the broker we will interact with, that in my case it is a localhost and runs in 1884 port).
The other important thing is that you have to bind the upd6 address (fec0:affe::1/64 is the same address that you see in the RIOT-OS README file for the MQTT-SN connection) and the port (1885 is the port that allows you to receive message from the RIOT's instances).
3- To execute the gateway open the Terminal from the directory where you have installed Paho and run this command:
> ./MQTT-SNGateway1- Install Mosquitto broker. You can download it here.
2- Now, you need to configure the bridge so that the Mosquitto broker can create a connection to AWS IoT. To do so you must create a new mosquitto_bridge.conf file and write the following lines inside it:
# =================================================================
# Bridges to AWS IOT
# =================================================================

# AWS IoT endpoint
connection awsiot
address a6as4ru7uhh5u-ats.iot.us-east-1.amazonaws.com:8883

# Specifying which topics are bridged
# topic awsiot_to_localgateway in 1
# topic localgateway_to_awsiot out 1
# topic both_directions both 1
topic sensor/values both 1

# Setting protocol version explicitly
bridge_protocol_version mqttv311
bridge_insecure false

# Bridge connection name and MQTT client Id,
# enabling the connection automatically when the broker starts.
cleansession true
clientid bridgeawsiot
start_type automatic
notifications false
log_type all

# =================================================================
# Certificate based SSL/TLS support
# -----------------------------------------------------------------
#Path to the rootCA
bridge_cafile ./AWS-certs/rootCA.pem

# Path to the PEM encoded client certificate
bridge_certfile ./AWS-certs/fc278d0e63-certificate.pem.crt

# Path to the PEM encoded client private key
bridge_keyfile ./AWS-certs/fc278d0e63-private.pem.key
Is important that you replace this part with your own endpoint:
And here you have to insert the path of your certificates:
Remember that you have downloaded and saved the certificates during this step:
3- To run Mosquitto broker on port 1884, open the Terminal from the root directory of your configuartion file, and execute this command:
> sudo mosquitto -c ./mosquitto_bridge.conf –p 1884Preliminary requirements
You must have installed:
- Git. If Git is not installed, you can download it here.
- The build-essential packet (make, gcc etc.). This varies based on the operating system in use.
- The Native dependencies. If they are not installed, you can download they here.
- OpenOCD. If OpenOCD is not installed, you can download it here.
- GCC Arm Embedded Toolchain. If it is not installed, you can download it here.
- Netcat with IPv6 support. The installation command is the following:
> sudo apt-get install netcat-openbsdSet up
1- To create your project, you need to clone the RIOT repository:
> git clone git://github.com/RIOT-OS/RIOT.git2- Now, in order to have a command that publish a message containing the virtual sensors’ values on a topic every five seconds, you must update RIOT/examples/emcute_mqttsn/main.c like this.
3- To start up the application follow step by step these:
- Open the terminal from the root directory of your project, and run this command to setup
tapandtapbrdevices:
> ./RIOT/dist/tools/tapsetup/tapsetupIf you want to check that the taps are on you can use this command:
> ifconfig | grep tap- Assign a site-global prefix to the
tapbr0interface executing the following command:
> sudo ip a a fec0:affe::1/64 dev tapbr0Remember that fec0:affe::1 is the address of the MQTTSN Gateway.
- Open the Terminal from the
RIOT/examples/emcute_mqttsndirectory and use the following command to open the native RIOT board:
> BOARD=native make term- Assign a site-global address with the same prefix with this command:
> ifconfig 5 add fec0:affe::99- To connect with the broker use the following command:
> con fec0:affe::1- Finally, to start the message publishing, run this command replacing the name of my topic (
sensor/values) with your own:
> pub_values sensor/valuesNote: if you want to see your web page properly working on localhost:4200, your frontend and backend apps must be running. See here how to do.
AboutThis project has been developed as part of my MSc degree at Sapienza University of Rome for the 2019/2020 Internet of Things course.
Related video on YouTube.


Comments
Please log in or sign up to comment.