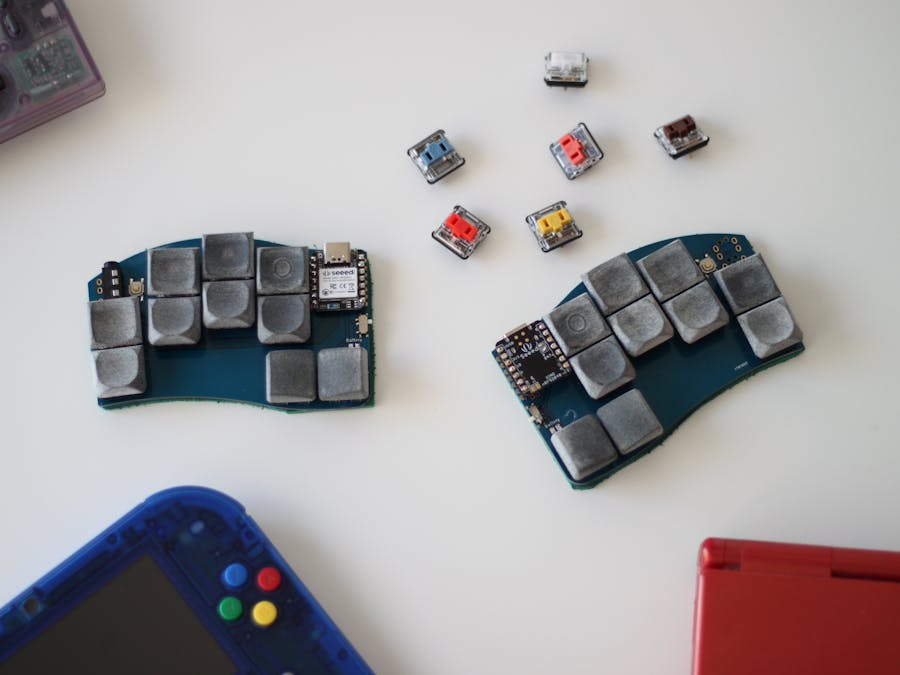
Hello all, I present to you Tiny20. My smallest keyboard design ever.
It might seem daunting at first, so I’ll talk about my journey and how I came to this design.
My first experience with a mechanical board was with a logitech full size board. It was way nicer than my laptop keyboard and it got me hooked. Fast forward a couple of years and I’m in the rabbit hole of mechanical keyboards. I found ergo boards but they seemed way too complex for me, so I decided to get this 60% keyboard which is QMK compatible (for those who don’t know, QMK is an open source firmware that makes you program the behavior of your keyboard).
At the same time I found this reddit postabout an ergo board and the blogabout it. A week or so later the same person posted about a discord server and that he’s making a toolto help design your own ergonomic keyboard. This was the start of a wild journey.
I learned QMK and started trying weird layouts on my 60% keyboard (a great thing for beginers is to get a big board so you can test as many combinations and layouts as you want). I went from 60% to 40% to 36 keys, then 34, then 32…I got down to 26 and then designed my first board using ergogen (the tool I talked about earlier). It works but not as I wanted so back to the drawing board. I started to mess with the layout again, trying to reduce the keys as much as possible. I found I could work with 20 keys.
At this point you might think “why is this person trying so hard to reduce the key count?” Well that’s a hard question if I’m honest. I wanted to reduce for a few reasons:
First reducing the number of keys equals to less movement of the fingers reducing strain and making it better for the hands. I was also trying to figure out what is the minimum I can have that is still usable. And lastly, it was a challenge for myself and felt like a puzzle: how can I make a keymap that has the same functionality as a full size keyboard but with only 20 keys instead of 104.
I ended up with this keymap:
Might seem really complicated but it’s really not that hard once you understand what’s going on. First, the small keys that are between the real keys represent a combo, a combo is the actuation of two or more keys at the same time. Then we have layers, a layer works like Shift on a regular keyboard, if you hold it, the keys change their functionality (i.e. 1 and !).
So once I had a keymap I liked and saw that it was possible to use it I started designing the board. I first tried using an arduino promicro, but the board being this small it didn’t really fit. At this point I learned about the seeeduino xiao board. A small board that I could use and has the perfect amount of pins for this board. This is where seeeduino has helped me. By the time I finished the design they started a contest and I was lucky enough to be a participant. They made the pcb using their fusion services, built the board and sent it to me and I have to thank them for making this a reality. So this is the result:
I ordered the keyboard from Seeed FusionDIY XIAO Mechanical Keyboard Contest campaign. This time I’ve used the seeeduino xiao-bleversion. This one uses the nRF52840 chip which has Bluetooth and is ZMK compatible. ZMK is another firmware for keyboards that’s been designed around wireless keyboards. This was my first time using ZMK but after a few hours of working on it I was able to make it work.
Now that I’ve been able to use it I found a couple of mistakes in my pcb design:
The board is reversible but I haven’t used a reversible xiao footprint so one has to face down this means that you can’t connect the board to the battery pads nor the reset. So neither the reset button nor the battery pads nor the power switch on the pcb work.
- The board is reversible but I haven’t used a reversible xiao footprint so one has to face down this means that you can’t connect the board to the battery pads nor the reset. So neither the reset button nor the battery pads nor the power switch on the pcb work.
Being the xiao separated from the pcb, you need to connect a wire from the pcb to the underside pads of the xiao for the battery and reset pads. This could be solved by using pogo pins for those pads
- Being the xiao separated from the pcb, you need to connect a wire from the pcb to the underside pads of the xiao for the battery and reset pads. This could be solved by using pogo pins for those pads
ZMK doesn’t support wired split keyboards so the TRRS jack is useless, meaning I can delete it from the pcb making it even simpler.
- ZMK doesn’t support wired split keyboards so the TRRS jack is useless, meaning I can delete it from the pcb making it even simpler.
With these 3 things, I will make a revision 2 solving the problems and adjusting the key positions a little bit for a better fit. Some upgrades I might look into are adding an horizontal encoder so it can be used as a scroll wheel or for volumen, etc. I want to look into pointing solutions like a trackpad or trackpoint so it doesn’t make the board much bigger. Another possible change could be to change the spacing, making the vertical spacing tighter so it’s easier to make vertical combos and faster to go from top row to bottom row.


Comments