After some time in analysis, I continue here with another way of representing the analog value of a potentiometer, this time I wanted to experience a 3.5" TFT LCD, I like its size and the various colors that can be represented. It is a component worth having for some projects. Of course, this document is also part of the saga about analog value.
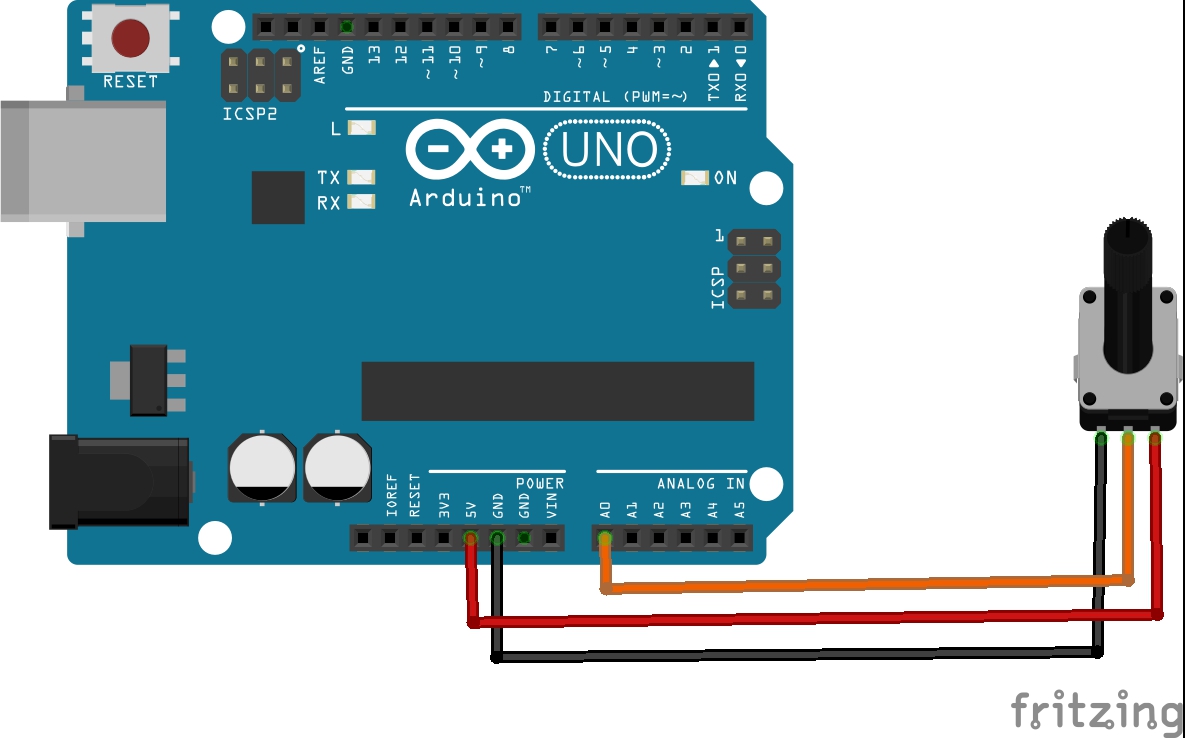
To develop this project, a complicated connection or diagram is not required, that is because the potentiometer must be connected to pin A0 and then the screen is mounted on the Arduino UNO following the image reference.
Another detail that is important: The necessary library are LCDWIKI_GUI.h and LCDWIKI_KBV, what I like about those library is the easy of designing elements, texts and backgrounds that are eye-catching.
The code's systemWe include the necessary graphic libraries to use the screen and represent the necessary forms.
#include <LCDWIKI_GUI.h> //Core graphics library
#include <LCDWIKI_KBV.h> //Hardware-specific library
Next we build the screen for the respective library.
LCDWIKI_KBV my_lcd(ILI9486,A3,A2,A1,A0,A4);We define the colors to use.
#define  BLACK   0x0000
#define RED     0xF800
#define GREY 0x2104 // Dark grey 16 bit colour
#define GREEN 0x07E0
#define WHITE 0xFFFF
#define BLUE 0x001F
// Meter colour schemes
#define RED2RED 0
#define GREEN2GREEN 1
#define BLUE2BLUE 2
#define BLUE2RED 3
#define GREEN2RED 4
#define RED2GREEN 5
We set the variables to control the time and to store the value of the analog reading.
uint32_t runTime = -99999; // time for next update
int reading = 0; // Value to be displayed
Now, in the following lines of setup code, we initialize the screen, set a dark background, and set the direction of screen rotation respectively.
void setup() {
  my_lcd.Init_LCD();
  my_lcd.Fill_Screen(0x0);
  my_lcd.Set_Rotation(1);
}
The ringMeter function is the heart of the code, internally a mathematical formula is applied to create various triangles, two vertices are on the inner arc and the other is on the outer arc and then an inverse triangle is generated. The generation of various triangles allows the circular bar to be built and the colors are gradually applied to it. Then the presentation of the centered text is generated and for this the number of figures it has is taken into account.
int ringMeter(int value, int vmin, int vmax, int x, int y, int r, byte scheme){
  // Minimum value of r is about 52 before value text intrudes on ring
  // drawing the text first is an option
  x += r; y += r;   // Calculate coords of centre of ring
  int w = r / 4;    // Width of outer ring is 1/4 of radius
  int angle = 150;  // Half the sweep angle of meter (300 degrees)
  int text_colour = 0; // To hold the text colour
  int v = map(value, vmin, vmax, -angle, angle); // Map the value to an angle v
  byte seg = 5; // Segments are 5 degrees wide = 60 segments for 300 degrees
  byte inc = 5; // Draw segments every 5 degrees, increase to 10 for segmented ring
  // Draw colour blocks every inc degrees

  for (int i = -angle; i < angle; i += inc) {
    // Choose colour from scheme
    int colour = 0;
    switch (scheme) {
      case 0: colour = RED; break; // Fixed colour
      case 1: colour = GREEN; break; // Fixed colour
      case 2: colour = BLUE; break; // Fixed colour
      case 3: colour = rainbow(map(i, -angle, angle, 0, 127)); break; // Full spectrum blue to red
      case 4: colour = rainbow(map(i, -angle, angle, 63, 127)); break; // Green to red (high temperature etc)
      case 5: colour = rainbow(map(i, -angle, angle, 127, 63)); break; // Red to green (low battery etc)
      default: colour = BLUE; break; // Fixed colour
    }

    // Calculate pair of coordinates for segment start
    float sx = cos((i - 90) * 0.0174532925);
    float sy = sin((i - 90) * 0.0174532925);
    uint16_t x0 = sx * (r - w) + x;
    uint16_t y0 = sy * (r - w) + y;
    uint16_t x1 = sx * r + x;
    uint16_t y1 = sy * r + y;

    // Calculate pair of coordinates for segment end
    float sx2 = cos((i + seg - 90) * 0.0174532925);
    float sy2 = sin((i + seg - 90) * 0.0174532925);
    int x2 = sx2 * (r - w) + x;
    int y2 = sy2 * (r - w) + y;
    int x3 = sx2 * r + x;
    int y3 = sy2 * r + y;
    if (i < v) { // Fill in coloured segments with 2 triangles
      my_lcd.Set_Draw_color(colour);
      my_lcd.Fill_Triangle(x0, y0, x1, y1, x2, y2);
      my_lcd.Fill_Triangle(x1, y1, x2, y2, x3, y3);
      text_colour = colour; // Save the last colour drawn
    }
    else // Fill in blank segments
    {
      my_lcd.Set_Draw_color(GREY);
      my_lcd.Fill_Triangle(x0, y0, x1, y1, x2, y2);
      my_lcd.Fill_Triangle(x1, y1, x2, y2, x3, y3);
    }
  }

  // Convert value to a string
  char buf[10];
  byte len = 4; if (value > 999) len = 5;
  dtostrf(value, len, 0, buf);
  my_lcd.Set_Draw_color(0, 0,0);
  my_lcd.Fill_Rectangle(x-60, y-15, x+60, y+20);

  // Set the text colour to default
  my_lcd.Set_Text_colour(WHITE);
  my_lcd.Set_Text_Back_colour(BLACK);
  my_lcd.Set_Text_Size(5);
  if (value>999){
    my_lcd.Print_String(String(value), x-60, y-15);
  } else if (value>99 && value<1000){
    my_lcd.Print_String(String(value), x-45, y-15);
  } else if (value>9 && value<100){
    my_lcd.Print_String(String(value), x-30, y-15);
  } else {
    my_lcd.Print_String(String(value), x-15, y-15);
  }
  return x + r;
}
The rainbow function allows you to set the color variation to use for the circular bar.
unsigned int rainbow(byte value){
  // Value is expected to be in range 0-127
  // The value is converted to a spectrum colour from 0 = blue through to 127 = red
  byte red = 0; // Red is the top 5 bits of a 16 bit colour value
  byte green = 0;// Green is the middle 6 bits
  byte blue = 0; // Blue is the bottom 5 bits
  byte quadrant = value / 32;
  if (quadrant == 0) {
    blue = 31;
    green = 2 * (value % 32);
    red = 0;
  }
  if (quadrant == 1) {
    blue = 31 - (value % 32);
    green = 63;
    red = 0;
  }
  if (quadrant == 2) {
    blue = 0;
    green = 63;
    red = value % 32;
  }
  if (quadrant == 3) {
    blue = 0;
    green = 63 - 2 * (value % 32);
    red = 31;
  }
  return (red << 11) + (green << 5) + blue;
}
During the loop you need to read the analog signal from the potentiometer and then call the ringmeter function to plot.
void loop() {
  if (millis() - runTime >= 100L) {
    runTime = millis();
    // Set the position, gap between meters, and inner radius of the meters
    int gap = 4, radius = 120, xpos = my_lcd.Get_Display_Width()/2-radius, ypos = my_lcd.Get_Display_Height()/2-radius;
    int value = analogRead(A5); // read of potentiometer value
    xpos = gap + ringMeter(value, 0, 1020, xpos, ypos, radius, GREEN2RED); // Draw analogue meter
  }
}All projects that have an interaction with the user allow to appreciate various interactions with the code, especially this project allowed me to explore the use of the TFT screen, its colors and even the basic graphic elements. The 3.5" screen is very nice and easy to use once you have the technical information from the manufacturer, so you can still share your experience with this screen.


_ztBMuBhMHo.jpg?auto=compress%2Cformat&w=48&h=48&fit=fill&bg=ffffff)


Comments
Please log in or sign up to comment.