


Hardware components | ||||||
| × | 1 | ||||
| × | 1 | ||||
| × | 1 | ||||
| × | 1 | ||||
| × | 1 | ||||
| × | 1 | ||||
| × | 1 | ||||
| × | 1 | ||||
| × | 1 | ||||
| × | 1 | ||||
Software apps and online services | ||||||
 |
| |||||
https://www.donluc.com/?p=4244
https://learn.dfrobot.com/makelog-314900.html
https://www.tiktok.com/@luc.paquin8/video/7456494706738892037
#DonLucElectronics #DonLuc #ESP32 #Bluetooth #Elecrow #DFRobot #Arduino #Project #Patreon #Electronics #Microcontrollers #IoT #Fritzing #Programming #Consultant
Bluetooth is a short-range wireless technology standard that is used for exchanging data between fixed and mobile devices over short distances and building personal area networks. In the most widely used mode, transmission power is limited to 2.5 milliwatts, giving it a very short range of up to 10 metres. It employs UHF radio waves in the ISM bands, from 2.402 GHz to 2.48 GHz.
You can pair all kinds of Bluetooth devices with your PC, including keyboards, mice, phones, speakers, IoT, and a whole lot more. To do this, your PC needs to have Bluetooth. Some PCs, such as laptops and tablets, have Bluetooth built in. If your PC doesn’t, you can plug a USB Bluetooth adapter into the USB port on your PC to get it.
DL2501Mk011 x DFRobot FireBeetle 2 ESP32-E
1 x Fermion: 2.0" 320x240 IPS TFT LCD
1 x GDL Line 10 CM
1 x Crowtail- Rotary Angle Sensor 2.0 - 10K Ohm
1 x Crowtail- LED 2.0 - Yellow
1 x Crowtail- LED 2.0 - Green
1 x Lithium Ion Battery - 1000mAh
1 x Switch
1 x Bluetooth Serial Terminal for Windows 10
1 x USB 3.1 Cable A to C
FireBeetle 2 ESP32-EPOT - A0
LEG - 16
LEY - 17
DC - D2
CS - D6
RST - D3
RX2 - Bluetooth
TX2 - Bluetooth
VIN - +3.3V
GND - GND
DL2501Mk01pDL2501Mk01p.ino
getDisplay.ino
getPotentiometer.ino
setup.ino
People can contact us:http://www.donluc.com/?page_id=1927
Electronics, IoT, Teacher, Instructor, R&D and Consulting- Programming Language
- Microcontrollers (PIC, Arduino, Raspberry Pi, Arm, Silicon Labs, Espressif, Etc...)
- IoT
- Wireless (Radio Frequency, Bluetooth, WiFi, Etc...)
- Robotics
- Automation
- Camera and Video Capture Receiver Stationary, Wheel/Tank and Underwater Vehicle
- Unmanned Vehicles Terrestrial and Marine
- Machine Learning
- Artificial Intelligence (AI)
- RTOS
- Sensors, eHealth Sensors, Biosensor, and Biometric
- Research & Development (R & D)
- Consulting
- Etc...
Facebook:https://www.facebook.com/neosteam.labs.9/
YouTube: https://www.youtube.com/@thesass2063
Twitter:https://twitter.com/labs_steam
Pinterest:https://www.pinterest.com/NeoSteamLabs/
Instagram:https://www.instagram.com/neosteamlabs/
Patreon:https://patreon.com/DonLucElectronics59
DFRobot:https://learn.dfrobot.com/user-10186.html
Elecrow:https://www.elecrow.com/share/sharepj/center/no/760816d385ebb1edc0732fd873bfbf13
TikTok:https://www.tiktok.com/@luc.paquin8
Twitch:https://www.twitch.tv/lucpaquin
LinkedIn:https://www.linkedin.com/in/jlucpaquin/
Don Luc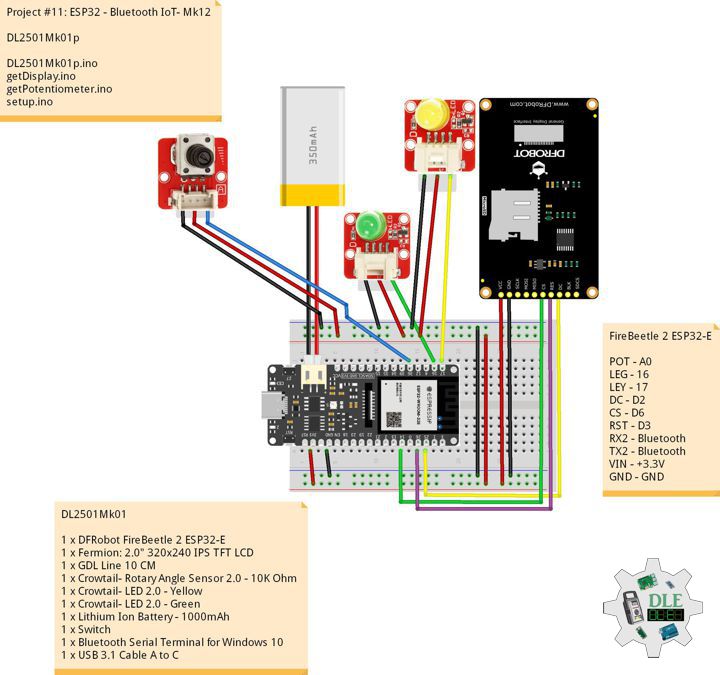


_3u05Tpwasz.png?auto=compress%2Cformat&w=40&h=40&fit=fillmax&bg=fff&dpr=2)
Comments
Please log in or sign up to comment.