


Hardware components | ||||||
 |
| × | 1 | |||
Software apps and online services | ||||||
| ||||||
If you’re thinking about getting a Sonoff device or you already have one, I’ll show you how to control it locally using Yeti. We’ll go through different steps: flashing the device, installing the Tasmota firmware and using Yeti to control your Sonoff and the rest of you smart home brands. Read more about the alternative to the official app.Yeti will also be able to control any other device that has Tasmota installed
Sonoff are affordable Wifi smart devices that provide users with smart home control. In order to control your devices, you need to get the official app (Ewelink). But is there any other alternative mobile app that allows local control? Yes, there is one, Yeti.
Not only Sonoff devices are compatible with Yeti but also, any kind of device that has Tasmota installed. In order to illustrate this guide we're using Sonoff as an example.
This tutorial is divided into 2 parts:
- First Part: how to install the Tasmota firmware in a Sonoff Basic device
- Second Part: How to control your Sonoff Basic with Yeti.
You’ll need Yeti and a Sonoff Switch or a tested device for this guide:
Get the Yeti mobile app:
Currently tested devices:
- Sonoff Basic
- Sonoff Plug S20
- Sonoff TH10-TH16 (without sensor)
- Sonoff 4CH
- Sonoff T1/T2
If you have any feedback or you’ve tested Yeti with other Sonoff devices add some comments below.
Installing the Tasmota FirmwareWe'll flash your Sonoff and install a new firmware. During this process some basic electronic skills are required in order to solder some connection pins.
Warning: The Sonoff Tasmota version installed in your device must be 5.11.0 or higher in order to be compatible with Yeti. We recommend the latest version of the firmware available here
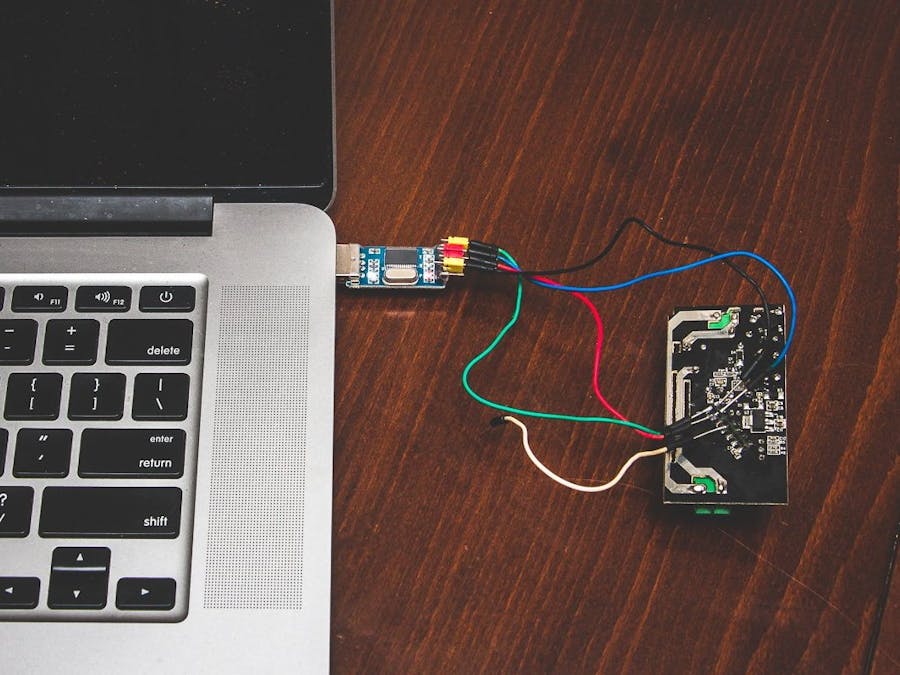
Step 1: Serial Connection
We’ll follow all steps posted in the official tasmota github repository: how to solder Sonoff basic
All you need to do is solder all PINS you can see in the images and use a USB TTL Serial wire to connect your Sonoff to your computer. See the image below:
Step 2: Connect your Sonoff and upload the Tasmota firmware
Now that we have our Sonoff Basic soldered we need to connect it to our computer and install the Tasmota firmware.
I highly recommend you to look at this youtube video where you can see, step by step, how to go through the installation process
Firstly, you need to install Platform IO plugging into your main code editor. In my case, I’m using VSCode. We’ll follow all instructions posted here: Install Platform IO
Then, connect your Sonoff (in flash mode) to your computer and upload the Sonoff source code to the Sonoff Basic device using Platform IO.
Advice: If you're not using the MQTT functionality, we recommend you to disable it. The wifi connection will be faster, otherwise it will try to connect to the fictitious MQTT broker continuously.
Remember that if you haven’t installed Tasmota in your Sonoff, Yeti won’t be able to find your device due to the official firmware limitations.
Warning: The Sonoff Tasmota version installed in your device must be 5.10.0 or higher
After installing Sonoff Tasmota, controlling your Sonoff and the rest of your smart home devices is really easy. Follow the step below to see how:
Step 1: Install Yeti
Go to the Store and look for Yeti Smart Home. Download and Install it.
Step 2: Let’s Yeti look for your Sonoff devices
You need to have Tasmota Installed and your Sonoff devices connected to the Wifi in order to allow Yeti to find them
Open Yeti and create an account. Then Yeti will automatically scan your network looking for your Sonoff Devices.
In case you have another smart home brand compatible with Yeti, it will also show you the devices during this process
Step 3: Control Your devices with Yeti
After scanning your wifi network, your Sonoff will appear in the home controller. If you press on the widget you'll be able to turn it on off. If you hold press on the widget you can then access to the control view as below:
Extra - Introduce you devices' IP manually
Sometimes Yeti won't be able to find your Tasmota devices due to mDNS is disabled or other network issues come up. For that reason, in the configure brand section, under the Sonoff "Connect" menu you can see an "Advanced Options" text (See the image below). If you tap on it, you can introduce the IP Address of your device manually, then tap on "Done" and Yeti will scan your Wifi Network looking for your specified device
Yeti is a smart home application that supports a wide range of smart home brands: Nest, Philips Hue, LIFX, Yeelight, Ecobee, Sonos, Netatmo, TpLink... so if you have any of them, check how easy can be controlling all of them using a single interface thanks to Yeti.
Charms
You can create charms so your devices will change with a single tap. There are some suggested routines like 'Leaving Home' that you can try. Don't forget to turn off your appliances before leaving home.
Routines
What about setting a device to turn on/off at a selected time? It sounds good, right? Check out our suggested charms to turn on your devices in the morning or turning your devices automatically at night. You can forget about doing repetitive tasks. Yeti will do them for you :)
Header Photo by: @cezex


Comments
Please log in or sign up to comment.