Introduction
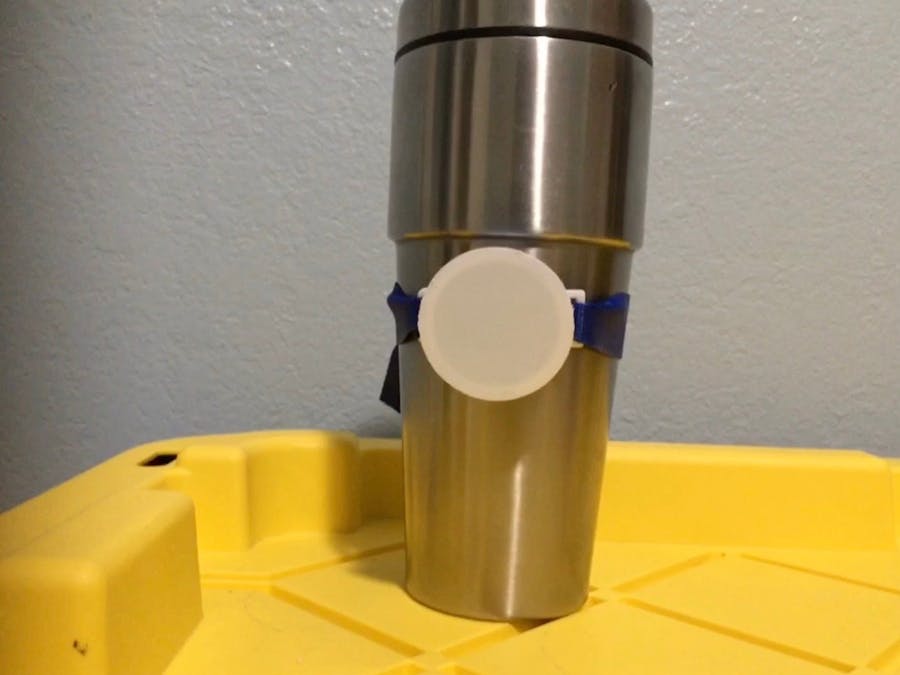
HydraWatch is a daily hydration tracking device that is attached around your water bottle. The HydraWatch utilize RSL10-Sense onboard tilt sensor and low power consumption to create a wearable system for your water bottle and turn your water into a smart water bottle that can keep track of your daily water intake as well as remind you when it is time to drink some water.
Schematic
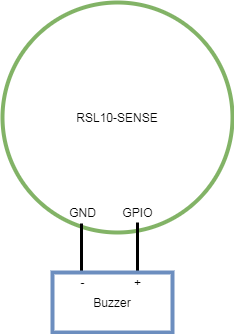
The only peripherals needed in this project is a Piezo Buzzer since the RSL10-Sense already had quite an extensive set of onboard sensors. The GND pin of RSL10-Sense will be connected to the Piezo Buzzer negative/ground pin ( the short pin) and the GPIO pin from RSL10-Sense will be connected to Piezo Buzzer positive/vcc pin ( the long pin).
Hardware
For hardware design choice i simply chose to go the circular watch route since it easy to design and manufacture as well a perfect choice of shape to be mount on a water bottle.
Firmware
For this project i used a modification version of sense-ics from the starter guide. I added a timer, tilt logic, GPIO control, LED control , and added few more new command to the BLE protocol.
main void()
{
    //Software time initalize
    struct SwTimer tim;
    struct SwTimer_Duration tim_dur;
    int set_elapsed_time ;
    SwTimer_Initialize(&tim);
    SwTimer_Start(&tim);
    //GPIO spare set as output
    Sys_DIO_Config(PIN_GIO_SPARE, DIO_6X_DRIVE | DIO_NO_PULL | DIO_MODE_GPIO_OUT_1);
    Sys_GPIO_Set_Low(PIN_GIO_SPARE);        // reset Spare GPIO low
    ....
}
This piece of code simply initialized the SoftwareTimer variable that we going to use to see how much time had passed since last intake of water. In addition, it also enable the GPIO pin to output for the Piezo Buzzer.
//global sensor varible
float gx, gy, gz;

//tilt sensor function
void la_vector_cb(bhy_data_generic_t *data, bhy_virtual_sensor_t sensor)
{
    /* Linear Acceleration sensor values are scaled using dynamic range. */
    uint16_t dyn_range = BHI160_NDOF_GetAccelDynamicRange();

    float x = data->data_vector.x / 32768.0f * dyn_range;
    float y = data->data_vector.y / 32768.0f * dyn_range;
    float z = data->data_vector.z / 32768.0f * dyn_range;

    gx = x;
    gy = y;
    gz = z;
}

int main(void)
{
    ....
    CS_SYS_Info("Entering main loop.");
    //initialize tilt sensor
    HAL_I2C_SetBusSpeed(HAL_I2C_BUS_SPEED_FAST);
    BHI160_NDOF_Initialize();

    while (1)
    {
         //do stuff here
    }
    return 0;
}
Next I create the the function la_vector_cb to read in the onboard tilt sensor value and store those value into it repsective global variable. Inside the main, I also enable the tilt sensor. Once everything is initialized the bulk of the logic will be inside the while loop() which is show below.
while (1)
    {
        /* Execute any events that have occurred and refresh Watchdog. */
        BDK_Schedule();
        //calculate elapsed time
        SwTimer_GetElapsed(&tim, &tim_dur);
        printf("time %lu \n",tim_dur.seconds );
        //Read in tilt sensor value
        BHI160_NDOF_EnableSensor(BHI160_NDOF_S_LINEAR_ACCELERATION,
                                 &la_vector_cb,
                                 50
        );
        printf("Linear Accel: x=%.2f g, y=%.2f g, z=%.2f g\r\n", gx, gy, gz);
        // read in user set elapsed time
        set_elapsed_time =  CSN_ENV_T1_PropHandler();

        if(tim_dur.seconds > set_elapsed_time)
        {
            //Set LED/Buzzer On
            LED_On(LED_RED);
            LED_On(LED_BLUE);
            Sys_GPIO_Set_High(PIN_GIO_SPARE);        // set Spare GPIO high
            HAL_Delay(1000);                        //delay

            //Set LED/Buzzer Off
            LED_Off(LED_RED);
            LED_Off(LED_BLUE);
            Sys_GPIO_Set_Low(PIN_GIO_SPARE);        // reset Spare GPIO low

            //check if major change in acceleration
            if(fabsf(gx) + fabsf(gy) + fabsf(gz) >= 1.0f)
            {
              //reset timer
              SwTimer_Remove(&tim);
              SwTimer_Initialize(&tim);
              SwTimer_Start(&tim);
            }

        }
        /* Enter sleep mode until an interrupt occurs. */
        SYS_WAIT_FOR_INTERRUPT;
    }
Inside the while loop, the first thing the system do is calculate the elapsed time and read in the tilt sensor data as well as the user set time between drink intake. Then the system check if the time elapsed time is greater than the user set time, If it is then the system turn on LED and Buzzer until the user take a drink of water.
//check if major change in acceleration
 if(fabsf(gx) + fabsf(gy) + fabsf(gz) >= 1.0f)
 {
    SwTimer_Remove(&tim);
    SwTimer_Initialize(&tim);
    SwTimer_Start(&tim);
 }
This if statement here check all three linear acceleration vector and if there combine value is greater than 1 that mean there a big movement happen. This indicate that the user is picking up and drinking from the water bottle. Once this if statement is executed, it will reset the timer to 0 and now the next set of LED/Buzzer trigger will happen after elapsed time is greater than the user set time
Software
For the app software , I use React Native as the app platform and using the React Native BLE Manger library for BLE communication. For this part, I am only going to go over how co communicate with the RSL10-Sense via BLE since it a major component in this project and covering how to build the app itself from scratch would be quite extensive.
Firstly, RSL10-Sense use a set of letter and / for it protocol
0/AL/L//The following command would return you the value of current ambiance light. The 0 indicate command index, AL indicate which sensor , and L indicate which sensor value.
You can find out the command abbreviation in CSN_XXX.h file. For example in CSN_EV.h ( the onboard environmental sensor BLE file)declaration as show below,
#include <ctype.h>
#include <stdio.h>
#include <stdlib.h>
#include <string.h>
#include <BME680_ENV.h>
#include <ics/node/CSN_ENV.h>
//-----------------------------------------------------------------------------
// DEFINES / CONSTANTS
//-----------------------------------------------------------------------------
#define CSN_ENV_NODE_NAME              "EV"
#define CSN_ENV_AVAIL_BIT              ((uint32_t)0x00000040)
#define CSN_ENV_SAMPLE_PERIOD_MS       (3000)
#define CSN_ENV_TEMP_OFFSET            (0)
#define CSN_ENV_PROP_CNT               (8)
// Shortcut macros for logging of ALS node messages.
#define CSN_ENV_Error(...) CS_LogError("ENV", __VA_ARGS__)
#define CSN_ENV_Warn(...) CS_LogWarning("ENV", __VA_ARGS__)
#define CSN_ENV_Info(...) CS_LogInfo("ENV", __VA_ARGS__)
#define CSN_ENV_Verbose(...) CS_LogVerbose("ENV", __VA_ARGS__)
//-----------------------------------------------------------------------------
// EXTERNAL / FORWARD DECLARATIONS
//-----------------------------------------------------------------------------
/** \brief Handler for CS requests provided in node structure. */
static int CSN_ENV_RequestHandler(const struct CS_Request_Struct* request,
char* response);
static void CSN_ENV_OutputHandler(struct BME680_ENV_Data *data);
// Temperature sensor Properties
static int CSN_ENV_T_PropHandler(char* response);
static int CSN_ENV_TF_PropHandler(char* response);
// Pressure sensor Properties
static int CSN_ENV_P_PropHandler(char* response);
static int CSN_ENV_PP_PropHandler(char* response);
// Humidity sensor Properties
static int CSN_ENV_H_PropHandler(char* response);
// IAQ sensor Properties
static int CSN_ENV_A_PropHandler(char* response);
// Composite requests
static int CSN_ENV_D_PropHandler(char* response);
static int CSN_ENV_DI_PropHandler(char* response);
//-----------------------------------------------------------------------------
// INTERNAL VARIABLES
//-----------------------------------------------------------------------------
/** \brief Indicates whether MULTISENSOR-GEVB was successfully detected by
* CSN_ENV_CheckAvailibility function.
*/
static bool env_available = false;
static struct BME680_ENV_Data env_data;
/** \brief CS node structure passed to CS. */
static struct CS_Node_Struct env_node = {
    CSN_ENV_NODE_NAME,
    CSN_ENV_AVAIL_BIT,
    &CSN_ENV_RequestHandler
};
struct CSN_ENV_Property_Struct
{
    const char* name;
    const char* prop_def;
    int (*callback)(char* response);
};
static struct CSN_ENV_Property_Struct env_prop[CSN_ENV_PROP_CNT] = {
    { "T",  "p/R/f/T",  &CSN_ENV_T_PropHandler},
    { "TF", "p/R/f/TF", &CSN_ENV_TF_PropHandler},
    { "P",  "p/R/f/P",  &CSN_ENV_P_PropHandler},
    { "PP", "p/R/f/PP", &CSN_ENV_PP_PropHandler},
    { "H",  "p/R/f/H",  &CSN_ENV_H_PropHandler},
    { "A",  "p/R/i/A",  &CSN_ENV_A_PropHandler},
    { "D",  "p/R/c/D",  &CSN_ENV_D_PropHandler},
    { "DI", "p/R/c/DI", &CSN_ENV_DI_PropHandler}
};
The Sensor name command for BLE would be "EV" from this line
#define CSN_ENV_NODE_NAME "EV"And the sensor value would be from these lines
static struct CSN_ENV_Property_Struct env_prop[CSN_ENV_PROP_CNT] = {
    { "T",  "p/R/f/T",  &CSN_ENV_T_PropHandler},
    { "TF", "p/R/f/TF", &CSN_ENV_TF_PropHandler},
    { "P",  "p/R/f/P",  &CSN_ENV_P_PropHandler},
    { "PP", "p/R/f/PP", &CSN_ENV_PP_PropHandler},
    { "H",  "p/R/f/H",  &CSN_ENV_H_PropHandler},
    { "A",  "p/R/i/A",  &CSN_ENV_A_PropHandler},
    { "D",  "p/R/c/D",  &CSN_ENV_D_PropHandler},
    { "DI", "p/R/c/DI", &CSN_ENV_DI_PropHandler}
};
So if you send
0/EV/T//You would get the current temperature.
Now if you want to have your own custom BLE command you simply just add in new sensor value command and it respective function in the library as show below.
static struct CSN_ENV_Property_Struct env_prop[CSN_ENV_PROP_CNT] = {
    { "T",  "p/R/f/T",  &CSN_ENV_T_PropHandler},
    { "TF", "p/R/f/TF", &CSN_ENV_TF_PropHandler},
    { "P",  "p/R/f/P",  &CSN_ENV_P_PropHandler},
    { "PP", "p/R/f/PP", &CSN_ENV_PP_PropHandler},
    { "H",  "p/R/f/H",  &CSN_ENV_H_PropHandler},
    { "A",  "p/R/i/A",  &CSN_ENV_A_PropHandler},
    { "D",  "p/R/c/D",  &CSN_ENV_D_PropHandler},
    { "DI", "p/R/c/DI", &CSN_ENV_DI_PropHandler},
    //New command
    { "T1", "p/R/c/T1", &CSN_ENV_T1_PropHandler}
};

//command function
static int CSN_ENV_T1_PropHandler(char* response)
{
    return 360;
}
This command i set here is to allow user to have 1 hour between each water intake.
Once we understand how to communicate with the RSL10-Sense, we can start working on the App BLE communication
startScan() {
    if (!this.state.scanning) {
      //this.setState({peripherals: new Map()});
      BleManager.scan([], 40, true).then((results) => {
        console.log('Scanning...');
        this.setState({scanning:true});
      });
    }
  }
This is the scan function that is attached to a button on the app once the button is pressed the app scan for available BLE device
handleDiscoverPeripheral(peripheral){
    var peripherals = this.state.peripherals;
    //console.log('Got ble peripheral', peripheral);
    console.log(peripheral.name);

    if (!peripheral.name) {
      peripheral.name = 'NO NAME';
    }
    if(peripheral.name == 'RSL10_BLE_Terminal')
    {
      console.log("Thinkkkkkk");
      peripherals.set(peripheral.id, peripheral);
      this.setState({ peripherals });
    }
    peripherals.set(peripheral.id, peripheral);
    this.setState({ peripherals });
 }
This function filter out the BLE name and look for the RSL10-Sense name and connected to it.
retrieveConnected(){
    BleManager.getConnectedPeripherals([]).then((results) => {
      if (results.length == 0) {
        console.log('No connected peripherals')
      }
      console.log(results);
      var peripherals = this.state.peripherals;
      for (var i = 0; i < results.length; i++) {
        var peripheral = results[i];
        peripheral.connected = true;
        peripherals.set(peripheral.id, peripheral);
        this.setState({ peripherals });
      }

      BleManager.retrieveServices(peripheral.id).then((peripheralData) => {
        //console.log('Retrieved peripheral services', peripheralData.);
        var service = 'e093f3b5-00a3-a9e5-9eca-40016e0edc24';
        var Notificationc = 'e093f3b6-00a3-a9e5-9eca-40026e0edc24';
        var WriteC = 'e093f3b7-00a3-a9e5-9eca-40036e0edc24';

        BleManager.startNotification(peripheral.id, service, Notificationc).then(() => {
          console.log("Notification started");
          const data = stringToBytes('0/EV/T1//'); //Data set intake time

          BleManager.write(peripheral.id, service, WriteC, data).then(() => {console.l         og("Write Data");}).catch((error) =>
            {console.log('error', error);});

        }).catch((error) => {
          console.log('Notification error', error);});
      });
    });
  }
This big chunk of code here is the communication process between the App and RSL10-Sense. The app configure and ServiceUUID and CharacteristicUUID and then send the protocol command string to set the intake time to RSL10-Sense.
Demo
Product Demo
App Demo


Comments
Please log in or sign up to comment.