


In this project, you'll turn a potentiometer to control the LED blink rate, to make it blink faster or slower.
Step 1: What You Will NeedThe parts you will need are all included in this Maker kit.
- SwiftIO board
- Shield
- Potentiometer module
- 4-pin cable
You have known that the digital signal has determined values. The analog signal is quite different. Its voltage changes smoothly with time. And its value ranges in a certain range, between 0V and 3.3V. So you could get 1.5V, 2V... There could be infinite possible values.
So how could you read its value? Here comes the analog to digital converter. It converts the analog voltage to a digital value that the microcontroller could read. It has different precision. The resolution is used to describe the possible values it could measure. The SwiftIO board is 12-bit resolution, which means there are 4096 (0-4095) values in total. The values from 0 to 4095 are known as raw values.
Let's see the working process of analog to digital conversion. When the board reads from the analog pin, it will first get a raw value between 0 and 4095, then this value would be converted to voltage value proportionally. Here is the formula:
resolution / reference voltage = raw value / actual voltage
where,
resolution: 4096
reference voltage: 3.3V
For example, if the raw value equals 0, the voltage would be 0V; if the raw value equals 4095, the voltage would be 3.3V; and 2047 corresponds 1.65V.
Step 3: The PotentiometerThe potentiometer is one kind of variable resistor. You could adjust its resistance by rotating it clockwise or anti-clockwise.
The resistance between ① and ③ is its maximum value. The wiper divides it into two parts. As the wiper moves, the resistance of the two parts will change accordingly.
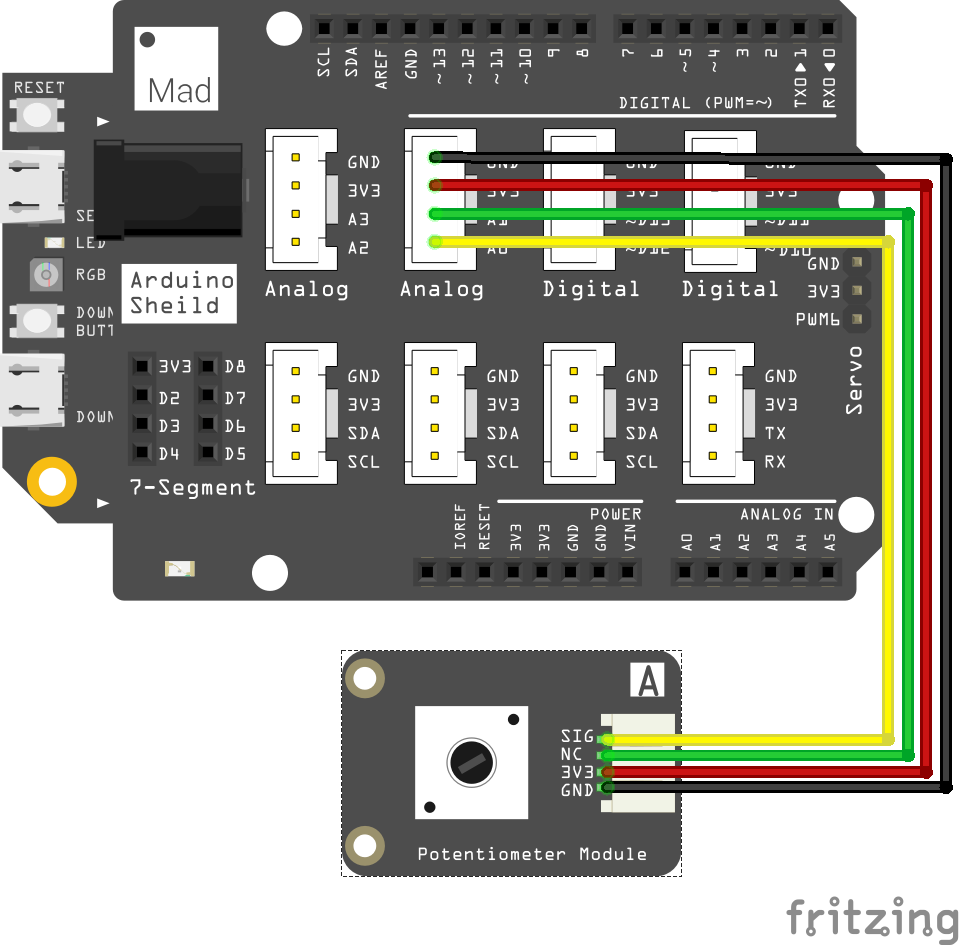
Step 4: The CircuitPlace the shield on the top of your SwiftIO board.
Connect the potentiometer module to pin A0 using a 4-pin cable.
Step 5: The Code/* Import the SwiftIO library to use everything in it. */
import SwiftIO
/* Import the board library to use the Id of the specific board. */
import SwiftIOBoard
/* Initialize an AnalogIn pin A0. */
let a0 = AnalogIn(Id.A0)
/* Initialize the red onboard led. */
let led = DigitalOut(Id.RED)
while true {
led.toggle()
/* Return the percentage of the voltage in the range of 0.0 to 1.0. */
let analogValue = a0.readPercent()
let delayTime = Int(analogValue * 500)
/* Stop the program for a certain period based on the value to keep current led state. */
sleep(ms: delayTime)
}import SwiftIO
import SwiftIOBoardFirst, import the two libraries: SwiftIO and SwiftIOBoard.
let a0 = AnalogIn(Id.A0)
let led = DigitalOut(Id.RED)
Initialize the red onboard LED and the analog pin (A0) the potentiometer connects to.
led.toggle()toggle() is used to reverse the digital output voltage. If the present voltage is high, then it will be changed to low, and vice versa. led.toggle() will change the state of the onboard LED automatically. You don't need to know if the LED is on or off.
let analogValue = a0.readPercent()a0.readPercent() allows you to get the input voltage in percentage. It represents the ratio between the raw value and the resolution (4096).
let delayTime = Int(analogValue * 500)
sleep(ms: delayTime)
The blink rate is decided by sleep time. Then this time is related to the input value. In this way, the potentiometer could control the LED.
Step 7: Run the ProjectAfter you download the code, as you turn the potentiometer, the LED blinks faster or slower accordingly.

Comments
Please log in or sign up to comment.