Pakistan is confronted with a number of severe environmental problems such as degradation of natural resources, industrial and vehicular pollution, pollution of marine environment, degradation of human health. Summarizing in monetary terms, the annual cost of environmental degradation in the country is about 4.3 % of GDP (US $ 4.3 billion). Specific examples are; air, land and water degradation, drought and desertification, water logging, forest depletion, loss of biodiversity, vehicular & industrial pollution and climate change.
I plan to make a portable device which will automatically stream real-time statistics of environment (Temperature, Humidity, Light Level, CO2 Gas Level, Environmental Pollution Level) to the Hologram Cloud and ThingSpeak Cloud using Arduino MKR GSM 1400. By this way, we can get real-time result anywhere any time.
After collection of data from various points of city we can perform ML Operations to identify the polluted area of city and will get other stats about Environmental factors and take the steps to save the environment.
ThemeArduino MKR GSM 1400 will receive the data from all sensors and modules, and send it to hologram Cloud via Hologram SIM card. After that, we will send the data from hologram to ThingSpeak channel for graphic visualization and for further process.
Hardware Setup
Please collect thee above mentioned hardware. Below is the picture of all components that we required in this project.
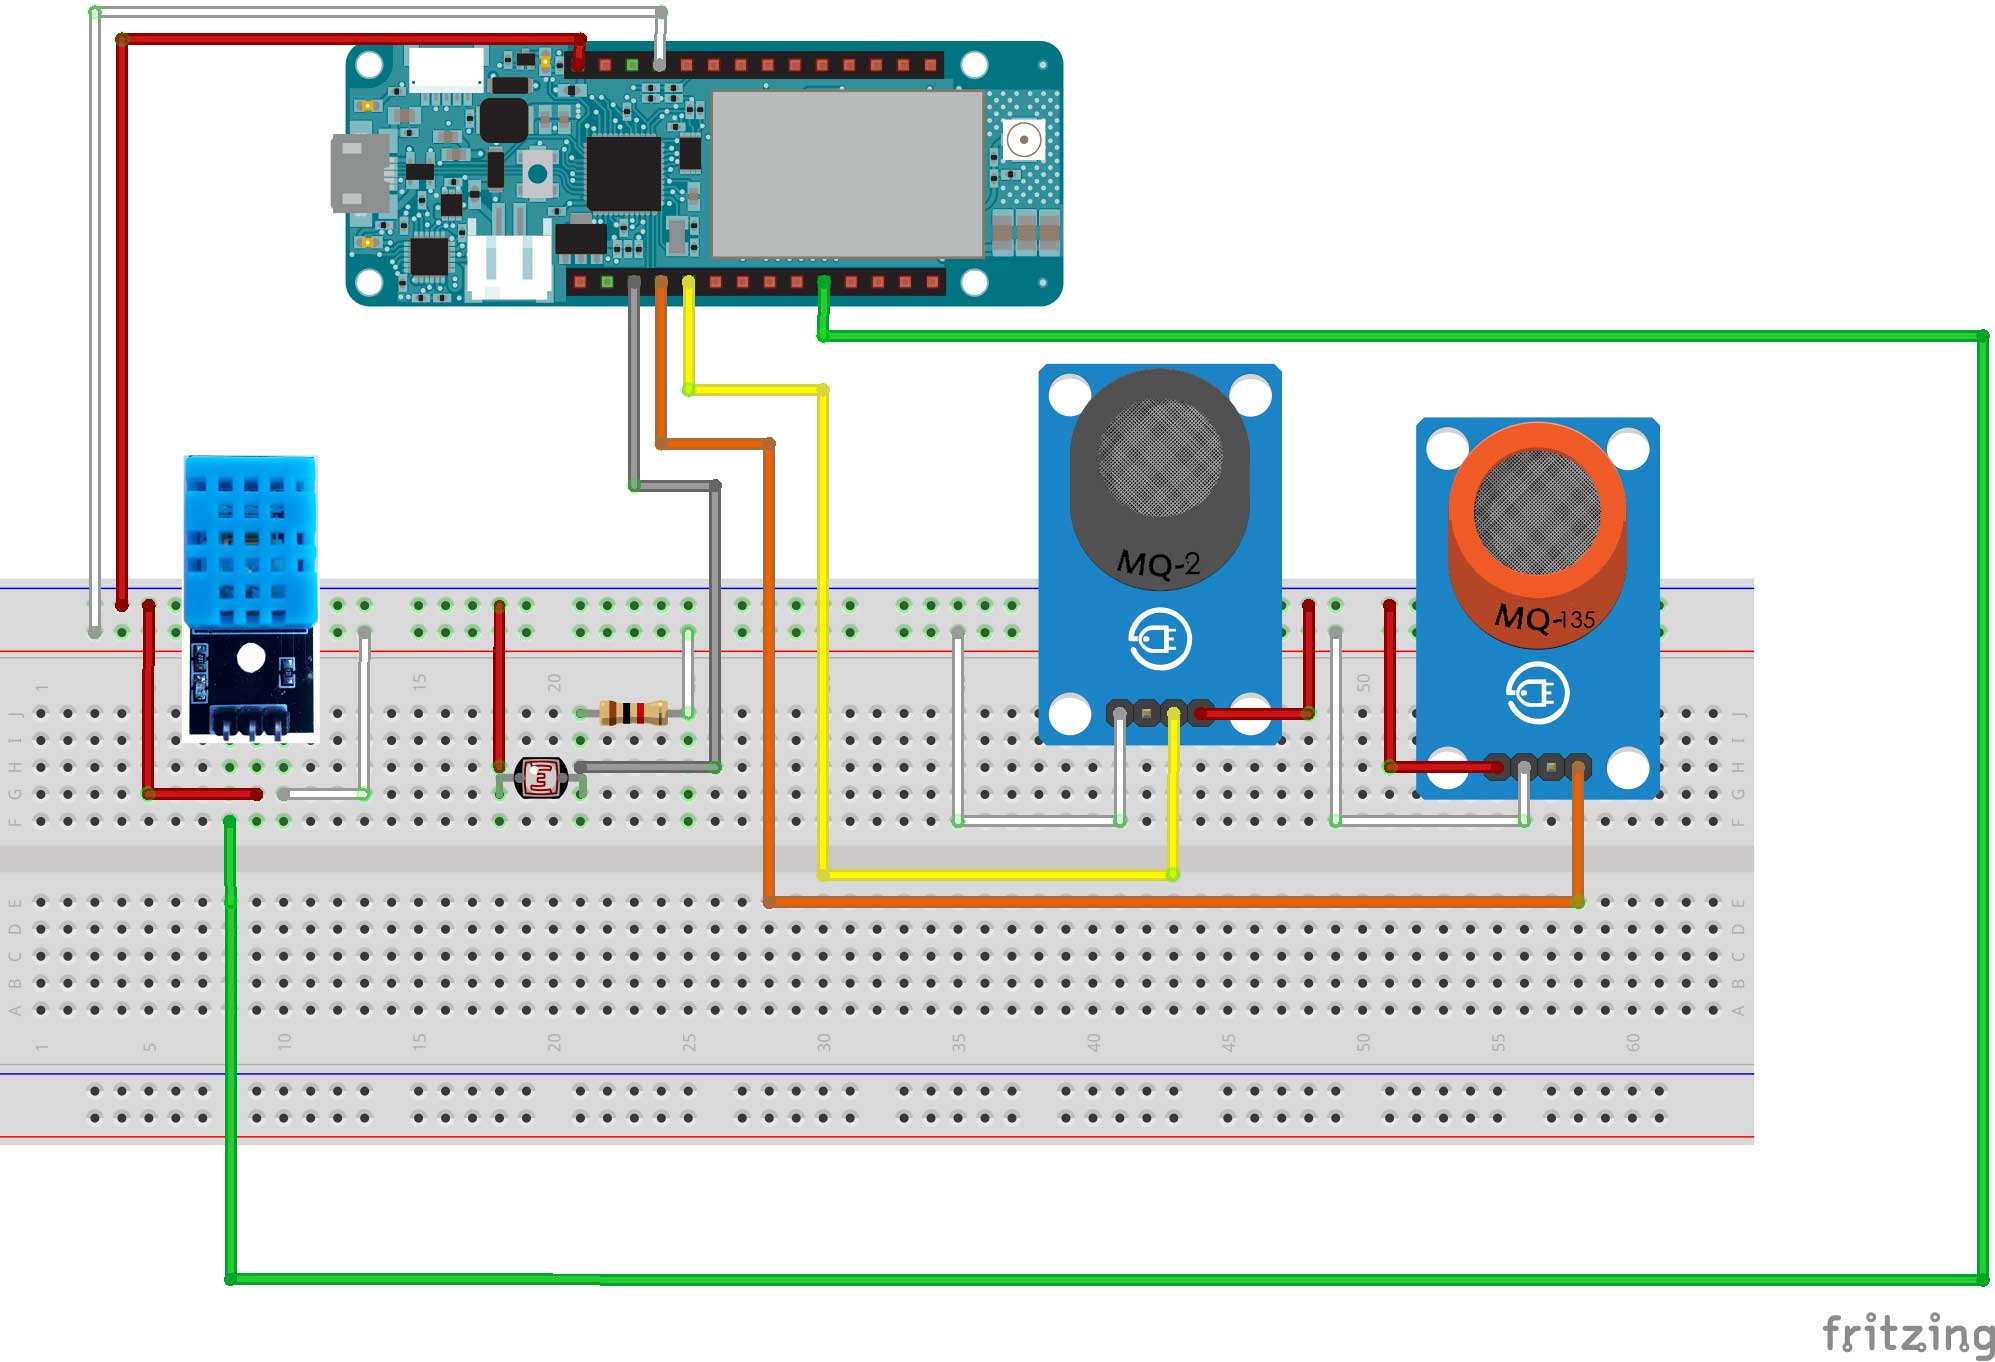
Follow the project Fritizing diagram and connect the modules with MKR GSM 1400 as the diagram below demonstrates.
DHT11 Module-> 1
LDR ->A1
MQ2 Module->A2
MQ135 Module->A3
After connections, the breadboard will look like this. It looks like difficult no problem, which is why I uploaded the Fritizing design diagram. :-)
Arduino IDE Setup for Arduino MKR GSM 1400
Before you upload the code to MKR GSM 1400, we need to make some setup to prepare our Arduino IDE for MKR GSM 1400. Firstly, we need to install MKR GSM 1400 board.
Navigate in Arduino IDE to Tools->Boards->Boards Manager Type MKR in Search box and you will get "Arduino SAMD Boards(32-bits ARM Cortex-M0+) By Arduino" Click on Install button.
After board Installation, we need MKR GSM Library for our project. Navigate to Sketch->Include Library->Manage Libraries and type MKRGSM in Search.
Arduino IDE is ready to upload code to board. But before this, we need to take some information from the Hologram Dashboard and also from ThingSpeak API Tab, so follow Hologram and ThingSpeak setup for further.
Hologram Setup
Code require device ID for SIM Authentication at Hologram Cloud. Log in to Hologram Dashboard https://dashboard.hologram.io/. If you are new to Hologram please follow this link to activate your SIM card https://hologram.io/docs/guide/connect/connect-device/.
After login, you will see the list of devices click on on device that is for MKR GSM 1400.
After that, click on Device Key, which is marked by the black box in picture. If you have not generated this, then generate it and copy the device key and paste in code.
Below is the code section snippet where you need to place your Device Key in HOLOGRAM_DEVICE_KEY and you can assign any name in HOLOGRAM_TOPIC I am going to use MKR GSM 1400 as topic.
Upload the code to MKR GSM 1400 after all configuration and the status from serial monitor which will show you either your MKR GSM board is connected with Hologram or not. If connected, you can see the values in your Jologram dashboard.
Click on "All Activity" to view your sensors values.
Below is the image that is demonstrating your sensor values and topic.
ThingSpeak Setup
Hologram will show us raw data like in JSON format that is very difficult to process so I plan to send all my MKR data from Hologram to ThingSpeak. For this, we need to set up Hologram routes that will be discussed in the next session, which will send our data to ThingSpeak cloud.
Log in to https://thingspeak.com/. After login, click on New Channel button.
Fill the channel name and fields, and then click on Save button.
After that, you will see your channel. But currently it's not showing the data because we still did not set up the bridge between Hologram and ThingSpeak, which will be discussed in next step.
Now after setting up the channel, we need to take Write API Key of ThingSpeak. Click on API Keys.
Place the Write API Key in the Arduino code and upload the sketch to board.
Set Up Hologram Route
To transfer the data from Hologram to ThingSpeak cloud, we need to set up a route. Click on Route link.
Click on Add Your First Route link.
Write route nickname and select topic. In out section, choose advance web hooks.
Enter: https://api.thingspeak.com/update?<<decdata>> in destination URL, and after that save the route.
Now Hologram is sending the data to our ThingSpeak channel.
Packing Into Box
After completing everything, it's time to pack our breadboard components into the box. So, I am going to solder the female header on vero board and put all the sensors in a box. Additionally, I solder two more groups of female headers 1 for 5V and other for ground as I am going to connect four sensors so every sensor need 5V and Ground.
Thanks for reading my project. if you have any query please feel free to comment on this project. i will try my best to answer your query.


Comments
Please log in or sign up to comment.