


Hardware components | ||||||
 |
| × | 1 | |||
 |
| × | 1 | |||
 |
| × | 1 | |||
Software apps and online services | ||||||
 |
| |||||
"A zoo (short for zoological garden) is a facility where animals are kept within enclosures for public exhibition and often bred for conservation purposes."
While zoos prioritize safety, there are still potential dangers for visitors. Here are some to be aware of:
🦁 Animal Encounters: Wild animals are unpredictable, even in captivity. Despite barriers, there's always a chance an animal could escape or react defensively if feels threatened by a visitor's actions (like loud noises, throwing objects).
🐞 Zoonotic Diseases: These are diseases transmitted between animals and humans. While zoos take precautions, some animals can carry diseases that can spread to humans through contact with the animal or its enclosure.
🚶♂️ Visitor Behavior: Sometimes visitors forget the rules. Reaching into enclosures, throwing things at animals, or not following posted warnings can put both the visitor and the animal at risk.
☠️ Incidents : There are several incident and cases of animal attacks in zoo happened around the world. 2014 incident in Delhi-India was very tragic. Visitor disregard for rules can lead to injuries. In 2020, a toddler sustained injuries after falling into a gorilla enclosure at a zoo in Cincinnati.
Vice versa there are also many cases where animals also get injured due stoned by visitors.
So, if rules get followed strictly, neither humans nor Animals get harmed. But sometimes foolish people in their enthusiasm disregard the zoo rules and try to approach the animals, hence subsequently entering dangerous areas where the zoo animals may either attack them or kill them.
There are security guards in every zoo, but when guards are on moving patrol, these careless people sometimes cross the railing or fence and avoid them.
🚩 Problem Statement : What if the sensitive and danger areas of zoo get continuously monitored by Vision AI based System which will detect human presence in such areas and alerts the concern authorities immediately to take preventive measures.
We can also use existing CCTV cameras streams/feeds from zoo to identify such incidents. But it will require significant amount of computational power to process that much amount of video data.
💡 Proposed Solution : So in such cases, we can take leverage of embedded Vision AI technology to perform video processing/ analytics at Edge. For that we require processor/microcontroller boards which can perform Computer Vision at the Edge.
I'm very grateful to SEEED Studio for providing me their awesome hardware and supporting my Project's Idea with Grove Vision AI Module V2
🚀 SEEED Studio's Grove Vision AI Module V2
The Grove - Vision AI V2 is a thumb-sized AI vision module equipped with the WiseEye2 HX6538 processor, which adopts the Arm Cortex-M55 dual-core architecture. It features a standard CSI interface and is compatible with Raspberry Pi cameras. It has an onboard digital microphone and an SD card slot.
It is highly suitable for various embedded AI vision projects. With the SenseCraft AI algorithm platform, trained ML models can be deployed to the sensor without the need for coding. It is compatible with the XIAO series and Arduino ecosystems, making it an ideal choice for various object detection applications.
To use the full functionality of the Grove Vision AI V2 you may need to purchase a CSI camera separately, SEEED recommend the OV5647-62 FOV Camera Module for Raspberry Pi
You will get all detailed information and getting started guide on WiKi Page of this module. Please go through it for more details.
Block diagram of Grove Vision AI (V2) system
Below is a block Diagram of the Grove Vision AI (V2) system, including a camera and a master controller which we are going to use. i.e XIAO ESP32S3
Now lets build the project step by step.
🎯 Aim - To Detect Human presence in sensitive and dangerous areas in Zoo and Alert the Authorities if any sightings occurred.
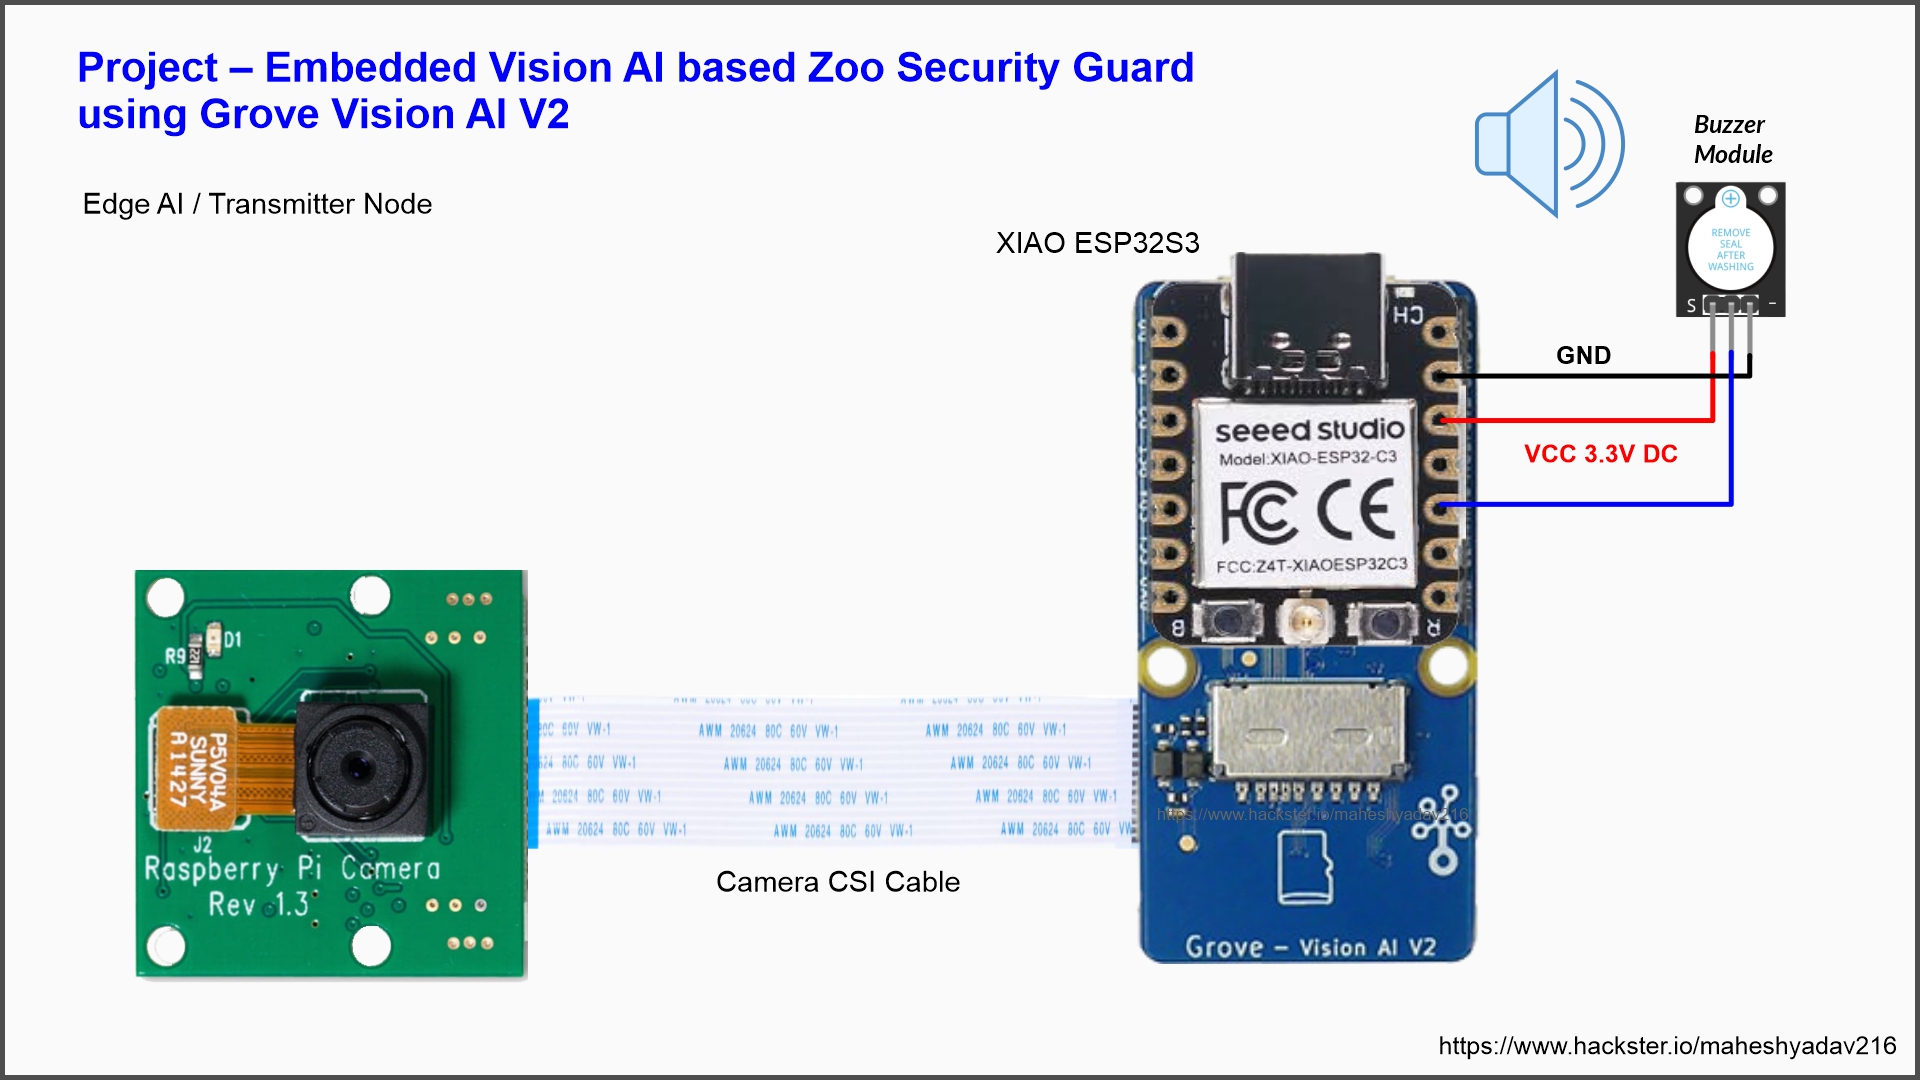
Step 1️⃣ - Assembly and Connecting the Hardware 🧰
Raspberry Pi Camera 📹(OV5647-62 FOV Camera Module) and Grove Vision AI Module V2 can be connected as shown below.
So to detect Human Presence in Video Stream provided by Raspberry Pi Camera we will use the SenseCraft Web-Toolkit.
Step 2️⃣ AI Model upload - using The SenseCraft Web-Toolkit 🛠️
The SenseCraft Web Toolkit is a visual model deployment tool included in the SSCMA (Seeed SenseCraft Model Assistant).
This tool allows you to deploy models to various platforms easily through simple operations. The tool offers a user-friendly interface and does not require any coding.
There are two locations you can find this tool
🔗 SenseCraft AI Wen Tool on GitHub
****Currently at the time of writing this writeup, the GitHub Tool is having some issues (AI model in the tool is not updating at this time... SEEED Studio). Hence SEEED is referring to its website version.
We have used Website version. Its working like a charm -
Follow the following steps to start the SenseCraft-Web-Toolkit: 🛠️
- Open the SenseCraft-Web-Toolkit website.
- Create Account (Its Free), then Login With your credentials
- Connect Grove Vision AI (V2) with camera (refer above How to connect image) to your computer using a Type-C cable.
Please Note that to upload the AI model into Grove Vision AI V2 board, it is not necessary to connect XIAO ESP32. Since we are uploading the model file into Grove Vision AI V2 Module not in XIAO. You have to connect type C cable to Grove Vision AI Module
- Having the Grove Vision AI Module connected via USB cable, select it as below:
- Then Select the Serial Port to Which Device is connected to your PC
- Once Grove Vision AI V2 module get connected you will see interface like following. Since we have already uploaded one model "Person Classification" on our device, hence it is showing that model and preview window
- You can try several Computer Vision models previously uploaded by Seeed Studio. You can filter them out according to task, device, and publisher. On this window you can directly change the model as following
- Or you can disconnect go Back on main page and select the desired AI model to deploy. You can check out following video where we have tried several models.
- We require Human presence detection model, so we have used "Person Detection YOLOV8" model. This is a person detection model designed based on the YOLOV8 framework, which is characterized by fast and accurate, enabling high performance target detection in embedded systems. You can use any person detection model as per your choice.
- You can use any person detection model as per your choice.
- Once you uploaded model. Then connect XIAO ESP32 S3 to the Vision AI V2 You can refer assembly video given below.
- Please align the XIAO ESP32's Type C USB port with same direction as of Grove Vison AI V2 as shown below
Circuit Diagram for the project is given below in Attachment Section or You can also find it on GitHub Repo.
Step 3️⃣ Software and Code : 💻
- We have used Arduino IDE v2.3.2 for programming XIAO ESP32S3.
- Download and Install the Seeed_Arduino_SSCMA library 📚
- You can download zip file and then add into Arduino IDE. Or you can just search in Arduino IDE's library manager and install it.
- Now connect the Type C cable to XIAO ESP32S3 and connect it to computer. Go to Arduino IDE and Select your Board. If it is not showing then you have to install the board package by going into Board Manager of Arduino IDE
- You can also follow the this guidegiven by SEEED.
- Once you selected you board and COM Port. Upload following Sketch given below and also in Attachment section
//=============================================================================//
// Project/Tutorial       - DIY Project - Embedded Vision AI based Zoo Security Guard
// Author                 - https://www.hackster.io/maheshyadav216
// Hardware               - Grove Vision AI V2,  XIAO ESP32S3, Buzzer
// Sensors                - NA
// Software               - Arduino IDE
// GitHub Repo of Project - https://github.com/maheshyadav216/Project-Embedded-Vision-AI-based-Zoo-Security-Guard
// Code last Modified on  - 27/06/2024
//============================================================================//
// Testing Code SSCMA
#include <Seeed_Arduino_SSCMA.h>

SSCMA AI;

void setup()
{
    AI.begin();
    Serial.begin(9600);
}

void loop()
{
    if (!AI.invoke())
    {
        Serial.println("invoke success");
        Serial.print("perf: prepocess=");
        Serial.print(AI.perf().prepocess);
        Serial.print(", inference=");
        Serial.print(AI.perf().inference);
        Serial.print(", postpocess=");
        Serial.println(AI.perf().postprocess);

        for (int i = 0; i < AI.boxes().size(); i++)
        {
            Serial.print("Box[");
            Serial.print(i);
            Serial.print("] target=");
            Serial.print(AI.boxes()[i].target);
            Serial.print(", score=");
            Serial.print(AI.boxes()[i].score);
            Serial.print(", x=");
            Serial.print(AI.boxes()[i].x);
            Serial.print(", y=");
            Serial.print(AI.boxes()[i].y);
            Serial.print(", w=");
            Serial.print(AI.boxes()[i].w);
            Serial.print(", h=");
            Serial.println(AI.boxes()[i].h);
        }
        for (int i = 0; i < AI.classes().size(); i++)
        {
            Serial.print("Class[");
            Serial.print(i);
            Serial.print("] target=");
            Serial.print(AI.classes()[i].target);
            Serial.print(", score=");
            Serial.println(AI.classes()[i].score);
        }
        for (int i = 0; i < AI.points().size(); i++)
        {
            Serial.print("Point[");
            Serial.print(i);
            Serial.print("] target=");
            Serial.print(AI.points()[i].target);
            Serial.print(", score=");
            Serial.print(AI.points()[i].score);
            Serial.print(", x=");
            Serial.print(AI.points()[i].x);
            Serial.print(", y=");
            Serial.println(AI.points()[i].y);
        }
    }
}- As XIAO ESP32S3 have PSRAM support, Please enable PSRAM as given in following image
- Then upload the code.
- When code get uploaded open serial monitor, you will see output somewhat like following
- In this window you can see, if your target=0 means there is no person, if it becomes 1 means, then there is human presence.
- **We will use this logic into our main program of the project to detect the human presence in sensitive and dangerous areas in zoo.
Step 4️⃣ Alert and Notifications System 🚨
So, there are several ways you can raise Alert for 'Human Presence detection in sensitive and dangerous area in Zoo'.
Please note that, Our (Project System) is supposed to be installed at zoo at different areas prone to dangerous and potentially risky for human presence. So there may be two scenarios.
1. WiFi connectivity Available - Hence we can send Alarm signals to Authorities and Security Guards through LAN/Internet.
2. WiFi/connectivity is not available - in such cases we can Raise Alarm by Loudspeaker but here we must take care that Animals should not get agitated by the sound.
- We can use different long distance wired/wireless technologies to send Alarm signals. Like for example we can use - Cellular GSM 3G/4G/5G, LoRa, SIgFox, NBIoT etc;
- In this project, for the sake of demo we have supposed that WiFi will be available and we can send Telegram Notifications to Nearby Guards to check that Area.
- For that we have used Telegram Bot to send notifications on Telegram App.
Future Scheme 🔮 - We have also planned to design Alert/Alarm System which will be placed at Security Guards Main Office. This device will be connected to our Edge device using ESP-NOW communication protocol.
Setting Up Telegram Bot 🤖
Telegram Messenger is a cloud-based instant messaging and voice over IP service. You can easily install it in your smartphone (Android and iPhone) or computer (PC, Mac and Linux). It is free and without any ads. Telegram allows you to create bots that you can interact with.
"Bots are third-party applications that run inside Telegram. Users can interact with bots by sending them messages, commands and inline requests. You control your bots using HTTPS requests to Telegram Bot API"
There are three very important steps -
- Create Telegram Bot
- Get your Telegram chat ID
- Libraries required for Telegram bot ESP32 integration
🦾Create a Telegram Bot
- We need to create a Telegram Bot that can alert us when our Edge AI Vision module detects the people. For that open Telegram App on your PC or Phone and search for BotFather.
- You have Chat with Bot named 'BotFather' to create your own new bot and its HTTP API credentials. i.e Bot Token
🤵 Get your Telegram chat ID
- In the telegram messenger every user, chat, and group is having a unique ID. So To prevent any unauthorized access to our bots from other users we need to find our unique user ID and use it inside our Arduino code for ESP32.
- To know your Telegram chat ID you have to chat with Bot named 'IDBot, For that open Telegram App on your PC or Phone and search for “@myidbot”.
📚 Libraries required for Telegram bot ESP32 integration
To establish communication with the Telegram bot, we’ll be using the Universal Telegram Bot Library created by Brian Lough that provides an easy interface for Telegram Bot API.
We also have to install the ArduinoJson library
You can either install above libraries in Arduino IDE by adding their zip file or You can also use Library Manager.
You can Check out following excellent tutorials
for more details about How to create Telegram Bot? and how you can integrate it with your ESP32 Board?.
Step 5️⃣ Final Code
Once you done with all above 4 steps, Check out and upload the code given below in attachment section or on GitHub repo.
Please replace your credentials in main code. Like, your WiFi SSID and Password. As well as your Bot Token and Chat ID
🚀 Demo and Results -
Once we run the program and point the Grove Vision AI V2 camera towards the area to be scanned, whenever person enters into that area, we will get Telegram Bot notifications Pop-ups on our smartphone and PC.
Project's current makeshifter assembly. 🤪
We have plans to make following upgradation in our project in future.
- Connectivity - More robust and ubiquitous wireless connectivity options like LoRa, SigFox, Cellular - 4G/5G, NBIoT etc.
- There will be two systems - Transmitter at Edge and Receivers (With Big Alarm Assembly) at Security Guards main office.
- Making system completely standalone by powering it through Solar power.
- Adding proper 3D Printed enclosure.
I will share all the documents, codes, schematics, etc. on GitHub.
Suggestions about this Tutorial/Project design, Circuits, code modifications, Optimization, Errors/Bugs findings and queries are most welcomed. Feel free to raise you queries, suggest your opinions and point out any errors or bugs.Credits
Thank you Hackster, SEEEDStudio, and all other peoples, websites and entities who helped me (directly/indirectly) for creating this article.


Comments