Project Concept in brief:
A server room is a room used to store, power and operate computer servers and their associated components. Every organization or Institution have their dedicated server rooms or data centers where they connect all their computers and networks (LAN) together. For such scenarios, Climate is one of the factors that affects the energy consumption and environmental impact of a server room. In this project, We will build a system which will monitor different key parameters of server room like Temperature, Humidity, Barometric Pressure etc., on an Arduino IoT dashboard. This system will also try to detect and notify for Power Failure, Fire, Smoke etc. and also we'll implement some edge level automation for temperature control.
Key Features
=> Arduino IoT Dashboard Monitoring
=> Data Logger - SD card (Local), Google Sheet
=> Notifications - Of Alerts on Telegram App
=> Edge Automation for temperature, humidity - Thermostat Control
Inspiration :
Few years back, I wanted to build this project for my college. Because in their server room, there was no such system of any kind of monitoring. Since server room was below ground floor (Basement), So they usually have to send one person there for every 1-2 hours to check everything ok or not. At that time, I also tried to implement this project using Arduino Uno and gprs/gsm module. But there was issue like very poor Network/gsm signal coverage, since server room was below ground floor. And for using Arduino Ethernet shield there has not support of https. So, that time I thought that, what if I can utilize Wi-Fi internet connection from wireless router from server room itself by connecting Arduino board in that network. And send all parameter data to website, instead of sms/gprs packets. But I left that project due to incompatibility or unavailability of Wi-Fi enabled MCU resources. But When I got to know about this Arduino Oplà IoT Kit and this contest, I think it is worth try that project again.
Thank you very much #Arduino!!! - Yes, For a last decade, "Arduino" have been changing life of every aspiring Maker, DIY Enthusiastic and Hobbyists around the world. Credits and Gratitude are beyond words. Thank you very much for organizing for such contest #CloudGames2022 and sponsoring and supporting my Idea with Arduino Oplà IoT Kit.
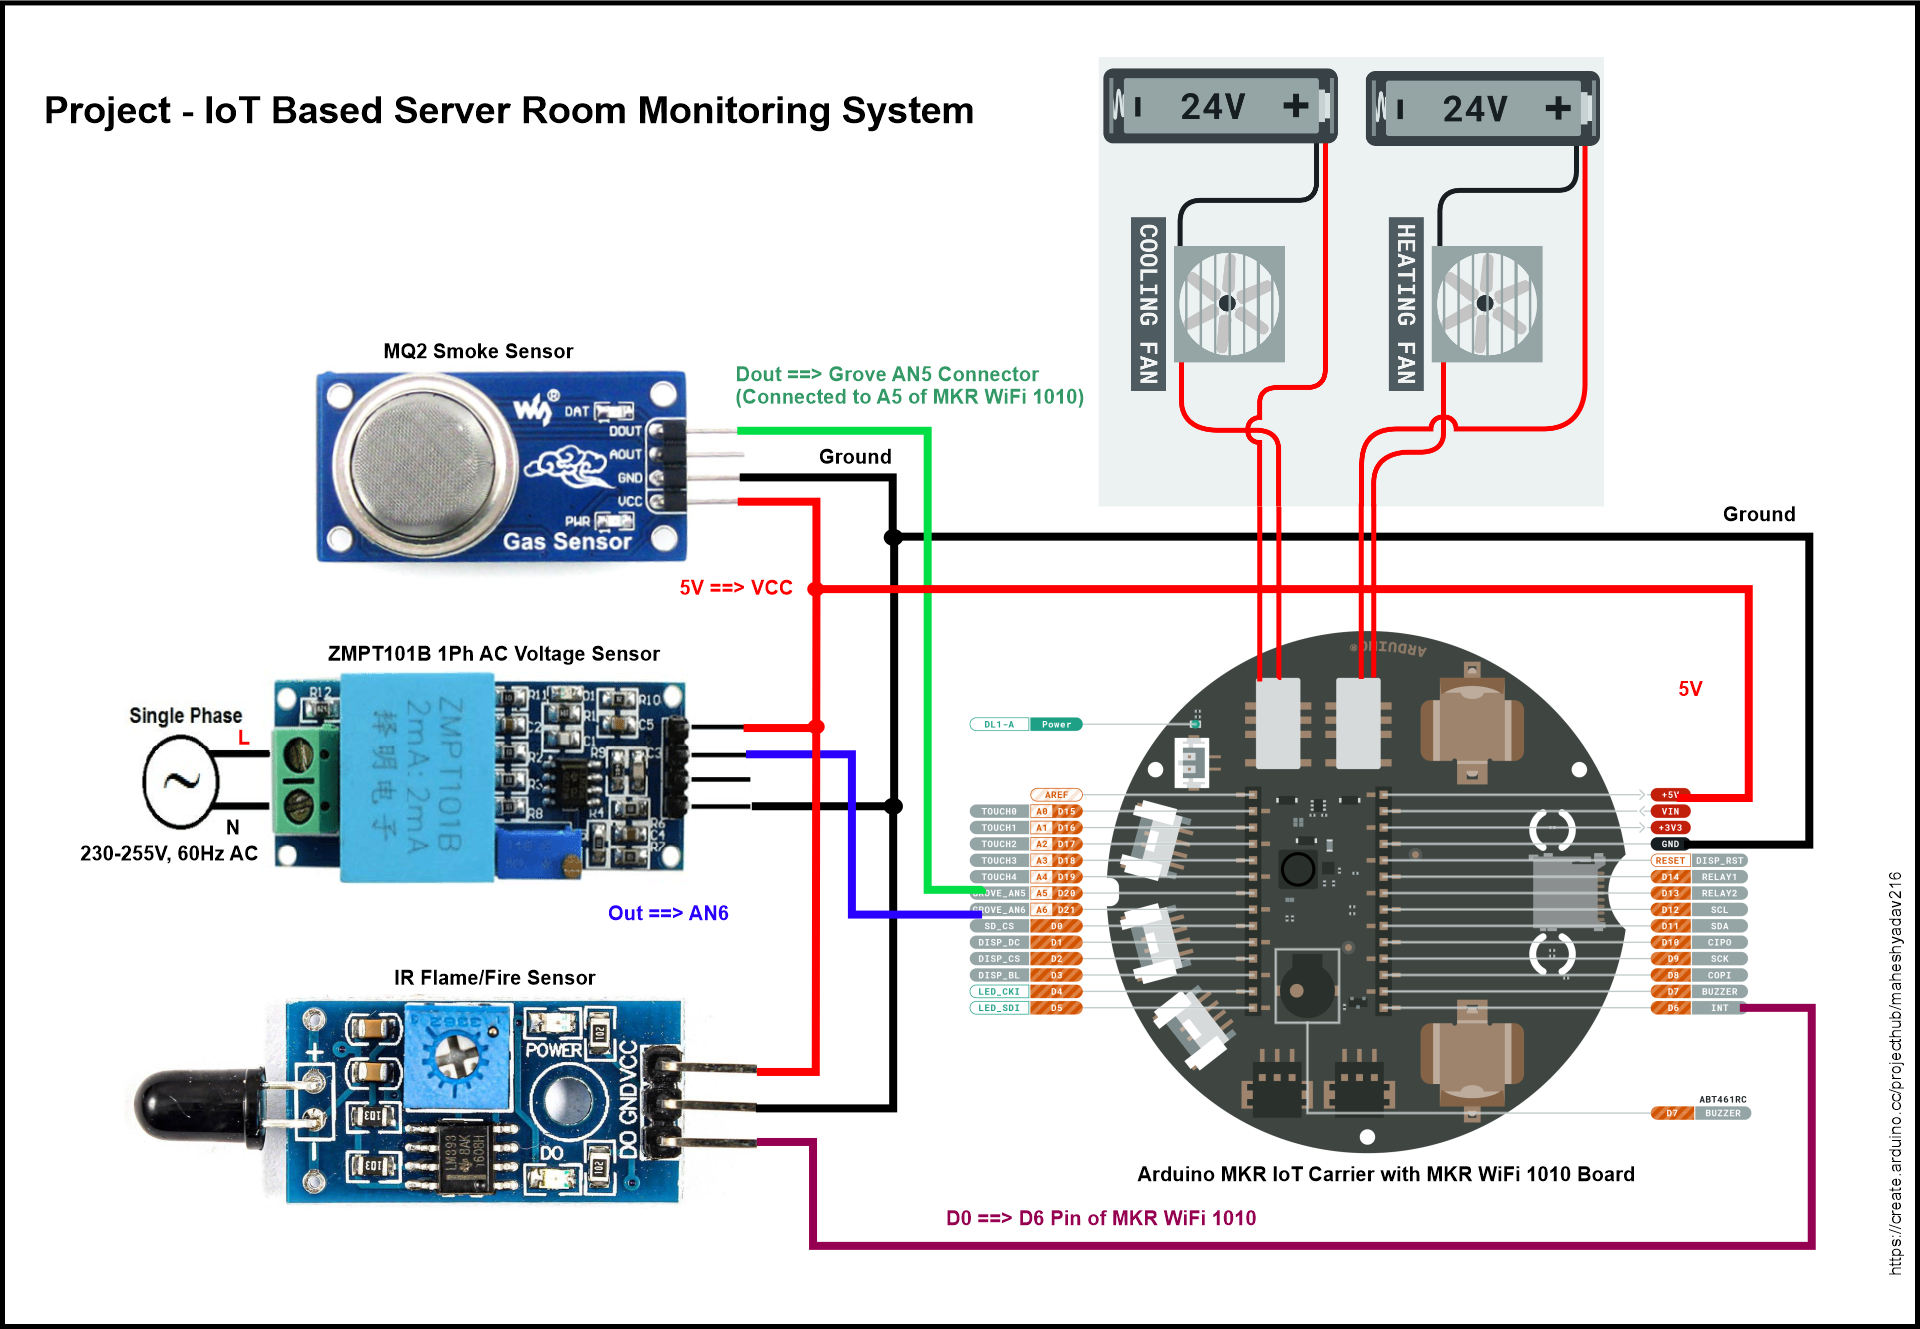
Block Diagram of the project
Check out following block diagram of this project which will give overview of how this whole system will be connected.
Hardware of this project
Arduino Oplà IoT Kit have different on-board sensors, Like, temperature, humidity & barometric pressure sensors, 6 axis IMU motion sensor, color detection sensor, gesture sensor etc. I've use temperature, humidity & barometric pressure sensor. Also three external sensors, as given above in components section - MQ2 Gas/Smoke Sensor, IR Flame/Fire Sensor and ZMPT101B Single Phase AC voltage sensor.
Software of the Project
As I mentioned earlier, Arduino community have a rich resources of info and documentation. I tried all the getting started projects from Opla kit official website. For programming mostly I used Arduino Web IDE and For basic interfacing and debugging I also used VS Code with PlatformIO IDE.
Arduino IoT cloud dashboard - For designing Web Dashboard I used Arduino's IoT Cloud dashboard. Thanks again to Arduino for Opla kit which came with another perk, it gave 12 Months Maker plan of IoT cloud. I designed Dashboard which looks like following.
It shows different widgets like, Temperature, Humidity Gauges, Pressure and AC voltage values. Three virtual LED's showing alerts of fire, smoke as well as Mains power failure. I've also used thermostat control code from Opla kit examples for maintaining temperature conditions. There is also manual override switches to control the relays of cooler and Heater Control. Unfortunately I do not have these equipment's also other power components to connect them, So I just simulated them using relays only.
I used Universal-Telegram-Bot-Library and ArduinoJsonLibrary platformIo.ini file is as following. I also used EmonLib for ZMPT101B Sensor AC Voltage Calculations
[env:mkrwifi1010]
platform = atmelsam
board = mkrwifi1010
framework = arduino
lib_deps =
    arduino-libraries/Arduino_MKRIoTCarrier@^1.0.2
    arduino-libraries/ArduinoIoTCloud@^1.6.0
    arduino-libraries/Arduino_ConnectionHandler@^0.6.6
    openenergymonitor/EmonLib@^1.1.0
    witnessmenow/UniversalTelegramBot@^1.3.0
    bblanchon/ArduinoJson@^6.19.3
Notifications, Alerts and Data Logging -
I tried direct webhooks integration with Arduino IoT Cloud for Google sheet data logging, but not got success. So I decided to use IFTTT Maker Webhook Integration, which was pretty easy.
The Arduino IoT Remote App (iOS/Android) does not provide any notifications facility, when some variable changes, or event occurs in the IoT Cloud dashboard, this may makes us to miss important events or, in this case, Alerts. I also explored IFTTT SMS integrations option but, it also has limitations. So, finally I decided to use Telegram Bot Notifications.
Demonstration -
!!! Note - Caution with ZMPT101B AC voltage sensor. Keep proper isolation, and work with very carefully, because we have to deal with High voltage AC voltage.
Thank you once again Arduino for this Project contest. To all expert Makers out there, I welcome suggestions about Project design, Circuit, code modifications, Optimization, Bugs and queries. Thanks to All fellow contestants.


Comments
Please log in or sign up to comment.