See what's new at Remyx.ai
Check out our new update on this project!
And check out the repo!
In automation, we often focus on engineering humans-in-the-loop to take advantage of the cognitive strengths of computers and the human mind. But dogs have a set of skills making them very well suited to certain tasks that humans cannot effectively perform. PoochPak introduces the sensors to relate that experience in terms of metrics we are interested in.
Home MonitoringLow power sensors like a heart rate monitor or microphone can be actively monitoring until triggered to take readings from resource intensive sensors like a camera.
Likewise, detecting certain objects can escalate to sending a text message while recording an image. Here, a dog's mobility and curiosity facilitate information gathering from a different vantage. This is still a weakness of home security systems reliant on stationary cameras.
Pet RecoveryWhile the cost of implanting an RFID chip in your pet is negligible, the logistics of finding your pet depend on somebody with the hand held chip reader helping. With cellular GPS and visual cues, you are more likely to safely recover your pet.
Security/RescueThis furry deployment mode may lend well to infosec applications. Adding a USB adapter while perhaps swapping the harness for something more benign makes war driving a walk in the park.
Furthermore, the canine shows an astonishing work capacity in security and rescue operations. Dogs can move fluidly through terrains and through spaces that humans awkwardly navigate.
PoochPak can put a pooch path on the grid. This documentation can make Search and Rescue efforts more efficient and reproducible.
With another USB port, operators can introduce a microphone/speaker to communicate with those trapped or drop a pin for GPS.
With PoochPak, you can take a look through the eyes of your watchful companion.
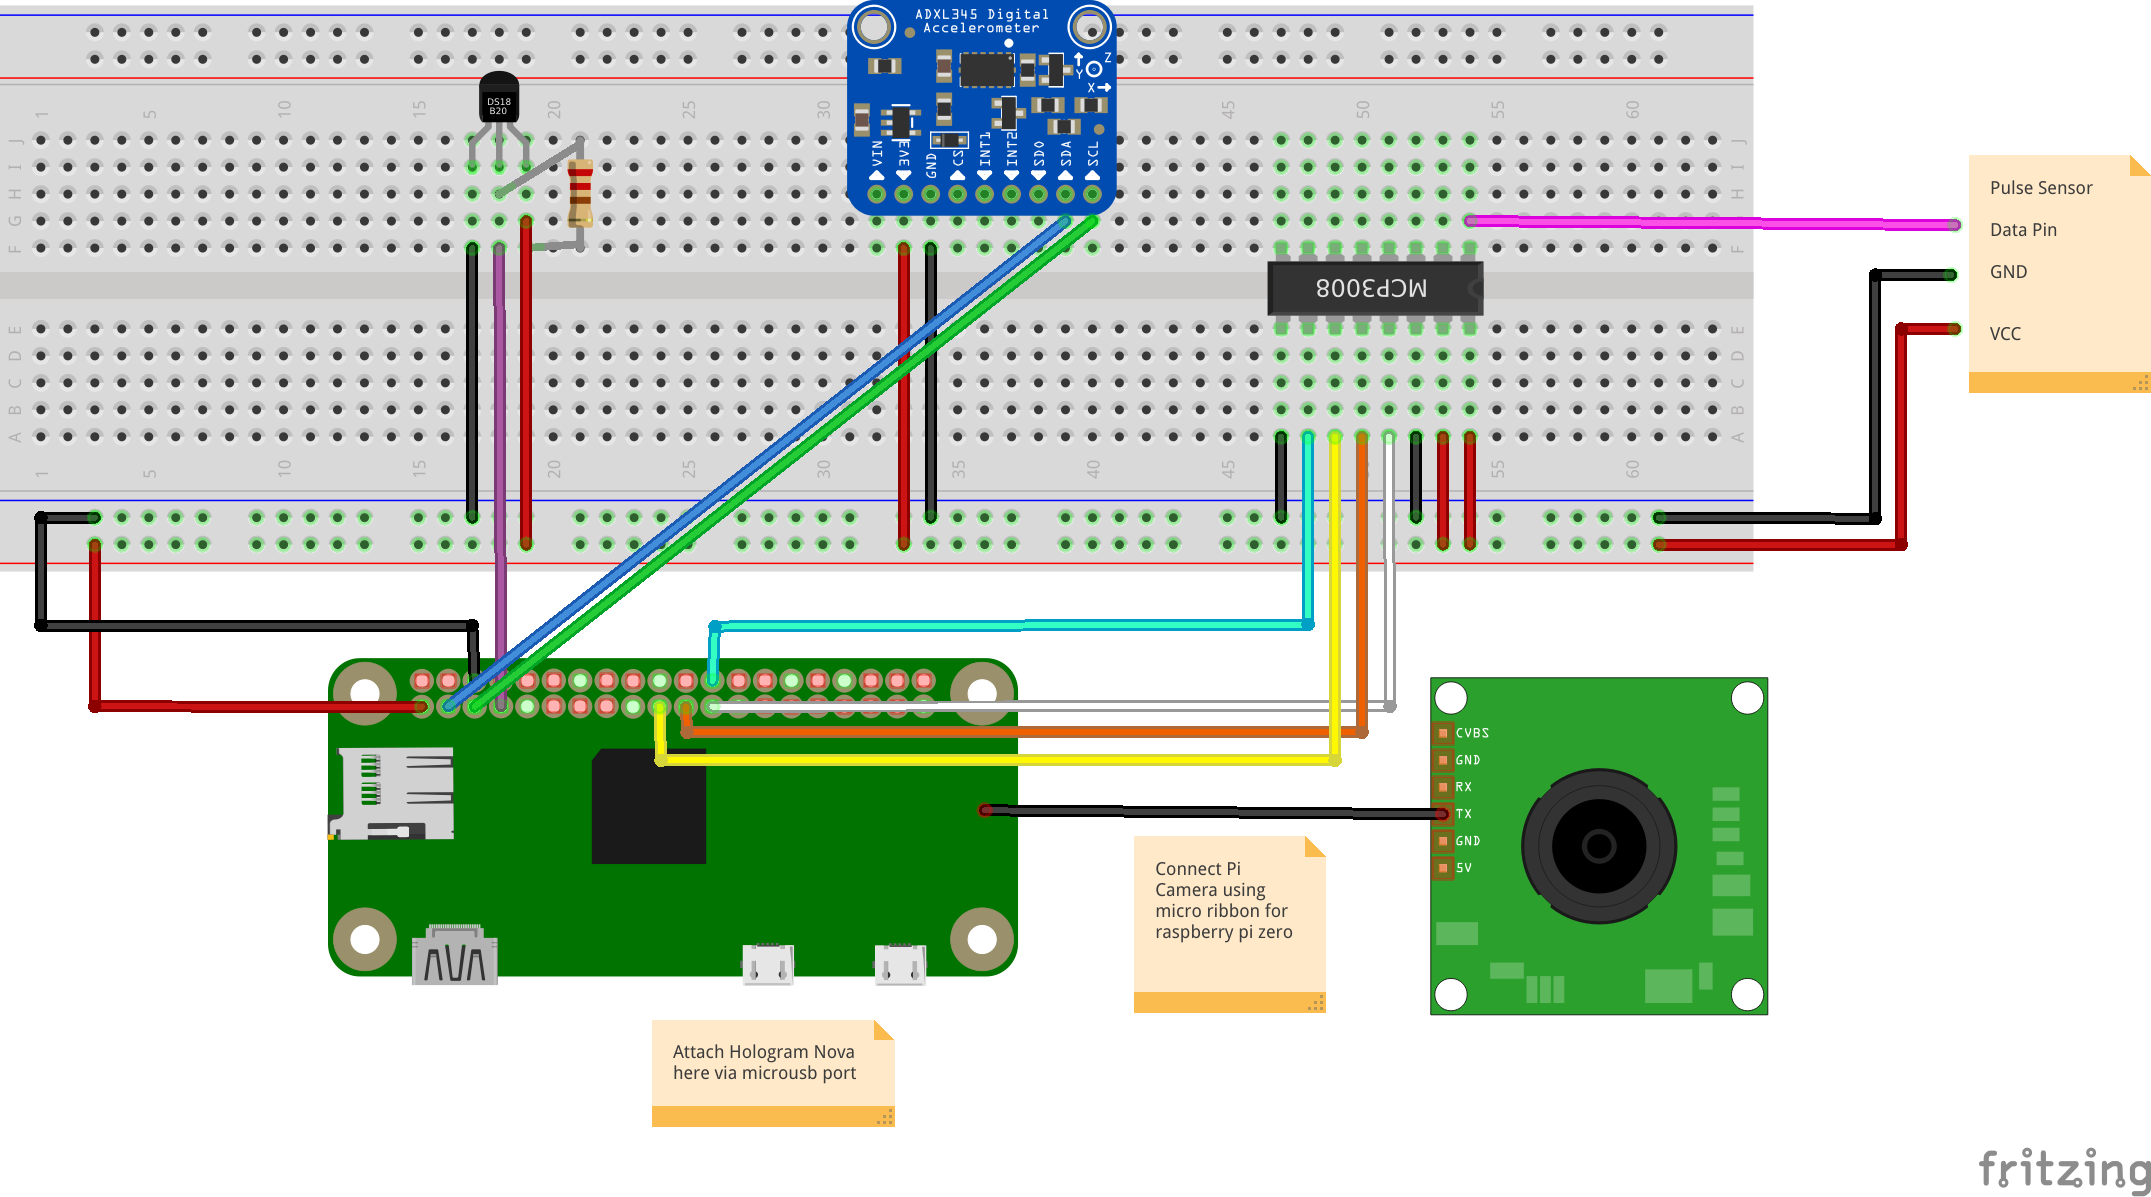
WiringTo wire all of the sensors to the raspberry pi, please follow the wiring diagram in the schematic section below. We wired all these sensors to a small pcb board for more reliable connections while the vest is worn. You should connect the Hologram Nova via a usb port (for the zero we used a microusb to usb converter). You should also connect the pi camera using the mini camera ribbon.
InstallationCompatibility between project dependencies requires python3.4 as default python3. You should burn this specific image for your raspberry pi zero. After making this image and wiring the pi, boot up and go through the first-time boot configuration. You should make sure to:
- Under Advanced Options, Expand filesystem
- Under Localization Options change timezone
- Change User password
- Under Interfacing Options, enable ssh, camera, SPI, IC2, and Serial
After a reboot, git clone this repo
cd ~/
git clone https://github.com/mayorquinmachines/PoochPak.git
cd PoochPak
Run the install script to install all dependencies. Note: This will take a long time! Leave it running overnight.
./install.shReboot your pi after the install script has finished. Run:
sudo modprobe bcm2835-v4l2
sudo modprobe w1-gpio
sudo modprobe w1-therm
This is just making sure all modules needed to communicate with the sensors are enabled.
Setting up HologramTo use hologram to send SMS, you'll need to set up you Hologram Dashboard and activate your sim card. Here is the Hologram starter guide for doing just that. The install script has handled installing hologram-cli and hologram-python-sdk for you. You can test this by running
sudo hologram versionOnce your sim card is activated and your device shows that it is live in your Dashboard, you want to set up a phone number you want to send SMS messages to. In your Dashboard, click on your device and navigate to Configuration. From that page, you'll want to configure your phone number under Configure phone number. This should set up you Nova to send SMS messages to this phone number. In this same page, you'll see + Show Device Key. Clicking on this button will give you a key you'll need to authenticate your hologram-python-sdk. You'll want to create a config file where you'll place this key for use. Run the following:
cd ~/PoochPak
touch config.py
echo "DEVICEKEY='<your-key-here>'" >> config.pyFinally, to run the code for object recognition and starting the sensor server, follow the instructions below!
Starting YOLO object recognitioncd yolo_picam/
nohup sudo python3 picam.py &nohup sudo python poochpak_server.py &When a person has been detected, you will receive a SMS message to the phone you configured in your Hologram Dashboard. To see the video recorded when a person has been detected, navigate to http://<you-raspberrypi-ip> and the video file will be available for you to download. If you navigate to http://<you-raspberrypi-ip>:8925 , you'll be able to get a dictionary with the readings from the sensors as well as GPS location of the vest.
TroubleshootingIf you're having issues with the Yolo object recognitition script (picam.py) not finding the camera, it could be that you need to reenable the camera again. Try enabling it again using sudo raspi-config and run sudo modprobe bcm2835-v4l2 .
Sometimes the Hologram Nova loses signal. You should make sure that the red LED is lit up and the blue LED is flashing. Rapid flashing means you're on the 3G network, slower flashing means 2G network, and no blue light means the Nova isn't on a network yet.
If the sensors aren't working correctly, take a look at the wiring again and make sure everything is correct. Then try reenabling their modules again:
sudo modprobe w1-gpio      #For temp sensor
sudo modprobe w1-therm     #For temp sensor
sudo modprobe spi-bcm2708  #For pulse sensor
There are also a script you can run to test all of the sensors. Try running
python ~/PoochPak/tests/run_tests.py


Comments
Please log in or sign up to comment.