


_Owo51ooXAa.png?auto=compress%2Cformat&w=40&h=40&fit=min&dpr=2)

Hardware components | ||||||
 |
| × | 1 | |||
| × | 1 | ||||
| × | 1 | ||||
 |
| × | 1 | |||
| × | 1 | ||||
| × | 1 | ||||
| × | 1 | ||||
Software apps and online services | ||||||
| ||||||
 |
| |||||
| ||||||
Hand tools and fabrication machines | ||||||
 |
| |||||
 |
| |||||
| ||||||
When we refer to RGB, we are talking about a model created to sense, represent and display images or interactions in electronic systems. A world full of colors is always more fun and, for some odd reason, a good percentage of geeks around the globe love RGB lights, even more than I do.
I had been looking forward to doing a project related to RGB lights, involving a remote control for quite some time, but I couldn't find a perfect excuse to start with an initial project. Eventually, the ideal opportunity came along, when I received my WisBlock WiFi Core. This is a new module developed by RAKwireless, which allows to develop projects based on the workhorse (Espressif ESP32) for IoT solutions, over a WiFi connection. An ideal device for remote control applications, such as control of lights, machines, devices, among others.
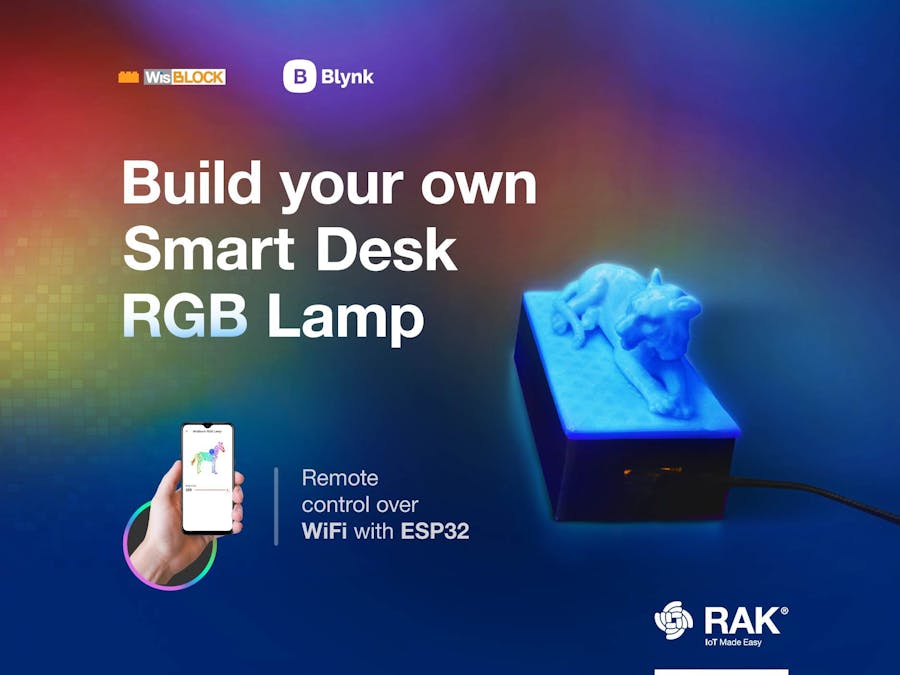
Chinese New Year was fast coming up. So, to bring a nice present to my colleagues in China, I thought of making a WisBlock-based dock to control RGB lights, which would support a perforated acrylic sheet with the shape/object I wanted to highlight, in this specific case a tiger, representing the Chinese zodiac animal of the year 2022. In this way, it could be a generic desk lamp.
Nevertheless, going a bit further –and chatting with my geeky friends–, they suggested that I go for a 3D-supported base that would allow me to create custom pieces in 3D and, at the same time, to directly illuminate the piece instead of the acrylic sheet. That seemed quite appealing to me, as I only needed a 3D printer and filament to make this project a reality, while still being able to be generic and reusable.
After various conversations and iterations with a collaborating artist, @Julian Henao, this was the result of the lamp:
Without further ado, let's get into the details of what you need to recreate your own Tiger Lamp.
Requirements- WisBlock WiFi Module (RAK11200 ESP32)
- WisBlock Base Board (RAK19003)
- LED’s: WS2812B RGB
- Jumper wires
- Solar panel connector cable
- USB C cable (for programming and powering the lamp)
- Access to a 3D printer and filament (preferably transparent for the piece, and any other color for the RGB base)
- Soldering iron
Hardware setup
- Connecting the WisBlock Modules
- Connecting and soldering the RGB leds
- Printing the lamp base and tiger
- Mounting the pieces together
Software Setup
- Blynk Setup
Flashing Firmware
- Setting up RAK11200 ESP32
- From Arduino IDE
What's next?
Software SetupElectronics are beautiful. However, when we talk about remote control, we need an interface to control our devices remotely. In this case, due to the incredible ease of use in integrating WiFi devices from the Espressif Systems line and the huge community and documentation available, we chose Blynk as the IoT platform.
This platform has been on the market for several years, but its main focus was initially on the development of mobile applications, which we could have in the palm of our hands at any time, in addition to encouraging the use of the platform itself by technology communities and passionate makers.
However, taking into account the impact presented in the ecosystem over time, they began to explore and develop an online platform much more robust to the initial development, which allows a more powerful management of IoT solutions in a scalable and secure way.
In this project, we will only be integrating a basic and convenient widget to control RGB lights from our phones. However, it will be a great opener to explore the different features that Blynk brings to our IoT solutions.
Blynk SetupTo get started, log in to your Blynk account. If you don't have an account yet, create one quickly and free of charge here.
Blynk Template
Once you log in, you will see the following page appear. At this point, select "+ New Template".
This new template will allow us to create configurations inherited from similar devices. So, we could create templates per device type and manage global configurations with a single click. For more detailed information about the templates, you can refer to the official documentation.
To create the template successfully, you only need to assign:
1) Name
2) Select the device to be used
3) Connection type
4) A description of the template configuration
Based on our project and the device to be used, we should have as the following:
Once you have confirmed the above information, just click on the "Done" button. At this point, the "Smart Desk RGB Lamp" template will automatically appear on the site.
For security reasons, as well as to identify the template in which the device is configured, we must use the "Firmware Configuration" provided in the "Info" tab of the template.
As the info page indicates, we must use the "Template ID" and "Device Name", as well as an Authentication Token (which will be automatically generated in the next steps), at the top of our main firmware code. Due to this, keep this essential info into consideration when making changes to the corresponding code, in the following steps.
Blynk Datastreams
To configure the data flow between our device and Blynk Cloud, we must configure some "Datastreams" as we did when we created the template above. Like creating a Template, refer to the "Datastream" option, and select "+ New Datastream."
Subsequently, when adding the Datastream, you must select the "Virtual Pin" option. Then, include all the corresponding information.
For this project, we need to configure 2 Virtual Pin DataStreams, “RGB”, and “Brightness”. Both will control the desired color we want to reflect on the lamp and the light intensity we prefer depending on the environment.
Make sure to carefully follow the instructions below for the creation of the datastreams to ensure a proper communication operation.
- RGB Datastream Creation
For the Datastream creation, make sure to place the following information accordingly.
Once the values are assigned, validate that the configured information matches the one shared in the image.
- Brightness Datastream Creation
For the Datastream creation, make sure to place the following information accordingly.
Once the values are assigned, validate that the configured information matches the one shared in the image.
Once created, we can observe the following overview on the Blynk platform.
To finish, make sure to press the “Save” green button, located at the upper right side corner of the site to save all the changes made on the Datastream settings.
Blynk Device
To create our first device at Blynk Cloud, we must select the first option in the menu located on the left side of the platform. You can easily recognize it as the option of the magnifying glass icon. At this point, we must click on "+ New Device", to proceed with the creation.
In the following window, choose the first option "From Template" (The one we just created!)
To finish, select the Template previously created “Smart Desk RGB Lamp”, and assign the name desired for your new device or, if you prefer, leave it as default.
Once the device is successfully created, you will notice a pop-up within the platform highlighting all the credentials needed to compile and connect our device with Blynk Cloud successfully. Remember that we need to use these credentials when compiling our firmware in the WisBlock WiFi Core.
If for some reason you could not copy the credentials when they were highlighted, do not worry, you can see them at any time directly in the "Device Info" option within the created device.
Blynk Widgets
The last step to be able to control our device remotely, is to create a dashboard. However, for one of the widgets we need for the project; "zeRGBa", we will need to use the mobile version of Blynk. Depending on the operating system of your phone, download the corresponding application:
Once downloaded, switch to “Developer Mode” by clicking the screwdriver icon located at the upper left side of the mobile application. Then, choose the device previously created, in our case the “Smart Desk RGB Lamp” device.
Once you are located inside the device, select the 3-bar icon located next to the screwdriver icon, and add the two needed widgets: 1) Slider, 2) Zergba.
Once selected, feel free to adjust the size and location of them as you prefer. To do it, just click directly on the widget for a couple of seconds. Having as result, something like below:
Once the widgets are added, make sure each of them is properly interconnected within the previously created datastreams on the platform. For this, click on the widgets and make sure to choose the proper datastream for each one of the widgets.
Once the widgets are added, make sure each of them is properly interconnected within the previously created datastreams on the platform. For this, click on the widgets and make sure to choose the proper datastream for each one of the widgets.
Just to make sure everything is connected as it should, check out the following settings and make sure to match all the different settings described in the following images.
Settings for the zeRGBa widget
- Settings for the zeRGBa widget
Settings for the Slider widget
- Settings for the Slider widget
That is all for now. Time to jump to hardware, to start glowing our RGB colors!
Hardware SetupThis section will describe how to attach all the WisBlock modules and the required printed elements needed to carry out the project. It also contains some information about the printed parts and the assembly process.
Connecting the WisBlock Modules
The main advantage of this project is that we only need one additional module to the WisBlock Baseboard to carry it out. The module is the ESP32 based WisBlock Core. Refer to the diagram below to make sure that the module is connected correctly.
Once connected, be sure to use the tiny screws to secure the core to the base to avoid technical problems in the future.
Connecting & Soldering the RGB LEDs
Depending on the LED strip you get, it may come with 3 or 4 pins to make the connection. No matter which one you use, you must make sure that the GND, 5V, and DI pins are properly connected to the base of the WisBlock.
The core used in the project only allows an output voltage of 3.3V. Therefore, the supplied voltage will not be enough for the RGB LED strip to work properly. But don’t worry, we have an excellent hack for it.
Due to the high power consumption caused by the use of LEDs, as well as the real-time remote communication via WiFi, the lamp was created to be powered directly from the power supply. A positive aspect for the project as it is powered directly from the USB power port, the voltage output generated by the Lipo Battery connector has a voltage output of 5V. Allowing the use of the LED strip directly, without the need to add a booster voltage or any external power supply just for the LEDs. That said, be sure to connect the GND and VCC pins as follows:
Once the power pins are connected, we will move on to the signal pin. The communication between the central module and the RGB LEDs should be through a digital pin. Looking at the pinout of the WisBlock motherboard, we quickly identify that we don’t have this pin available.
However, since the RAK11200 module has an ESP32-WROVER module in its core, we can use the SCL and SLA pins as digital pins if they are out of use. So, we are going to connect our digital signal pin "DI'' from the RGB to the SDA pin (GPIO4) of the WisBlock Baseboard. Resulting in something like the following:
Printing the RGB Lamp Base and Tiger
Download the Smart Desk RGB Lamp model files for 3D printing directly in the RAKstars Thingiverse.
Printing parameters may vary depending on the filament and 3D printer used. For reference, the final result we show in this tutorial was printed with PLA filament using the default profile available for the Ender 3 in Ultimaker Cura. The estimated time for each part was around:
- Lamp Base: 8 hours
- 3D Tiger: 5 hours
Clear/Transparent or white filaments are the recommended options for printing the 3D Tiger to get the best diffusion of the RGB light. On the other hand, you can print the Lamp Base using the filament color you like more.
The 3D Tiger is a model that requires a support to print correctly. For example, it needs something under the bottom of the head, around the mouth and nose, to get a good result. If this is the first time you hear about 3D printing supports, we recommend you reading this article to understand them better. Although there are a couple of support types, we recommend using tree supports for this model. The video Tree Supports for Better 3D Print Results in Cura goes into more detail about setting up this kind of support in Cura.
NOTE: If some settings don’t appear in the Print settings section, you may need to change the settings visibility. The image below clarifies how you can select the group of settings to show and the preview after slicing.
Mounting the RGB Base Desk Lamp
Once the printing is finished, it's time to assemble all the parts and start creating the color magic. First, take the main printed base, then mount the WisBlock Baseboard directly to the base supports using the respective screws.
Once set, secure the LED strip following the exact mechanism as the base.
NOTE: You can see that the LED strip has support for 2 LED strips to increase the brightness reflected by the bottom of the lamp. However, after testing with the transparent PLA, we found that a single 8-pixel LED strip was sufficient for the part we built. So feel free to expand that capacity if necessary.
Now it's essential to make sure everything is working properly before we attach our final 3D printed part. To make this possible, we first need to upload our code and do the respective integration of the platform we will use to control our lamp remotely.
Flashing firmwareSetting up RAK11200 ESP32
The first thing to check before flashing the firmware is to make sure that the BSP for the RAKwireless ESP32 is installed in the Arduino Boards Manager. If you need more information about how to install it, please refer to the official RAK documentation for the WisBlock WiFi Core. There is no need to repeat this step once you have done it successfully.
Just as a reference, check out the meanings of each button available in the Arduino IDE:
After setting the BSP correctly, you need to check if everything is working properly. As an initial basic example, we will compile the “Blink” code available as an example on the Arduino IDE. You can easily find it in “File > Examples > 01.Basics> Blink”
// the setup function runs once when you press reset or power the board
void setup() {
  // initialize digital pin LED_BUILTIN as an output.
  pinMode(LED_BUILTIN, OUTPUT);
}

// the loop function runs over and over again forever
void loop() {
  digitalWrite(LED_BUILTIN, HIGH);   // turn the LED on (HIGH is the voltage level)
  delay(1000);                       // wait for a second
  digitalWrite(LED_BUILTIN, LOW);    // turn the LED off by making the voltage LOW
  delay(1000);                       // wait for a second
}
If the code compiles successfully, it’s time to upload it into the WisBlock WiFi Core. Make sure you are matching the following parameters to do so (You can find these options in the Tools Menu):
- Board: “WisCore RAK11200 Board”
- Upload Speed: “115200”
- Flash Frequency: “80MHz”
- Flash Mode: “QIO”
- Partition Scheme: “Default 4MB with spiffs (1.2MB APP/1.5MB SPIFFS)”
- Core Debug Level: “None”
- Port: “COM(The number that appears in your pc)”
IMPORTANT NOTE: Before uploading your code, you must short circuit BOOT0, and GND pin on the WisBlock Core and press the Reset button at the same time. Then, press the Upload button on the Arduino IDE.
If the code upload was successful, you will see the following message in your Arduino IDE.
At this point, the WisBlock Core should start blinking!
From Arduino IDE
Now let’s add the color magic. To start, flash the following code using the same steps provided above and just make some small modifications, based on your Blynk Template Configuration.
As you could notice over the steps of the Blynk Template and Device configuration, a "Template ID", "Device Name", and “Authentication Token” were generated. At this point, you must add those keys generated at the top of our main firmware code. In my case, the keys generated were the following ones:
#define BLYNK_TEMPLATE_ID "TMPLFD2eow3t"
#define BLYNK_DEVICE_NAME "Smart Desk RGB Lamp"
#define BLYNK_AUTH_TOKEN "SmKevFKdJ3ZiKpqnX77QH5S8cL1Cm73d"
In addition to the keys to be added, you must assign the following parameters where they are indicated in the code:
- Your WiFi network SSID
- Your WiFi network Password
Now, just copy and paste the following code to the Arduino IDE, change the respective parameters, and you are ready to go!
#define BLYNK_TEMPLATE_ID "TMPLFD2eow3t"
#define BLYNK_DEVICE_NAME "Smart Desk RGB Lamp"

#define BLYNK_AUTH_TOKEN "72OC9N5MeNjjSdB2m6JEkClUczg4EOGg"

#define BLYNK_PRINT Serial

#include <WiFi.h>
#include <WiFiClient.h>
#include <BlynkSimpleEsp32.h>
#include <Adafruit_NeoPixel.h>
#include <SPI.h>

#define PIN 4 // Use GPIO4, in case of using the SDA pin as a digital pin
//#define PIN 5 // Use GPIO5, in case of using the SCL pin as a digital pin

#define NUMPIXELS 8 // Change the pixel number according to your project

Adafruit_NeoPixel pixels = Adafruit_NeoPixel(NUMPIXELS, PIN, NEO_GRB + NEO_KHZ800);

// You should get Auth Token in the Blynk App.
// Go to the Project Settings (nut icon).
char auth[] = BLYNK_AUTH_TOKEN;

// Your WiFi credentials.
// Set password to "" for open networks.
char ssid[] = "xxxxxxxx"; // Assign your Network SSID
char pass[] = "xxxxxxxx"; // Assign your Network Password


BLYNK_WRITE(V1)
{
  int R = param[0].asInt();
  int G = param[1].asInt();
  int B = param[2].asInt();

  //Serial.println(R);
  //Serial.println(G);
  //Serial.println(B);

  for (int i = 0; i < NUMPIXELS; i++) {
    pixels.setPixelColor(i, pixels.Color(R, G, B));
  }

  pixels.show();
}

BLYNK_WRITE(V2)
{
  int Bright = param.asInt();
  pixels.setBrightness(Bright);
  Serial.println(Bright);
  pixels.show();

}

void setup()
{
  // Debug console
  Serial.begin(115200);
  Blynk.begin(auth, ssid, pass);
  pixels.begin();
}

void loop()
{
  Blynk.run();
}
Before loading the code on the board, make sure that it matches the following configuration parameters found in (you can find these options in the Tools menu)
Board: “WisCore RAK11200 Board”
- Board: “WisCore RAK11200 Board”
- Upload Speed: “115200”
- Flash Frequency: “80 MHz”
- Flash Mode: “QIO”
- Partition Scheme: “Default 4MB with spiffs (1.2MB APP/1.5MB SPIFFS)”
- Core Debug Level: “None”
- Port: “COM(The number that appears in your pc)”
You must check that the pins connected are the same assigned within the code. The SDA pin is linked to the GPIO4 and the SCL pin is the GPIO5. Depending on where is connected your WS2812B RGB, must be the same pins in the code
Once the code is uploaded, restart your WisBlock, and you are ready to control the lights remotely from the Blynk application!
We can see a remote control of the lights in this lamp, in an efficient and fast way. It's just the beginning of a project full of improvements. How about adding functions to generate specific led interactions that can be activated remotely? Maybe even make the LED interaction follow the rhythm of the music playing in the background? There are many possibilities that we can continue to create.

_Owo51ooXAa.png?auto=compress%2Cformat&w=60&h=60&fit=min&dpr=2)


_M6kErcYJ84.png?auto=compress%2Cformat&w=40&h=40&fit=fillmax&bg=fff&dpr=2)
Comments
Please log in or sign up to comment.