

Hardware components | ||||||
 |
| × | 1 | |||
 |
| × | 1 | |||
Hand tools and fabrication machines | ||||||
 |
| |||||
 |
| |||||
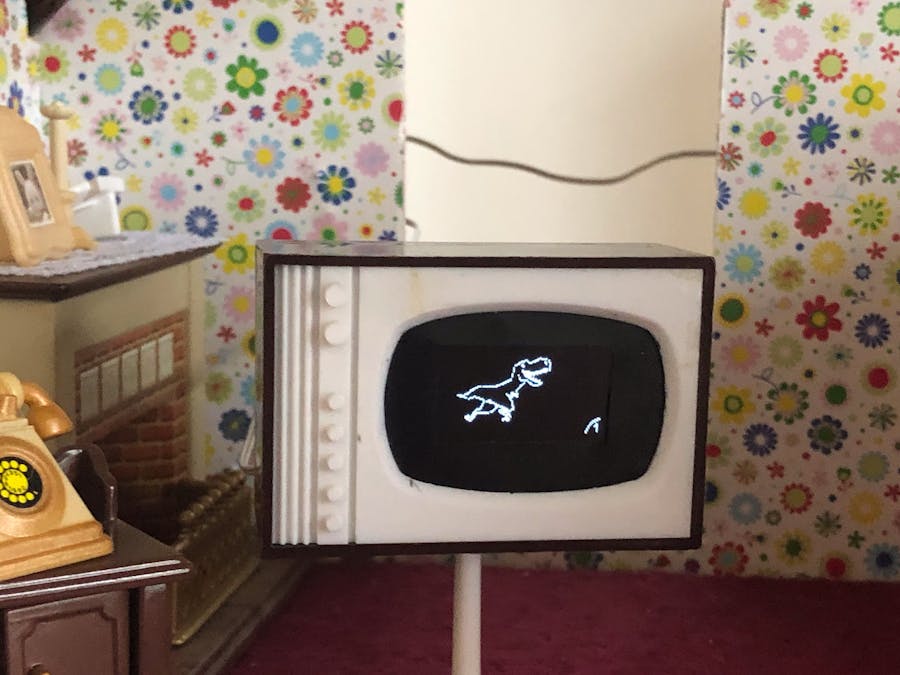
This project was originally published on my personal homepage. The dollhouse Mini TV is a small Arduino project using a cost-efficient ESP8266 chip and an SSD1306 OLED display to build a small working TV for my daughter's birthday. She already had an older plastic TV showing some yellowed picture and the project brings that TV to live.
The TV displays an endless loop of different TV "channels" showing animations, a clock, and a weather forecast. With a small button at the side, one could stop the loop and watch the current channel. A second button press continues the loop.
From prototype to working mini TVThe display size for this project was predefined by the frame size of the old dollhouse TV. There were only a few options and I had an SSD1306 OLED display laying around. A normal NodeMCU or Adafruit feather was too big for the small frame, so I decided for a Wemos D1 which fitted nicely into the old TV.
The TV is powered via dollhouse cabling. All rooms have mini sockets installed providing 4.5 volts out of 3 AA batteries, enough to power the mini TV. Only the DC polarity is a small problem for the TV, it needs to be plugged in the correct way.
The display shows 4 screens (can be extended) in a carousel mode. Most of them are little cat or dinosaur animations but it has real weather forecast and a nice clock as well.
Hardware components & tools- Wemos D1 mini
- SSD1306 OLED Display
- Tactile Button Switch
- Dollhouse plug (fitting into the sockets the dollhouse already has)
- USB cable (for programming only)
- Some wires
- Soldering iron
- Hot glue
Wiring is pretty simple the display connects via I2C bus to the Wemos board and the button just needs two wires.
SoftwareLike some of my other Arduino projects I used Homie as base library for this project. This is actually not really necessary for the Mini TV as it has no special requirements and does not need MQTT. But since it use the same SSD1306 OLED display I could reuse some code from the mqtt-bme280-homie project. Additionally, I get OTA update with Homie as well, which is important here, because I hot glued the board to the rear wall of the TV and could not access the USB connector anymore.
The following software libraries are used for this project:
- Homie V2 including dependencies
- SSD1306 driver for ESP8266 platform
- NTPClient to connect to a time server
- ESP8266 Weather Station
- PlatformIO environment for building the code
As usual, the source code and configuration details can be found on GitHub: https://github.com/mhaack/arduino-dollhouse-tv It is organized into 4 main modules:
- dollhouse-tv.cpp - the main program drawing all the TV screens and assembling all together
- DisplayNode - generic class to control the SSD1306 display
- ButtonNode - simple and generic class to capture the button press (this is from http://github.com/luebbe Homie node collection)
- WundergroundNode - Homie wrapper class around the WundergroundClient (from ESP8266 Weather Station)
You can add as many screens as you want and add them to dollhouse-tv.cpp via the setup method. Each screen animation goes into its own method, for an animation example see drawCat. These animations can be built out of a sequence of XBM bitmaps. The workflow to add a new image animation is simple. First get the image either as an animated gif or independent image files, ideally in black and white format. Gifs have to be split into individual image files. These can be converted that to a XBM bitmap file using some image tool or a online service like https://convertio.co/gif-xbm/. Put the XBM files into the project src folder or merge them into images.h. After that, they can be loaded in the code by using drawXbm. Make sure you add the x & y coordinates from the method parameters when drawing on the screen to have smooth transitions if the screen is changed to the next one.
That's it have fun with the Mini TV.

Comments