The story is simple I saw this little cute printer in a shop. I'm a maker and I wanna try to create myself the things that I like. So my idea was try to make a thermal printer that works on WiFi LAN. My first idea for the main board was ESP8266 and WifiManager Arduino library.
The final product is a Thermal Print Machine with Adafruit HUZZAH ESP8266. You can use the print by smartphone or computer on the web browser thanks to Vue.js webapp. You can upload your photo and apply three kind of filter, or write a text in many fonts.
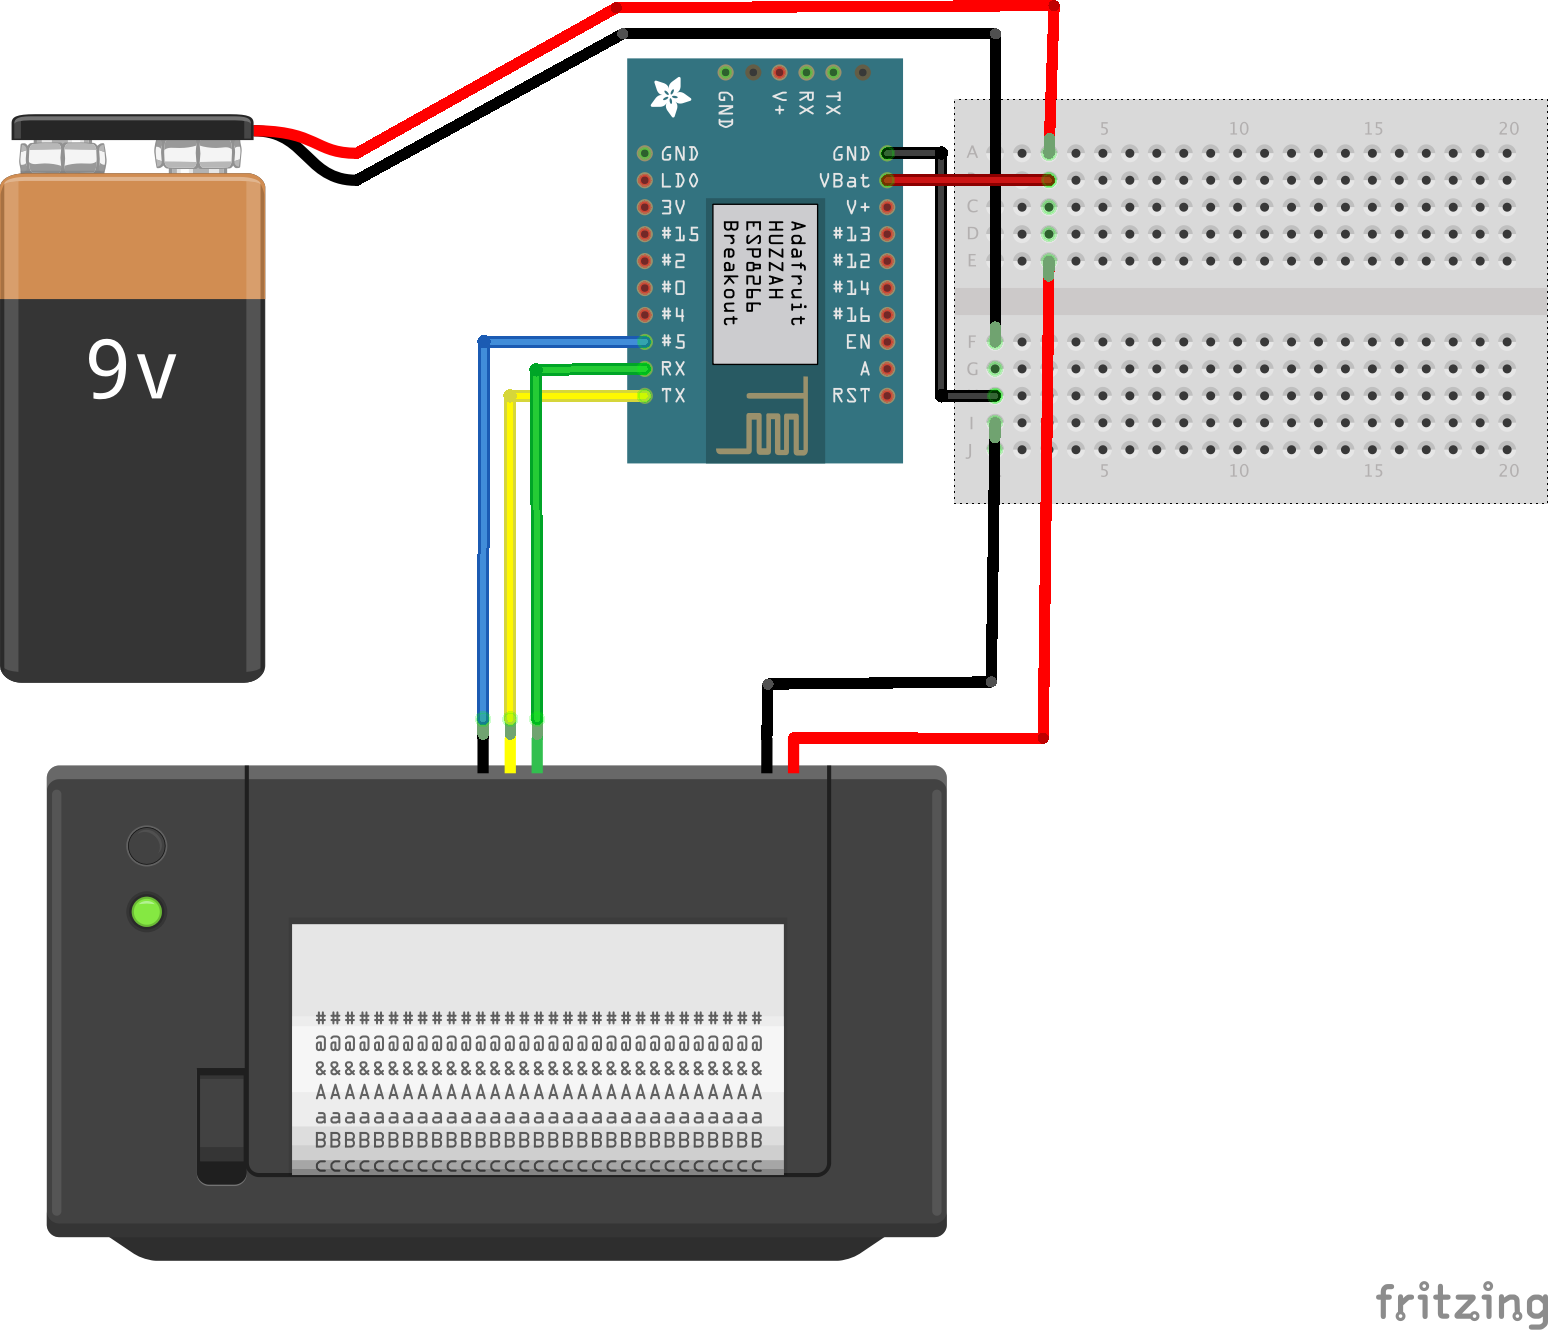
Step 1 - List of MaterialsThe list of materials are really short. For the prototype phase you can use a breadboard and connect all the components to breadboard like in the figure. After the first test you can solder all the components directly to the Adafruit HUZZAH board and programming the device.
You can buy all the materials on Amazon Store. I've the link directly to the product. You can choose also different colors for led and switch. In the future I wanna design a case and printing in 3D.
- Adafruit HUZZAH Esp 8266 (https://amzn.to/2IwmGs9)
- Adafruit Thermal Print (https://amzn.to/3f12CtI)
- Programmer Serial <-> USB 3.5 volt (https://amzn.to/3kuQAtC)
- Elegoo wire (https://amzn.to/3kuQAtC)
- Breadboard (https://amzn.to/3pxDT4R)
- Case (https://amzn.to/3lEKYP0)
- Power switch 9v 3A (https://amzn.to/3kB9G1p)
- [optional] Led (https://amzn.to/2Uysh3A)
- [optional] ON/OFF Button (https://amzn.to/38OhUAS)
Important NoticeIt is mandatory to use a 9v - 3A power supply to power the thermal printer which has absorbtion peaks.
Software
To program, compile and charge the software for the Arduino board you must use the Arduino IDE.In the Arduino IDE you have all the features that the project require. You can also visit www.arduino.create.io to program, compile and upload online your code.Make sure that you must have also all the libraries.Download all the package from Github (http://github.com/masteruan/ThermalServer).
The software is divided into two parts. The "embedded" software relates to the management of the serial communication with the printer and the wifi connection. The second part of the software deals with providing the user interface written in html and javascript. To facilitate the writing of the code and optimize the user experience, the vue.js framework written in javascript was used.
Vue.jsVue (pronounced /vjuː/, like view) is a progressive framework for building user interfaces. Unlike other monolithic frameworks, Vue is designed from the ground up to be incrementally adoptable. The core library is focused on the view layer only, and is easy to pick up and integrate with other libraries or existing projects. (https://vuejs.org)
Thermal POS custom LibraryFor the library I used a custom library from Adafruit Thermal printer library. This because my thermal print is a bit different from the original Adafruit Thermal. You can use the original one library branded from Adafruit. In this case you can use thie official wiki: Import the library from Arduino IDE.
Step 2: Arduino IDEArduino is an open-source hardware and software company, project and user community that designs and manufactures single-board microcontrollers and microcontroller kits for building digital devices and interactive objects that can sense and control both physically and digitally. Its products are licensed under the GNU Lesser General Public License (LGPL) or the GNU General Public License(GPL), permitting the manufacture of Arduino boards and software distribution by anyone. Arduino boards are available commercially in preassembled form or as do-it-yourself (DIY) kits. This is the official page https://www.arduino.cc
1. Download and install the Arduino IDE from the download page;
2. Download and install the code from my GitHub page:(http://github.com/masteruan/ThermalServer);
- In case of problems, follow this tutorial to install Arduino Library (https://www.arduino.cc/en/guide/libraries);
Step 3: The Hardware StuffFor the Hardware you must connect just the power source and the serial comunication between Adafruit HUZZAH board and the Adafruit Thermal Printer Nano.
Also you can connect the Adafruit HUZZAH board to 9v battery power source, the Tx and RX pin to the print and pin number 5 to DTR pin on the print. Use this official reference guide from Adafruit (https://cdn-learn.adafruit.com/downloads/pdf/mini-thermal-receipt-printer.pdf).
**IMPORTANT**Use Battery pin to connect the power source to the board.This pin is connected to a voltage regulator component that reduce the input voltage from 9v to 3.5v.
Step 4: The Software StuffWell the core part of the project is the code!!It's a really simple code Arduino based. You need Arduino IDE program or Arduino Create online platform.You can download the official Arduino IDE from the official site (https://www.arduino.cc) or use Arduino Create Platform (https://create.arduino.cc).
Main codeYou can download the code from GitHub: http://github.com/masteruan/ThermalServer
Take a look to the code:
1. Include libraries and declare some variables
#include <SoftwareSerial.h>
#include <ESP8266WiFi.h>
#include <WiFiClient.h>
#include <ESP8266WebServer.h>
#include <ESP8266mDNS.h>
#include <WiFiManager.h>
#include <ArduinoJson.h>
#include "Pos_Printer.h"
#include "app.h"
2. Activate the printer instance. I use POS_printer library. You can use also the original Adafruit thermal printer library
Pos_Printer printer(&Serial, DTR_PIN);3. Declare different functions:
void handlePrint() {...}
void handleConfig() {...}
void handleRoot() {...}
void handleNotFound() {...}
void initPrinter(int &heatTime, int &heatInterval, char &printDensity, char &printBreakTime){...}
4. Setup the Serial communication with the printer. Double check on the baudrate parameter. In my case, the printer worked at 9600 baud rate. This parameter could be also 115200.
void setup(void){
Serial.begin(9600);
[...]
printer.begin(9600);
[...]
WiFiManager wifiManager;
wifiManager.setDebugOutput(false);
wifiManager.autoConnect("Printer");
[...]
server.on("/", handleRoot);
server.on("/print", handlePrint);
server.on("/config", handleConfig);
server.onNotFound(handleNotFound);
server.begin();
}
5. Manage the client connection:
void loop(void){
server.handleClient();
}This is the Thermal Printer Server complete.
- Switch on the board and the printer
- Waiting for Serial connection between Adafruit HUZZAH and the print
- Open your smartphone or another device and find a wifi router called "printer"
- Open the page using the IP http://192.168.0.71
- charge an image or type some text
- send the picture to the printer
- Look the result
- In the future I will try the same project with ESP8266 Amica board (https://amzn.to/3kB5DC6) or ESP32 board (https://amzn.to/32KtlFS)
- I will design a case and print in 3D
- I will add 3 switch button on the case to print directly some standard information


Comments
Please log in or sign up to comment.